As with all self-installing plug-ins, you have to deal with the installation of the plug-in while you are working on its implementation. The installation of menus requires you to use special callbacks to indicate what you want to register and where it will go in addition to what components (items) the plug-in will implement.
The components of a menu consist of the entries you want to appear on your menu, along with any special custom functions that are required (in the case of callback menu items).
To install (register) your custom menu, you need to include the XSILoadPlugin callback in which you specify the name of each menu plug-in item (and any related plug-in items, such as self-installing commands or operators, etc.). Each menu plug-in item is registered using a separate call to the RegisterMenu (PluginRegistrar) method which contains the following information:
Where the menu will appear (see Understanding Menu Anchor Points).
How it will appear (see Fiddling with its Appearance).
What name it will have: the name of the menu plug-in is important because Softimage will expect to see its definition callback matching that name plus _Init in order to figure out how to display it when the time comes For more information, see Menu Callbacks.
As outlined in Where Can Menus Appear? , a menu anchor point represents the location where a menu plug-in item will appear in the Softimage user interface. There are three types of locations where you can insert your menu plug-in item:
Toolbar Menus—menus that drop down from a toolbar button (for example, the siMenuTbGetPrimitiveSurfaceID member of the siMenuAnchorPoints enum corresponds to Get PrimitiveSurface on the Model toolbar).
Window Menus—menus that drop down from a fixed menubar (for example, the siMenuMainFileImportID member of the siMenuAnchorPoints enum corresponds to the end of the Import submenu under the File menu).
Contextual Menus—menus that pop up when you right-click in the Scene Explorer or one of the 3D Views according to the context (for example, the siMenuSELayersContextID member of the siMenuAnchorPoints enum corresponds to the pop-up menu that appears when the Scene Explorer's Scope Menu is set to Layers).
To begin with, all members of the siMenuAnchorPoints enum begin with siMenu and end with ID. Each member identifies the type of anchor point with one of the following conventions (bolded):
Toolbar Menus: siMenuTb___ID
Window Menus: siMenuMain___ID
Contextual Menus: siMenu___ContextID
In addition, there are two kinds of contextual menus that correspond to the view context:
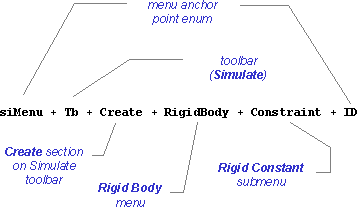
The rest of the enum name (___) contains the path of the submenu. For example, siMenuTbCreateRigidBodyConstraintID can be broken down as follows:
You may want to add the same menu plug-in item to many different menus. For example, if you created a custom command that
creates a new type of primitive you may decide to add a command menu entry under the ApplicationCommands and ModelCreatePoly. Mesh window menus, the GetPrimitivePolygon Mesh toolbar menu and one or more of the contextual menus.
To add an entry to several points, you need to add one RegisterMenu (PluginRegistrar) call for each menu anchor point but use the same menu plug-in item for each. For example, if your plug-in implements a custom
command plug-in item called MooMooCow and you want that command to appear in the ApplicationPreferences window menu as well as the Preferences contextual menu in the Scene Explorer, the XSILoadPlugin callback should include calls similar to these:
// Register the Moo command
	in_reg.RegisterCommand( "MooMooCow", "Moo" );

	// The Moo command will appear in the Application > Preferences
	// menu as well as the (SE) Preferences contextual menu
	in_reg.RegisterMenu( siMenuMainApplicationPreferencesID, "MooMenu", true );
	in_reg.RegisterMenu( siMenuSEPreferenceContextID, "MooMenu", false );
Then you only need to define (specify which menu items or entries are associated to that menu plug-in item) the menu plug-in item once: in the MooMenu_Init callback.
As you can see from this example, a menu plug-in item doesn't necessarily have to appear the same way in different locations.
In this example, the menu that appears in the ApplicationPreferences window menu will appear as a drop-down (secondary) menu but the one that appears in the Preferences contextual menu will appear on the main menu level.
You have a number of options available to define how your menu will appear:
You can decide whether you want your menu items (entries) to appear in a submenu (secondary menu) off a single menu anchor point or on the same level as the anchor point—see Nesting: Using SubMenus.
You can define how each entry will appear (and to some extent, what label announces the submenu, if relevant) and assign an access key to it—see Naming: Using Labels.
You can distinguish some of your menu items from the rest by using separators (horizontal lines between items)—see Organizing: Using Separators.
In many cases your menus will appear at the end of an exising menu. If you have only a few entries, it may make sense to display the entries in the same menu. Otherwise, you can use submenus to easily organize large numbers of entries:
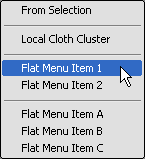
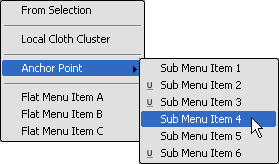
You specify whether your menu plug-in item will appear as a flat list inside the anchor menu or as a secondary drop-down menu when you are registering the menu plug-in item with the DisplayAsSubmenu parameter of the PluginRegistrar.RegisterMenu method:
// To register a flat menu (no submenu):
	in_reg.RegisterMenu( siMenuTbDeformID, "AnchorPoint", false );

	// To register a submenu:
	in_reg.RegisterMenu( siMenuTbDeformID, "AnchorPoint", true );
	// ... or the equivalent (true is the default):
	in_reg.RegisterMenu( siMenuTbDeformID, "AnchorPoint" );
One thing to be aware of is that the name of the menu plug-in item will appear as the submenu anchor point, as the above statement demonstrates the underlying code to produce the SubMenu (drop-down menu) example in the table above.
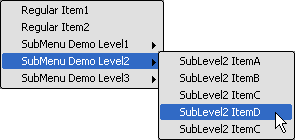
Another point of interest is that you can nest any number of submenus, but you only need one menu anchor point: the other dependent submenus are defined inside the Init callback for the top-level menu plug-in using an AddItem call with siMenuItemSubmenu as the specified value for the Style parameter:
function NestedMenus_Init( in_context )
	{
		// Get the menu object from the Context input
		var oTopMnu = in_context.Source;

		// Add some regular menu items
		oTopMnu.AddItem( "Regular Item1", siMenuItem );
		oTopMnu.AddItem( "Regular Item2", siMenuItem );

		// Add the submenu item
		var oSubLevel1 = oTopMnu.AddItem( "SubMenu Demo Level1",
			siMenuItemSubmenu )
		oSubLevel1.AddItem( "SubLevel1 ItemA", siMenuItem );
		oSubLevel1.AddItem( "SubLevel1 ItemB", siMenuItem );

		// Nest another submenu item
		var oSubLevel2 = oSubLevel1.AddItem( "SubMenu Demo Level2",
			siMenuItemSubmenu )
		oSubLevel2.AddItem( "SubLevel2 ItemA", siMenuItem );
		oSubLevel2.AddItem( "SubLevel2 ItemB", siMenuItem );
		oSubLevel2.AddItem( "SubLevel2 ItemC", siMenuItem );
		oSubLevel2.AddItem( "SubLevel2 ItemD", siMenuItem );

		// ... and another ...
		var oSubLevel3 = oSubLevel2.AddItem( "SubMenu Demo Level3",
			siMenuItemSubmenu )
		oSubLevel3.AddItem( "SubLevel3 ItemA", siMenuItem );
		oSubLevel3.AddItem( "SubLevel3 ItemB", siMenuItem );
		oSubLevel2.AddItem( "SubLevel2 ItemC", siMenuItem );

		// ... etc.

		// Finish with success notification
		return true;
	}
This example produces this type of nesting:
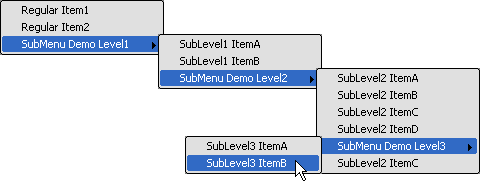
Since each submenu is added to a menu object, you get the menu object returned from the AddItem (Menu) call to nest another submenu. In the above example, if it had used the oTopMnu object to add each SubLevel submenu, it would have created the three submenus as siblings instead:
For flat menus, the name of the main entry point does not appear, but the name you register the top submenu with (RegisterMenu (PluginRegistrar)) or the name you add submenus with (AddItem (Menu)) appears as the name of the anchor point (see Nesting: Using SubMenus for more information about creating submenus).
For menu items (except separators), you define the name of the item with the Label parameter for whichever method you use (AddItem (Menu), AddCommandItem (Menu) or AddItem (Menu)):
// Add an entry that appears as 'Daffy Duck' and calls a special
	// function defined in the same plug-in file as 'QuackQuackQuack':
	oMnu.AddCallbackItem( "Daffy Duck", "QuackQuackQuack" );

	// Add an entry that appears as 'Launch Explorer' and invokes the
	// 'OpenXSIExplorer' command:
	oMnu.AddCommandItem( "Launch Explorer", "OpenXSIExplorer" );

	// Alternative ways to do the same things:
	var cbk = oMnu.AddItem( "Daffy Duck", siMenuItem );
	cbk.Callback = "QuackQuackQuack";

	var cmd = oMnu.AddItem( "Launch Explorer", siMenuItem );
	cmd.Command = "OpenXSIExplorer";
You can also assign one of the letters in the label as an access key by inserting an ampersand (&) before that letter. An access key is a letter that appears underlined which the user can press to activate the associated callback or command. For example:
// Assign 'k' as the access key for the 'Daffy Duck' menu entry:
	oMnu.AddCallbackItem( "Daffy Duc&k", "QuackQuackQuack" );

	// Assign 'x' as the access key for the 'Launch Explorer' menu entry:
	oMnu.AddCommandItem( "Launch E&xplorer", "OpenXSIExplorer" );
You may want to set certain menu items apart from the others visually. There is a special method that inserts a horizontal line between items: the AddSeparatorItem (Menu) method. For example:
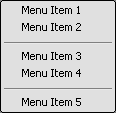
// Of five items, separate the third and fourth
		oSepMnu.AddItem( "Menu Item 1", siMenuItem );
		oSepMnu.AddItem( "Menu Item 2", siMenuItem );

		oSepMnu.AddSeparatorItem();

		oSepMnu.AddItem( "Menu Item 3", siMenuItem );
		oSepMnu.AddItem( "Menu Item 4", siMenuItem );

		oSepMnu.AddSeparatorItem();

		oSepMnu.AddItem( "Menu Item 5", siMenuItem );
Notice that the order of these items determines the order in which they appear. See Ordering: Specifying the Sequence of Menu Items for more information.
The sequence in which you define menu items determines their order in the final menu. This is true for all menu items: command entries, callback entries, submenus and separators. Compare the following example with the example in the previous section (Organizing: Using Separators):
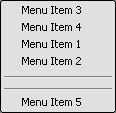
// Move the lines out of order
		oSepMnu.AddItem( "Menu Item 3", siMenuItem );
		oSepMnu.AddItem( "Menu Item 4", siMenuItem );

		oSepMnu.AddItem( "Menu Item 1", siMenuItem );
		oSepMnu.AddItem( "Menu Item 2", siMenuItem );

		oSepMnu.AddSeparatorItem();
		oSepMnu.AddSeparatorItem();

		oSepMnu.AddItem( "Menu Item 5", siMenuItem );
If you are defining your own custom command and you wonder whether it is really necessary to implement a command or if you can get away with defining a special callback function, consider these facts:
Commands get added to the Softimage command map; callbacks do not. One implication of this is that callbacks cannot be assigned hotkeys.
Callbacks cannot be re-used outside of the plug-in module in which they are defined; but once a command is registered, it is available throughout Softimage until it is explicitly unloaded.
Commands must have unique names in Softimage; callbacks can use the same name as another command in Softimage (in case of a clash, the callback is invoked).
Callbacks are easier to implement: all functionality is contained within the single callback named in the AddItem (Menu) call. In addition to being identified in the AddCommandItem (Menu) call, commands need to be registered in the XSILoadPlugin callback, defined in their Init callback and then implemented in their Execute callback.
Some operations require specific types of input, whether it be a minimum number of input objects, or objects of a certain primitive type, etc. You can add a filter that matches whatever condition your function or command requires such that if the selected object(s) do not match that condition, your menu will be disabled (even appearing greyed-out).
Filters are applied to a MenuItem object by identifying which registered filter (either as the name of the filter or the Filter object) you want to use with the MenuItem.Filter property.
This example demonstrates how to specify a filter for a custom menu. The code is defined in the Init callback. When the user tries to invoke any of the menu entries with a null or surface mesh object selected, the menu will be disabled. As soon as the user selects a polygon mesh object, the menu becomes accessible:
// Get the menu object from the Context input
	var oFMnu = in_context.Source;
	oFMnu.Filter = "polygonmesh";

	// Add three callback items but only enable them for
	// polygon meshes.
	oFMnu.AddCallbackItem( "Punch Out Hole", "PunchOutHole" );
	oFMnu.AddCallbackItem( "Remove Corner", "RemoveCorner" );
	oFMnu.AddCallbackItem( "Smooth Curves", "SmoothCurves" );
 Except where otherwise noted, this work is licensed under a Creative Commons Attribution-NonCommercial-ShareAlike 3.0 Unported License