


The recommended way to get started developing a C++ self-installing plug-in is to use one of the Softimage SDK wizards to generate the initial code. For C++, the wizards also generate a Visual Studio .NET project (.vcproj), a Visual C++ project (.dsp), and a GNUMakefile. Using the wizards ensures that your development environment is set up correctly.
We also recommend using Add-on directories to store both the source code and the compiled plug-in. For example, take a look at the SDK example workgroup, where each example is stored in a separate Add-on directory.
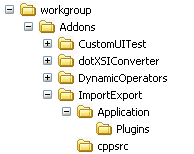
The C++ examples put their source code in a cppsrc folder, and the makefiles put the compiled plug-in directly into Application\Plugins folder.
Click File  Plug-in Manager to open the Plug-in Manager.
Tip In the Tools Development Environment layout, click the Plug-ins tab to switch to the Plug-in Manager view.
To create the property in a workgroup or an Add-on directory, expand the location in the Plug-in Tree, right-click the Plugins folder, click New, and then choose Command, Operator, Property, Event, or, for any other type of plug-in, Empty Plug-in.
To create the plug-in in the User location, click File New, and then choose Command, Operator, Property, Event, or, for any other type of plug-in,
Empty Plug-in
.
In the Plug-in Name box, type a name for the plug-in.
The first character in a plug-in name should be a letter. Subsequent characters can be letters, numbers, underscore (_) characters, or spaces.
If you include spaces in the plug-in name, the wizard replaces the spaces with underscores when it creates the plug-in file.
In the C++ Compiler Version, select Visual Studio 2008 or Visual Studio 2010, depending on your development environment.
Edit and compile the code.
 Except where otherwise noted, this work is licensed under a Creative Commons Attribution-NonCommercial-ShareAlike 3.0 Unported License