In the case of an ICE tree, forces make particles and simulated deformed objects move according to different types of forces that imitate nature. Each particle cloud or simulated object can have multiple forces applied to it.
Although anything is possible in the world of 3D, Softimage needs to use physics based on the real world in order to calculate forces properly. As a result, the forces that are used in the ICE Tree are based on Newtonian physics.
You can, of course, bend the laws of physics to your own animation needs, which are not always restricted to the real world. Cartoons often break most conventional physics to achieve their effects. You can create your own force or simulation compounds using the nodes found within ICE.
Meanwhile, here are some of the main concepts that forces in the ICE Tree use:
Velocity: the speed and direction of an object, or its rate of change in position. This is a vector.
Speed: the amplitude of the velocity (the length of the velocity vector) but without the direction that velocity has. This is the ratio of the distance an object moves versus the time it takes.
Acceleration: the rate of change of velocity.
For more information on velocity, speed, and acceleration, see ICE Particle Speed [ICE Particle Simulations].
Force: a push on an object that infers a change in velocity. It is also a vector that indicates the direction of the push. Its length determines the strength of the push.
Force is a vector that gets applied to an object to change its velocity, and the object's mass is taken into consideration (Force = Mass * Acceleration). The Force is calculated by the change in velocity multiplied by the mass.
When the Simulate Particles node applies force to a particle's position, it takes into account the particle mass.
Mass: the quantity of matter of an object. The mass determines how quickly objects react to the forces applied to them and how they react in a collision with an obstacle. Objects with a higher mass tend to keep their velocity when exerting forces on them. Therefore, to make a change in an object's motion, you need to apply stronger forces to an object with more mass than to one with little mass.
For more information, see ICE Particle Mass [ICE Particle Simulations].
Gravity: the attraction between all objects that have mass. Earth's gravity is a downward acceleration exerted on objects.
For more information, see Gravity Force.
Drag: a force applied by a fluid on a solid object in the opposite direction to its velocity. The force depends on the velocity of the object and its size, and on the density of the fluid.
For more information, see Drag Force.
To use forces in the ICE tree, you can access forces from within the ICE tree or from any toolbar in Softimage. Each represents a different set of forces, but you can use both sets in the ICE tree.
ICE forces: Choose any of the commands from the Particles  Forces menu on the ICE toolbar — see Creating and Applying ICE Forces to ICE Simulations. Each of the Force compounds used by these commands are found in the Forces group on the Task > Particles tab in the ICE
tree view's preset manager.
Forces menu on the ICE toolbar — see Creating and Applying ICE Forces to ICE Simulations. Each of the Force compounds used by these commands are found in the Forces group on the Task > Particles tab in the ICE
tree view's preset manager.
Non-ICE forces: Choose them from the Get Forces menu on the Simulate toolbar or the Get > Primitive > Control Object menu on any other toolbar — see Creating and Applying Non-ICE Forces to ICE Simulations.
There are several attributes that are used to define forces that are used in a simulation. These attributes are used in several compounds that are described in this section, but you can also use them on their own in an ICE tree.
You can use any of these attributes by specifying them in the Get Data and Set Data nodes, as described in Using ICE Particle Attributes [ICE Particle Simulations].
For more information on attributes in general, see ICE Attributes [ICE Reference].
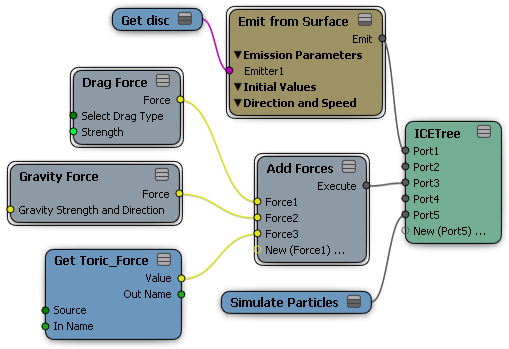
To use any force compound inside the ICE tree, you need to first have an Add Forces compound plugged in to the Forces port of the Simulation Root compound, or into a port on the ICETree node.
The Add Forces compound is a hub for the forces in your ICE tree: it adds up and blends the effect of all forces that are plugged into it, then applies it to the simulated objects.
If no other force is plugged into the Add Forces compound, you can open its property editor and create a simple velocity force in any global direction (XYZ).
Each point cloud or deformed object can have multiple forces applied to it. As well, you can have the same force applied to a number of point clouds or objects in a scene.
Create an ICE deformation or particle simulation — see Creating a Basic Particle Emission.
Choose any of the Particles Forces commands from the ICE toolbar: Gravity, Drag, Wind, Point, Coagulate, Neighboring, and Null Controller. See Types of ICE Force Compounds for information on each one.
Each of these commands does two things:
It adds the Add Forces compound to the ICE tree (if not already present), plugging it into the Forces port of the Simulation Root compound. This compound is a hub for the forces in your ICE tree: it adds up and blends the effect of all forces that are plugged into it, then applies it to the simulated objects.
It adds the command's corresponding Force compound to the ICE tree, plugging it into the Force port of the Add Forces compound. See Types of ICE Force Compounds for a description of each compound.
If you selected the Particles Forces Null Controller command, you must pick a null object you want to use to control the particles. This object's Get data node is then plugged
into the Null Name port of the Null Controller Force compound.
In the Force compound's property editor, set the parameters as you like.
You can continue to add more forces in this way: any additional forces are simply plugged into the existing Add Forces compound.
The order in which the forces are plugged into the Add Force compound is not important because they are simply added together.
The ICE force compounds can be found in the Forces group on the Task > Particles tab on the preset manager in the ICE tree.
There is a standard procedure to use all of these forces in the ICE tree — see Creating and Applying ICE Forces to ICE Simulations.
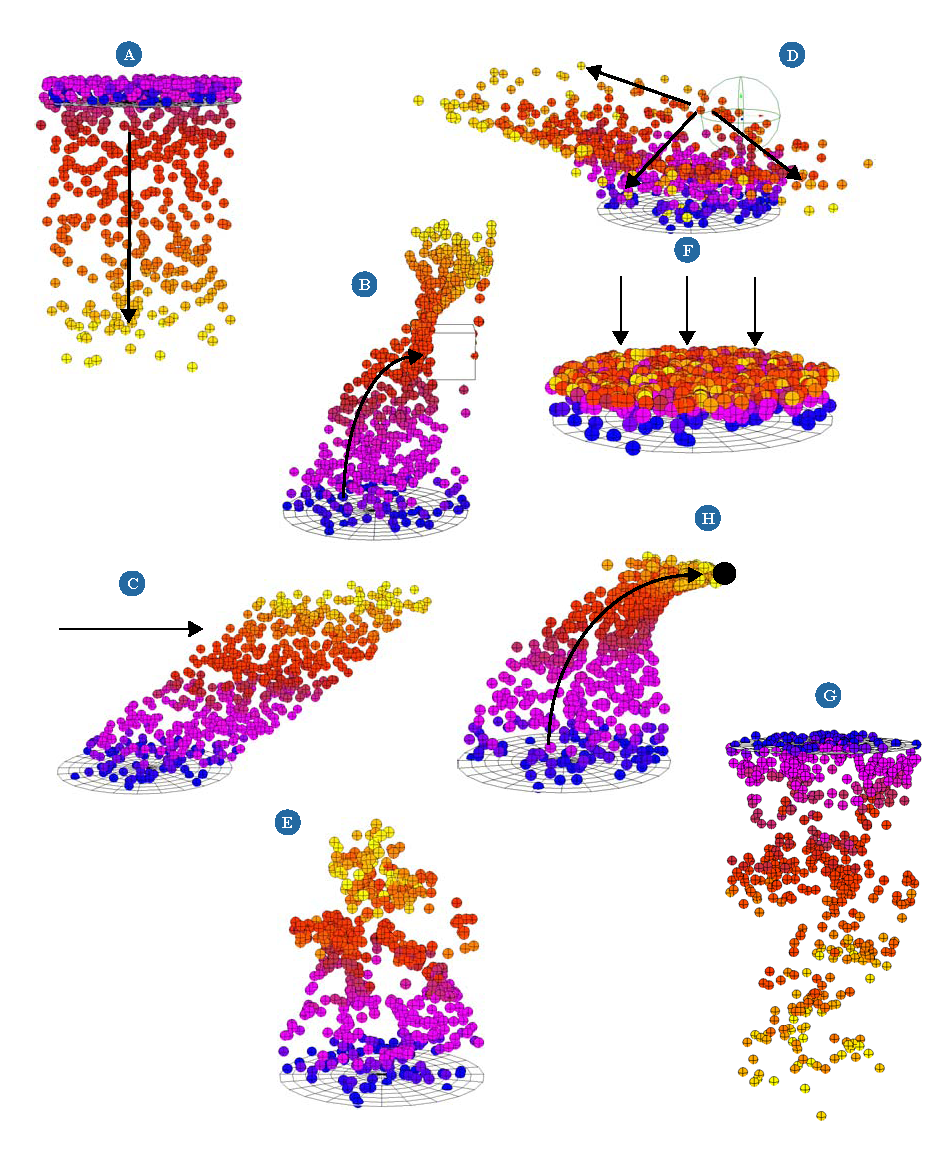
| A |
The Gravity Force compound applies a force that defines an acceleration over time. Gravity is the same for all objects regardless of their mass. However, everything changes at the moment there is air resistance/friction or when the object collides with another: that's where mass, energy, and momentum play a major role.
|
| B |
The Surface Force compound attracts particles/objects to or repels them from an object's surface, much like a magnet attracts/repels iron filings. This makes it easy to produce effects such as those created by magnets, black holes, or gravity. |
| C |
The Wind Force compound generates a force that speeds up particles or simulated objects to a target velocity. This is a directional force with velocity and strength. |
| D |
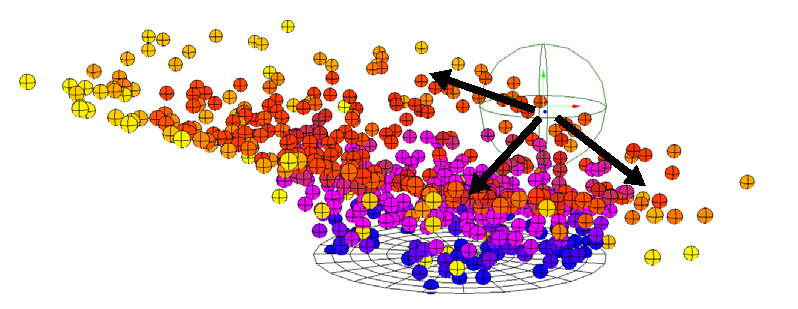
The Null Controller Force compound uses the location and shape of a null to control the center, direction, and size of the force. The points are either attracted to or repelled from this null in a manner that is similar to how particles move toward or away from a goal object. |
| E |
The Neighboring Particles Force compound attracts particles to each other when they get within a certain range, in a manner similar to the Coagulate force. However, there is no friction between the particles so they don't stay clumped together as with the Coagulate force. |
| F |
The Drag Force compound adds flow resistance to the movement of an object in the opposite direction to its velocity, as in a fluid. This force give a more direct level of control when you want to slow down simulated objects. For example, you could create the effect of particles moving under water using the drag force or create a slow-motion effect of particles as they are being emitted. |
| G |
The Coagulate Force compound attracts points toward their neighbors to form clumps. Once the points get within a certain range of each other, the friction (drag) slows them down. This force is useful for blood splatter, mercury or liquid metal forming, water droplets. You may want to try using this force with the particle shape set as blobs to create these types of effects. |
| H |
The Point Force compound attracts particles/objects to or repels them from a position in space that you define. |
In addition to the ICE force compounds, you can use non-ICE forces in ICE simulation trees. These are the simulation forces that have been available for previous versions of Softimage — see Types of Forces [ Simulation and Effects].
You may want to work with these forces if you're used to them, or also because each force is represented in the scene by its own control object. The control object lets you select, transform, rotate, and scale the force.
Choose Get Force force name from the Simulate toolbar or Get Primitive Control Object force name from any other toolbar to create a force object in a viewport.

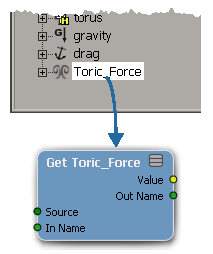
From an explorer, drag the force's name into the ICE Tree to create a Get Data node for it.
In the ICE tree, drag the Add Forces compound from the Forces group into the ICE view.
Plug the Add Forces compound's Execute output into a port on the ICE Tree node, above the Simulate Particles (or Simulate Rigid Bodies) node.
You can also plug this into a State compound's Execute port, if you're using a state system.
Plug each force node's Force output into a Force port on the Add Forces compound. The force's output is a 3D vector representing the force which is based on the PointPosition attribute of the element.
The order in which the forces are plugged into the Add Force compound is not important because they are simply added together.
You can continue to create and apply forces to a simulation in this way.
You can create a group that includes several non-ICE forces, then bring the group's node into the ICE tree and plug it into the Add Forces compound. This way, you can add forces to, or remove forces from, the group without needing to change any connections in the ICE tree: the group node remains connected and is updated by the Add Forces compound.
Create and select several forces from the Get Force menu on the Simulate toolbar (or from Get > Primitive > Control Object on any other toolbar)
Create a group (press Ctrl+G) that includes the forces you want to use in the ICE tree.
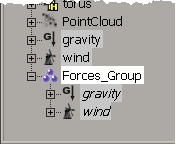
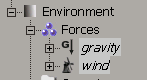
By default, there is a Forces group that is created in the current simulation environment. Standard forces are automatically added here when they are created. Select either the Environments or Curr. Envir. scope in the explorer to see the simulation environment. See The ICE Simulation Environment for information.
|
|
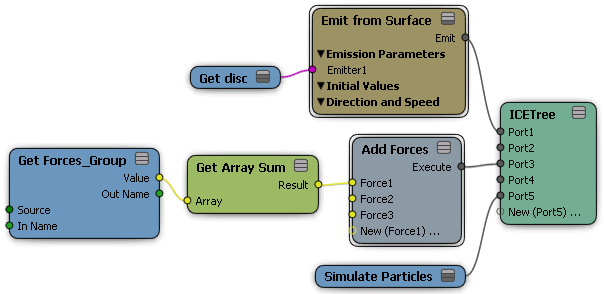
Drag the Forces group name from an explorer into the ICE tree to create a Get Data node for it.
In the ICE tree, click the Tool tab and drag the Get Array Sum node from the Array group into the ICE view.
You are adding this node because the output from the Forces Group node's Value output is an array: it considers multiple objects, but the Add Forces compound can only take 3D vectors as an input. This node acts like a converter in that it takes the array value and then outputs a single value, which can be a 3D vector.
Plug the Forces Group node's Value output into the Get Array Sum's Array port.
Plug the Get Array Sum's Result output into a Force port on the Add Forces compound.
 Except where otherwise noted, this work is licensed under a Creative Commons Attribution-NonCommercial-ShareAlike 3.0 Unported License


