This section provides some basic information that is common to all transformation tools. More details about each specific type of transformation is provided in the sections that follow.
The Scale, Rotate, and Translate tools let you transform objects interactively using the mouse in the 3D views.
Select the objects to transform, and activate a transformation tool:
To translate, press V or click the t button on the Transform panel.
To rotate, press C or click the r button on the Transform panel.
To scale, press X or click the s button on the Transform panel.
Once a transformation tool is active, you can press Tab to cycle through them or Shift+Tab to cycle backwards.
The corresponding local transformation parameters are automatically marked for animation.
Note that if the Tweak Component tool is active, then the X, C, and V keys change the transformation mode within that tool. Deactivate Tweak Component before pressing those keys, or use the buttons on the Transform panel.
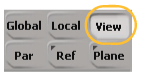
If necessary, change the manipulation mode. For a description of each mode, see Translation Modes, Rotation Modes, and Scaling Modes. Each tool remembers the last mode used for objects and for components. Similarly, Softimage remembers whether COG is on or off for objects and components separately.
If desired, you can restrict the interaction to specific axes. See Specifying Axes.
If desired, you can set the pivot. The pivot defines the position around which elements are rotated or scaled. When translating with snapping, the pivot is the position that snaps to the target. See Setting the Pivot.
Manipulate the objects using the mouse in the 3D views:
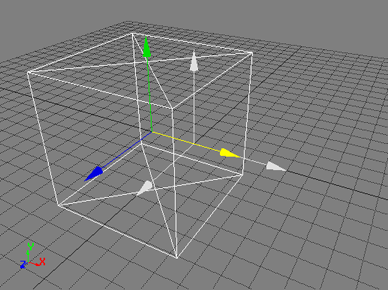
If you are using the SRT manipulators, click and drag on different parts (handles) of the displayed transformation axes to transform the objects in different ways.
For general information about the SRT manipulators, see Transforming Interactively with the SRT Manipulators.
For specific information about each manipulator, such as the handles used by different tools, see Using the Translate Manipulator, Using the Rotate Manipulator, or Using the Scale Manipulator.
If you are not using the SRT manipulators, click and drag the mouse anywhere in the 3D views. The function of the left, middle, and right mouse buttons depends on the tool, mode, and other options — check the mouse/status line at the bottom of the main window for details. You can also drag while pressing multiple mouse buttons simultaneously.
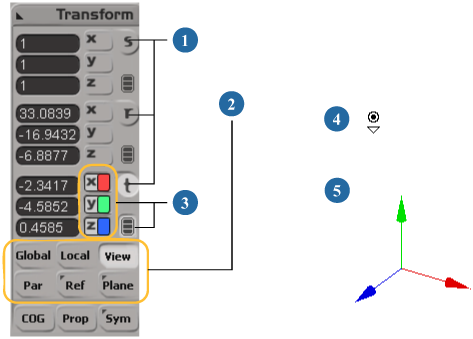
When transforming interactively, you can specify which axes are active using the x, y, and z icons in the Transform panel. For example, you can activate rotation in Y only, or deactivate translation only in Z. Active icons are colored, and inactive icons are gray.
Click an axis icon to activate it and deactivate the others.
Shift+click an axis icon to activate it without affecting the others.
If Allow Double-click to Toggle Active Axes is on in the Transform preferences, then you can also specify transformation axes by double-clicking in the 3D views while a transformation tool is active:
If you are using the SRT manipulators:
Double-click on a single axis to activate it and deactivate the others.
If only one axis is currently active, double-click on it to activate all three axes.
Shift+double-click on an axis to toggle it on or off individually. (If it is the only active axis, it will be deactivated and both of the other two axes will be activated).
If you are not using the SRT manipulators:
Double-click a mouse button to activate a single axis and deactivate the others: use the left mouse button for the X axis, the middle mouse button for the Y axis, and the right mouse button for the Z axis.
Double-click a different mouse button to activate only the corresponding axis.
Double-click the same mouse button to reactivate all three mouse buttons.
By default, the marked parameters do not change when you specify axes (except in Par mode for translations and Add mode for rotations). For example, if you activate only the X axis while translating, the posx, posy, and posz parameters all remain marked for animation. This is because the active axes affect interaction only. For example, if you interactively translate along X in Local mode, the object's local Y and Z parameters may change if its orientation is different from its parent. In such a case, if you set a keyframe for only the local posx parameter, then you may get unexpected results when you play back the animation. However for translations in Par mode and rotations in Add mode, the axes of interaction correspond exactly to the local values stored for animation.
If desired, you can force the marked parameters to reflect the active axes in all manipulation modes by turning Transform  Automark Active Transform Axes on — but remember that the reference frame for interactive manipulation does not correspond to the reference frame used for
storing local animation unless you are translating in Par mode or rotating in Add mode.
Automark Active Transform Axes on — but remember that the reference frame for interactive manipulation does not correspond to the reference frame used for
storing local animation unless you are translating in Par mode or rotating in Add mode.
When transforming elements interactively, you can set the pivot by pressing the Alt key while a transformation tool is active. The pivot defines the position around which elements are rotated or scaled (center of transformation). When translating and snapping, the pivot is the position that snaps to the target.
Make sure that Transform Modify Object Pivot is set to the desired value:
Off (unchecked) to set the tool pivot used for interactive manipulation only. This is useful if you are simply moving elements into place. The tool pivot is normally reset when you change the selection. However, you can lock and reset the position manually.
Note that when you move the tool pivot from its default location and then scale or rotate objects, the position values change as well. If you are setting keys, make sure to mark all affected parameters.
On (checked) to modify the object pivot. The object pivot acts like a center for the object's local transformations. It is used when playing back animated transformations, and is also the object's default pivot for manipulation. For more information about the object pivot, see Working with Object Pivots.
Note that the object pivot will be modified only when you are transforming in Object mode. If components are selected, the tool pivot is always used.
You can reset and deactivate the object pivot on the Pivot tab of an object's Local Transform property editor.
The Modify Object Pivot option is also available on the Transform tab of the Transform preferences.
Alt+drag the manipulator's center, or one of its axes, to change the position of the pivot manually. You can use snapping, as well as change manipulation modes on the Transform panel.
Alt+click in a geometry view. The pivot snaps to the closest point, edge midpoint, polygon midpoint, or object center among the selected objects. This lets you easily rotate or scale an object about one of its components.
Right-click and choose Edit Pivot. Drag the pivot to a new location, and then right-click again and turn off Edit Pivot.
If Ref or Plane manipulation mode is active, the current reference plane is automatically updated. For information about reference planes, see About Reference Planes.
Do one of the following with a transformation tool active:
Press and hold Alt. Click on the triangle below the pivot's icon, and choose Lock.

The tool pivot remains at its current location, even if you change the selection or activate another tool. You can also reset the pivot to its default from the same menu, but it's easier to simply Alt+middle-click while a transform tool is active.
Transforming Interactively with the SRT Manipulators
The SRT manipulators let you transform elements interactively by clicking and dragging on different parts (handles) of the displayed transformation axes. You can also use gestural manipulation or choose the behavior when clicking outside of a manipulator.
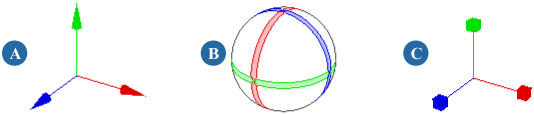
Transformation manipulators: Translate (A), Rotate (B), and Scale (C).
To enable or disable the SRT manipulators
To use the manipulator handles directly
Move the mouse pointer over the manipulator handle you want. Different tools have different handles:
For a description of the Translate manipulator handles, see Using the Translate Manipulator.
For a description of the Rotate manipulator handles, see Using the Rotate Manipulator.
For a description of the Scale manipulator handles, see Using the Scale Manipulator.
The handle under the mouse pointer is highlighted and the pointer updates to reflect the axes or plane of manipulation.
Middle-click and drag anywhere in a 3D view.
The axis that most closely matches the mouse movement over the first few pixels is used for the transformation.
Gestural manipulation works only if Click Outside Manipulator is set to No Interaction or Simple Transform in the Transform preferences. See the next section, To choose the behavior when clicking outside of the manipulators, for more information about these options.
To choose the behavior when clicking outside of the manipulators
You can choose how the transform tools behave when you click outside of the manipulators.
Open the Transform preferences by choosing Transform Transform preferences.
On the Transform tab, set Click Outside Manipulator to one of the following options:
No Interaction: There is no effect when you click outside the manipulator.
Select Tool: Clicking outside the manipulator performs a selection using the current selection filter and the last-used selection tool.
Simple Transform: Clicking outside the manipulator performs a transformation using a default manipulation mode: View for the Translate and Rotate tools, or Uni for the Scale tool.
SI3D-style Transform: Clicking outside the manipulator performs a transformation as if Enable Transform Manipulators is off. The left, middle, and right mouse buttons transform the selected elements differently, depending on the current manipulation mode set on the Transform panel.
Transforming Interactively without the SRT Manipulators
When you are transforming objects interactively without using the SRT manipulators (that is, when Transform Enable Transform Manipulators is off), the different mouse buttons manipulate the object in different ways. The exact way depends on the manipulation mode,
as well as other options, but you can always look at the mouse/status line at the bottom of the Softimage window to see what
each button will do. Usually, the different mouse buttons transform the object along different axes or planes, but if a single
axis is active they transform at a slow, medium, or fast rate.
You can set the relative speed of the interactive Scale, Rotate, and Translate tools. For example, you can slow down the interaction for precise, detailed work.
Choose Transform Transform Preferences from the Transform panel.
On the Transform tab of the Transform preferences, set the SRT Increments. Values are relative.
The Scale, Rotate, and Translate values are used with the SRT manipulators, as well as when multiple axes are active when you are not using the SRT manipulators.
The Slow, Medium, and Fast values are used by the left, middle, and right mouse buttons when a single axis is active and you are not using the SRT manipulators.
When you select a transformation tool for a selected object or component, Softimage displays an icon corresponding to the transformation axes at the active pivot position.
If you are using the SRT manipulators, you can click and drag on different parts of these icons to manipulate the object.
If you are not using the SRT manipulators, these icons are simply visual cues that indicate the X, Y, and Z axes as defined by the current transformation mode.
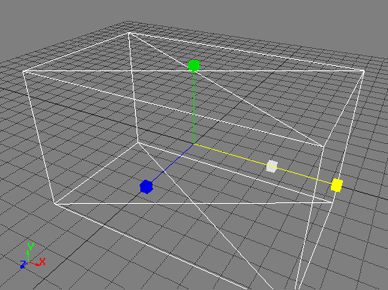
The axis on which you are scaling turns yellow and resizes as you scale the object. The cues representing the original size are displayed in light gray.

The axis on which you are rotating turns yellow. The sphere rotates as you rotate the object.
The axis on which you are translating turns yellow and moves as you translate the object. The cues representing the original position are displayed in light gray.
As an alternative to transforming objects interactively, you can enter numerical values in the boxes on the Transform panel:
In Ref mode, values are relative to the active reference plane.
In View mode, values can be either global or relative to the object's parent. This depends on a preference; see Choosing the Reference Frame for Numerical Transformations in View Mode.
In all other modes, values are relative to the object's parent.

Alternatively, you can enter local or global transformation values directly in the Kinematics property editor.
Like other input boxes, you can enter specific or relative values for one or more selected objects. For multiple objects and clusters, you can also use random values or specify a range of linear values (note that this does not work for components). See Entering Values in a Text Box [Interface and Tools] for more information.
Choosing the Reference Frame for Numerical Transformations in View Mode
When View mode is active, you can choose whether the rotation and translation values displayed in the Transform panel are global (relative to the scene) or local (relative to the parent's center). This affects not only the displayed values, but also the effect of new values that you type into the boxes.
To specify the reference frame for numerical transformations in View mode
Choose Transform Display Global Coordinates in View Mode.
When this option is on, the translation and rotation values displayed in the Transform panel are relative to the scene origin
(global). In addition, if Transform Automark Global Transforms is also on, then global transformation parameters are automatically marked when you activate the Translate or Rotate tool
in View mode.
When this option is off, the translation and rotation values displayed in the Transform panel are relative to the object's parent (local).
This setting is saved in your preferences and restored the next time you start Softimage. The setting is not saved in your scene.
Editing Multiple Parameters in the Transform Panel
You can edit multiple parameters in the Transform panel simultaneously. This lets you quickly set the same value for all selected parameters.
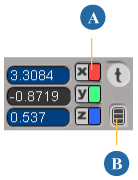
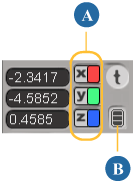
| A |
Shift+right-click on an axis icon to select it for multi-editing. |
| B |
Shift+right-click on the All Axes icon to toggle all axes for multi-editing. |
To edit multiple parameters on the Transform panel simultaneously
Select the transformation parameters that you want to edit simultaneously:
To select or deselect a specific transformation and axis, Shift+right-click on the corresponding axis icon.
To toggle each all the axes individually for a specific transformation, Shift+right-click on the corresponding All Axes icon.
The parameters that you select are highlighted in blue to indicate that they are active for multi-editing. In addition, the keyboard focus is set to the boxes so that you can begin typing immediately.
Enter a new value. The value is applied to all highlighted parameters. You can also enter relative values, linear ranges, and random values — see Relative Input Using Math Operations [Interface and Tools].
In your Tools > Transform preferences, Transform Hidden Objects controls whether you can transform objects interactively if they are hidden (you can always enter values numerically). Keep this off to prevent you from accidentally making modifications that you cannot see. Turn it on to make it easier to work with transform groups, which are hidden by default.


