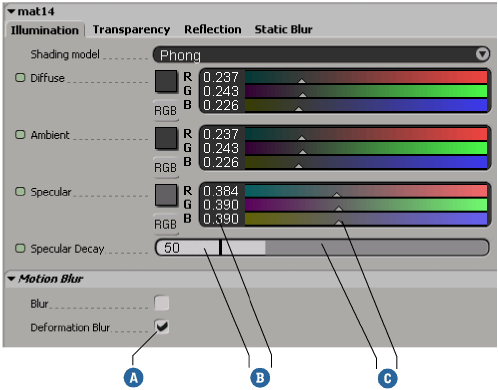
Object, shader, or operator parameter values can be edited directly by means of text boxes, check boxes, sliders, and virtual sliders located throughout the interface. You will change parameters mostly in property editors (as the one shown below). For more information on property editors, see Modifying Properties in Property Editors.
In addition to property editors, you can enter values in many of the text boxes in the main command panel, and use virtual sliders to change values in the explorer.
You change the value of a parameter in a text box by typing in either text or numerical values (see Entering Values in a Text Box for more information). Some sliders and text boxes, such as those that control color channels, are grouped together.
If the text box contains more characters than it can display, it automatically scrolls with the text cursor.

To change values using sliders
Click anywhere along the slider to set a value. Values on the left are lower and values on the right are higher. When you use the left mouse button to drag, the scene updates continuously.
Drag a slider to the right or left while pressing the Shift key to make finer adjustments.
Drag a slider to the right or left while pressing the Ctrl key to change the value of all the sliders in a color-control group simultaneously.
Drag with the middle mouse button. When you use the middle mouse button, the scene updates only when you release the mouse button instead of refreshing continuously as you drag. This is especially useful when setting values on parameters that may take a long time to update. Again, press Shift for finer adjustments.
If you need to specify more precise values than is possible with the sliders, you can enter values numerically. See Entering Values in a Text Box.
Entering Values Outside of Slider Ranges
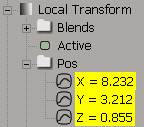
Many parameters with sliders let you set values outside of the slider range. For example, the range of the Local Transform property editor's Position sliders is between -50 and +50, but objects can be much farther from their parent's origin than that.
If a parameter supports values outside of the slider range, you can set such values by typing them into the associated numeric box or by pressing Alt while using the virtual slider tool.
When you set a value outside the slider range, the displayed range automatically expands to twice the current value. For example, if the default range of a parameter is between 0 and 10 and you set the value to 15, the new range is 0 to 30. However, the change is not permanent — if you set the parameter to a value within the default range and then close and reopen the property editor, the displayed range is back to its default.
Entering Values Using Virtual Sliders
You can change the values of marked parameters by using "virtual sliders." This means simply activating a tool that lets you do the job of a slider without having to open up any property editors. For more information about marking parameters, see Marking Parameters for Animation.
Select one or more objects, and mark the desired parameters. You can mark a parameter by:
Use the Shift key to add a parameter and the Ctrl key to toggle.

Press F4 and drag the mouse back and forth using the following as a guide. You can scrub horizontally using the entire screen width:
Middle-click and drag to the right to increase values, and to the left to decrease values. The default increments are proportional to the range of the parameter's slider in its property editor.
Press Ctrl to make coarse adjustments (10 times the default increment).
Press Shift to make fine adjustments (1/10th the default increment).
Press Ctrl+Shift to make ultra-fine adjustments (1/100th the default increment).
Press Alt to extend beyond the range of the parameter's slider in its property editor (if the slider range is smaller than its total range).
Left-click to select other objects or mark other parameters while staying in the virtual slider mode.
Press the Up and Down arrow keys to increment or decrement the values by 1 unit. Hold the Ctrl key while pressing the arrow keys to increment or decrement by 10, or hold the Shift key to increment or decrement by 0.1.
There are many ways to enter information in a text box. You can enter information the conventional way by using your keyboard. For numeric input, you can also use gestural movements and key combinations to increase or decrease the parameter values.
Most numeric boxes round values for display purposes. For example, if you type "0.0001" then the displayed value is "0" even if the correct value has been stored in the parameter and logged to the command history.
To enter information by typing
Move the mouse pointer inside the text box and click. The pointer shape becomes a text cursor (flashing vertical bar). Any existing text is selected and is overwritten as soon as you begin typing.
If you click in the text box a second time, the text is deselected and the cursor is placed where you clicked. You can now:
Use the left- and right-arrow keys on the keyboard to move the cursor to the appropriate place in the text box.
Drag the cursor over the part of the contents you want to replace. The selected characters are highlighted. Now type in the text you want.
Press Shift+left- or right-arrow key to select characters that are to the left or right of the cursor. You can delete or replace these characters.
Double-click to select a word so that you can replace it completely with the text that you type.
Right-click to open a pop-up menu and choose the command to Undo, Cut, Copy, Paste, Delete, or Select All the contents of the text box.
Delete characters to the left of the cursor using the Backspace key, or delete characters to the right of the cursor using the Delete key.
Many boxes that support numeric values let you set values outside of the corresponding slider range.
To enter information by gestural input (scrubbing)
To enter information by increments
Relative Input Using Math Operations
All text boxes allow you to input relative values by means of four basic math operations (addition, subtraction, multiplication, and division), as well as other operators such as linear and random.
Enter the symbol for the math operator ( + – * / ). You can use only one math operator per text box.
For example, if the selected value in the text box is 10 and you replace this value by 5+ and press Enter, the result is 15 because you added 5 to the existing value.
When you have multiple elements of similar parameter values, anything you enter in a text box is applied to all these parameters:
These illustrations describe the different ways in which elements can be transformed using text box input. For illustrative purposes, the example of translation is used, but the concepts apply to any parameter:
You can randomize parameter values using commands on the Animate toolbar. The values become set to random values within a range centered about a pivot point.
The relative commands use the parameter's current value as the center of the range.
The absolute commands use the midpoint of the slider's range. Although you can set some parameters to values outside the slider range when typing values, it is the visible range of the slider in the interface that determines the center.
You can also set random parameters when typing values (see Relative Input Using Math Operations).
Select one or more objects and mark the desired parameters. You can mark a parameter by:
Use the Shift key to add a parameter, and the Ctrl key to toggle.
For more information about marking parameters, see Marking Parameters for Animation [Animation].
Choose a command from the Create  Parameter
  Randomize Marked Parameters menu on the Animate toolbar:
10% Relative. Generates random parameter values within a range +/-5% of the parameter's slider range, centered on the current value.
25% Relative. Generates random parameter values within a range +/-12.5% of the parameter's slider range, centered on the current value.
50% Relative. Generates random parameter values within a range +/-25% of the parameter's slider range, centered on the current value.
75% Absolute. Generates random parameter values within a range +/-36.5% of the parameter's slider range, centered on the slider's midpoint.
100% Absolute. Generates random parameter values anywhere within the parameter's slider range.