Much of the work in creating a convincing simulation is the process of trial and error. You usually need to try out many different combinations of settings until you find the right effect. Caching can help you do this, similar to how you create a flipbook for testing out animations.
Saving different variations of a simulation or animated deformation.
Reducing the number of calculations that are performed when playing back or rendering scenes.
Exporting an object's data to other scenes, other computers, and to other 3D software packages, such as Autodesk® Maya® or Autodesk® 3ds Max®.
Blending multiple cache file clips in the animation mixer to create various effects.
Blending multiple cache files in an ICE tree by using the Cache On File node.
When the simulation is cached, each frame that has been played is evaluated and stored. This means that you need to play through the whole simulation (with the All frames button selected in the timeline, and not RT) to cache each frame of it. If you change something in the simulation, all subsequent frames are affected, so the cache is emptied and you need to cache again to update it with the changes.
There are three ways of caching ICE simulation data:
Use the Cache on File node in the ICE tree to save ICE simulations or animated deformations and their ICE attributes in point cache files — see Writing Cache Files in the ICE Tree.
You can also use the Cache on File node to read (load) attribute information from a cache file, as well as blend or merge cache file sequences with each other — see Reading a Cache File in the ICE Tree.
Use the options on the Write tab in the Cache Manager to plot ICE simulations or animated deformations and their ICE attributes into point cache files — see Writing Cache Files.
Use the Simulation Time Controls to cache ICE simulations and their local ICE attribute values to a point cache file, and optionally to an action source. This also creates a simulation environment cache that allows you to play the simulation backwards and scrub through it. These controls are available from the ICE simulation's environment via the explorer, or from the Simulation page in the Cache Manager — see Creating ICE Simulation Environment Cache Files.
The point cache file that is created with the Cache on File node is the same type as the one created when using the Cache Manager — see The Cache Manager. This means that you can use the resulting cache file in either the ICE tree or the animation mixer.
The Cache On File node is an advanced feature. It should be used as a dedicated operator to write or read simulation data, and not be changed dynamically. It's best to use it to read a cached sequence, and then blend it with other sequences, add nodes to it to build a new ICE tree, or to improve on the simulation.
The Cache On File node needs you to tell it what to do — in fact, it's so lazy that it's set to "do nothing" by default. You must use either of these two modes to make it do some work:
Set it to Write Cache mode when you want to write a simulation sequence to a cache file — see Writing Cache Files in the ICE Tree below.
Set it to Read Cache mode when you want to load a cache file into the ICE tree — see Reading a Cache File in the ICE Tree.
Writing Cache Files in the ICE Tree
You can use the Cache on File node in the ICE tree to write the simulation or animated deformation data stored on an object, including its ICE attribute information, to a cache file. You may want to write a cache file in this way if you're using a dedicated write cache operator with some special data manipulation that you've created.
Writing the cache from the ICE tree stores the values at the evaluation point and outputs these values from that point on, until you click the Update icon. If the values change over time, it stores only one frame, and evaluates the next one. This node optimizes parts of the ICE tree so that it does not evaluate at every frame.
Only the simulated frames of an ICE tree are written to the cache, which doesn't include the first frame of the scene. This frame is considered to be the initial state and is therefore not simulated.
The Cache on File node doesn't know when a simulation has changed: if there is a change that you want to cache, you need to run the simulation again to rewrite the cache. Likewise, be aware that as long as this node is plugged in and set to Write Cache mode, the cache file is overwritten every time you play the simulation. Make sure to disconnect the node or set it to "Do Nothing" when you're ready to stop caching.
Select an object or point cloud whose ICE simulation you want to cache.
In the preset manager of the ICE Tree view, click the Tool tab and drag the Cache on File node from the Data Access group into the tree workspace.
Plug its Execute output into the lowest port on the ICETree node (below all other nodes that are plugged into it) if you want the whole ICE tree to be evaluated for caching.
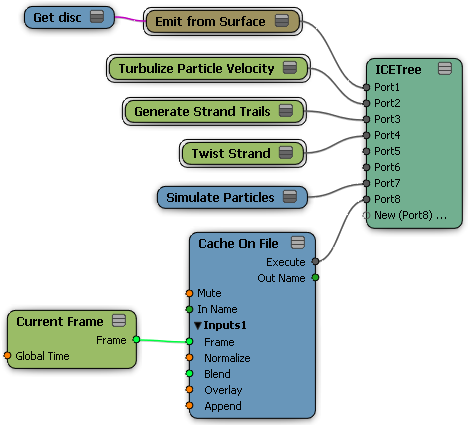
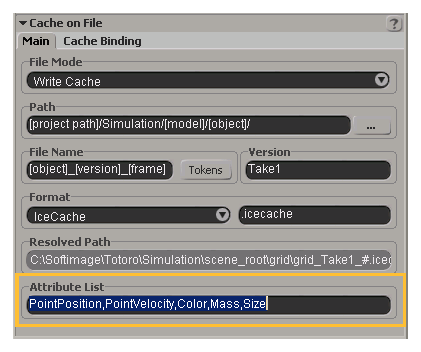
Open the Cache on File property editor, and select Write Cache from the File Mode list.
Select the Path for the current cache file — see Cache on File.
The File Name for the cache has this syntax: [object]_[version]_[frame]
The tokens used for the Path and File Name are automatically set according to what's used in the Simulation Preferences.
If you want to change the tokens used for the Path or File Name, click the Tokens button to see which ones are available to use. You can use any of the Universal tokens, in addition to the ones for Caching.
Select a cache file Format from the list — see Cache File Formats. Only the ICEcache and Custom formats are supported.
Use the Attribute List text box to specify the ICE attributes that you want to include in the cache file — see Specifying ICE Attributes in the Cache File. If you specify nothing here, all required attributes are included in the cache file.
By default, the Current Frame node is plugged into the Frame port of the Cache on File node. This port specifies the frame number to be used to resolve the file name.
You could plug another node or compound in here to drive the frames used for the cache, such as the Frame Cycle Control compound.
Play the whole simulation to cache each frame of it, or play only the frames you want to cache.
Make sure that the All frames button is selected in the timeline, and not RT (real time), otherwise some frames may be skipped. See Playing Back All Frames or Playing in Real Time for more information.
When you first play the simulation, the data is being cached so it takes a bit of time. However, once it's cached, the playback is usually faster than if no source was cached.
The frames that are played are cached into the file in the path that you specified.
Now you can do either of the following with the cache file:
Read the cache file in this ICE tree or in the ICE tree for another object — see Reading a Cache File in the ICE Tree.
Load it into the animation mixer as a cache clip on a track. You can then do things like creating cycles for looping simulations, scaling the clip's time, using a timewarp on them to reverse the simulation or adjust the timing with a curve, or blending cache clips together. See Using Cache Files in the Animation Mixer for information.
Specifying ICE Attributes in the Cache File
At the bottom of the Cache on File property editor, you can specify which attributes you want to write into the cache file. If you don't enter anything into this list, Softimage automatically makes sure that all required attributes are included. These are the attributes that are used in the object's ICE tree and in the render tree for rendering (such as those being used by an attribute shader in a render tree).
However, if you want to cache only specific attributes, you can do so by entering their names in the Attribute List text box. Make sure to separate each attribute name by a comma (for example: PointPosition,PointVelocity,Color,Shape,Size,Mass), but don't put any spaces between the comma and the following attribute name.
Note that when you specify attributes here, only those attributes will be cached into the file: they are not added to the required attributes.
For more information on specifying which attributes to cache, see Setting ICE Attributes for Caching.
For information on ICE attributes in general, see ICE Attributes.
Reading a Cache File in the ICE Tree
Once you have created a cache file, you can use the load it in the ICE tree using the Cache on File node. You can use this node to simply play back the cached data, or you can modify the cache file data by plugging in nodes as you would to build and modify any ICE tree.
You can also load the cache file onto a track in the animation mixer — see Using Cache Files in the Animation Mixer.
You can apply the cache file to the same object for which you created the cache file, or to another object. If you're loading a cache file onto a different object, the number of points on this object must match the number of points that were on the object whose data was cached.
When in read mode, the Cache on File node overrides any Simulate nodes that are plugged into the ICE tree so that their simulation is ignored.
If you have multiple Cache on File nodes plugged into the ICE tree node, you can blend them together in different ways (see Blending Cache Files). If you don't blend them, only the data from the lowest Cache on File node is played because it is the last node that is evaluated.
To read a cache file in the ICE tree:
Select the object to which you want to apply the cache file.
Create a simulated ICE tree node for the object so that the frames are updated.
In the preset manager of the ICE Tree view, click the Tool tab and drag the Cache on File node from the Data Access group into the tree workspace.
If you want to blend the results of multiple cache files, see Blending Cache Files below.
Plug its Execute output into a port on the ICETree node, most likely below any Simulate nodes. No matter where it's plugged in, the Cache on File node overrides any Simulate nodes that are in the tree.
In the Cache on File property editor, select Read Cache from the File Mode list. This loads the data from the file you select and inserts it at this point in the tree.
In this property editor, select a cache file from the Path text box.
By default, the Current Frame node is plugged into the Frame port of the Cache on File node. This port specifies the frame number to be used to resolve the file name.
If you want to play the cache file using the frames in the scene timeline, select the Global Time option in the Current Frame node. This option is off by default, which means that the cache file's local simulation frames are used, which are often offset from the scene's frames.
You can replace the Current Frame node with another one to drive the cache frames played. For example, you could use:
Use the playback controls to play the simulation in the cache files on the selected object. You can also play the simulation backwards, or scrub the playback cursor back and forth.
Select the Mute option on the Cache Binding tab in the Cache on File property editor to temporarily disable the playback of the cache file.
You can blend the ICE attribute data stored in a cache file with another cache file, or with the object's current attribute data in the scene. You can use these options only if you have two or more Cache on File nodes plugged into an ICE tree.
To blend multiple cache files:
Get a Cache on File node for each cache file and plug each of them into the ICETree node.
The Cache on File node that is at the lowest port on the ICETree node is the only one that is played unless you set the blending values.
In each of the nodes' Cache on File property editors, make sure that each Cache on File node is set to Read from File.
Click the Cache Binding tab in the property editor of the lowest Cache on File node and select one or more of the following options to control the blending.
This option specifies the amount of blending of attribute values from this cache file with the ones in other cache files that are plugged in, or in the current scene.
Set this value to 1 to simply overwrite the other attribute values with those in this cache file. Any value less than 1 uses only a percentage of the value weight in this cache file, such as a value of 0.5 using only 50% of the value weight.
This option normalizes (averages) the attribute values from the cache file with the ones in other cache files or in the current scene. If this option is not selected, the attribute values are added together (additive) when blended.
This option blends cache files by overlaying one cache file sequence with a second one. If this option is not selected, the particle's ID is used.
When overlaying, particles are linearly removed from the first sequence and added to the next one based on the second sequence. The balance is defined by the Blend value. A value of 0.5 means 50% of the particles in each cloud are deleted from the first sequence and then added to the next one. Their attributes are not blended.
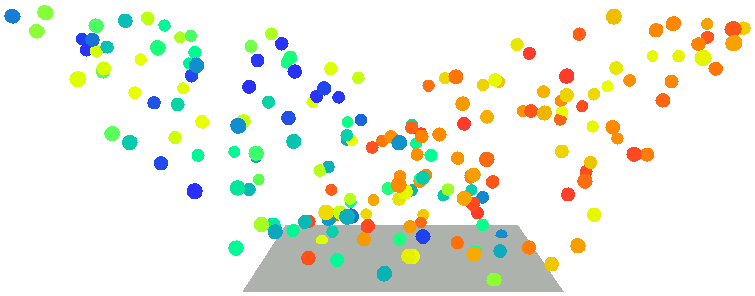
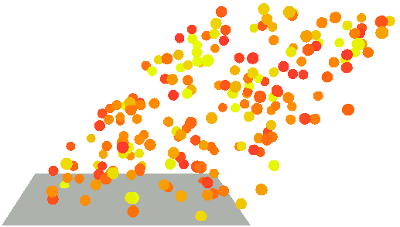
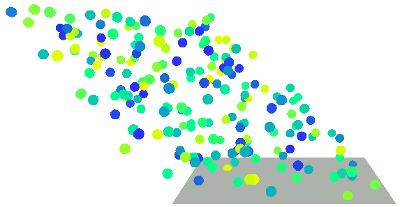
Cache files A and B being blended together at a Blend value of 0.5 with the Overlay option on. Because the blend is 50%, half of the particles from the first sequence are deleted and then added to the second one.
This option merges the particles into the existing point cloud when loading multiple file cache sequences. The cached points are added to the existing points instead of replacing them. If this option is not selected, the particles blend with each other.
This option works only on point clouds.
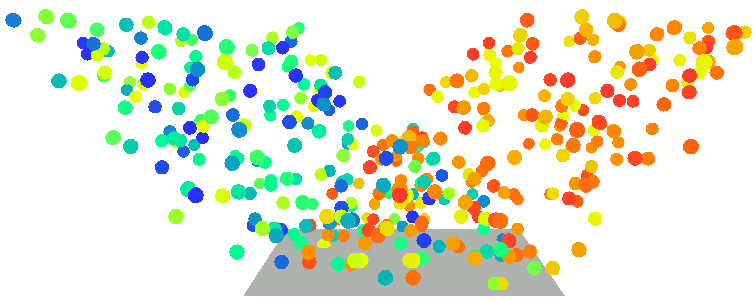
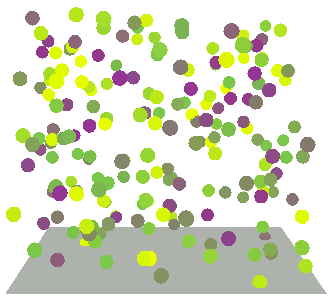
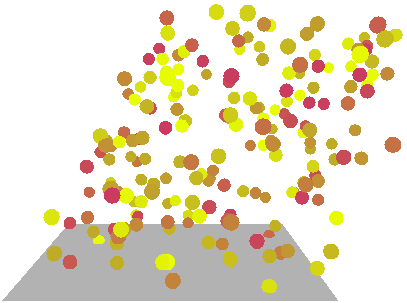
Cache files A and B being blended together with the Append option on. The particles from the first sequence are added to the second one.