You can now draw implicit bone chains using the Create  Skeleton Draw Bones command from either the Model or Animate toolbar.
In previous versions, you could only get the implicit bone primitive from the Get Primitive Implicit Bone command.
Many of the usual IK skeleton chain features apply to implicit bone chains, such as applying an envelope, using the Move Joint tool, duplicating the chain in symmetry, icon and shadow icon display, snapping, and using the bone selection filters.
See Drawing Implicit Bone Chains for more information.
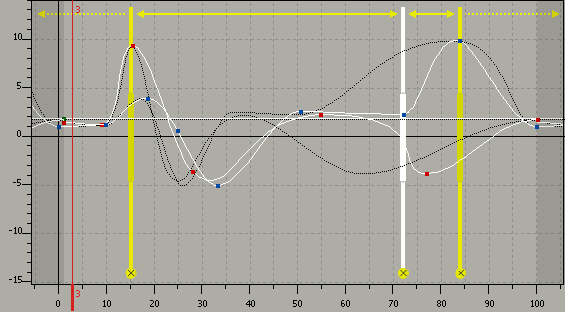
The new Retime Keys tool in the fcurve editor lets you easily retime animation directly on the fcurves. You create retime markers to mark any segment of the fcurves you want to retime, then drag the retime markers to squash, stretch, or shift the animation as you like.
Choose Edit Transformation Tools Retime Keys Tool or click the Retime Keys icon on the fcurve editor toolbar to activate the Retime Keys tool.
Classic mode is now the default mode for the fcurve editor.
To switch between Class and Suite modes, do any of the following:
Classic Mode command from the fcurve editor toolbar.
Classic Mode option (if you're in Classic mode).
Fcurve Editor Menu Command Changes
The fcurve editor has experienced some menu command name changes to make it more compatible with the fcurve editors in the other Autodesk 3D applications. Here's a brief summary:
Transformation menu now contains these commands: Save Buffer command is now Curves Buffer Curve Snapshot
Swap Buffer command is now Curves Swap Buffer Curve Snapshot
Interactive Update command is now View Interactive Update
Navigate menu contains all navigation commands that were in the Edit menu.
Auto Frame Curves command is now View Frame Auto Frame
Frame All Curves command is now named Frame All
Frame Selection command is now named Frame Selection
Frame Timeline command is now named Frame Playback Range
Frame Selected Keys command is now named Frame Selected Keys
Frame Selected Curves command is now named Frame Selected Curves
Frame Region command is now named Frame Region
Resample command is now named Resample Curve
Fit command is now named Simplify Curve
Make Rotations Continuous command is now named Euler Filter
Relative Cycle command is now Curves Pre/Post Extrapolation Cycle with Offset
Gradient Extrapolation command is now Curves Pre/Post Extrapolation Linear
Cycle, Curves Freeze Cycle, and Curves Constant commands are now in the Curves Pre/Post Extrapolation menu.
The new Disable Auto Switch option in the Animation Editor Preferences prevents the animation editor from automatically switching to the expression, scripted operator, or fcurve editor based on the type of animation that's on the selected element.
You can now drag and rectangle-select multiple clips using the default Select tool (press the space bar). Previously, you could do this only with the Rectangle Select tool. See Working with Clips
You can now change the order of the tracks by dragging and dropping them where you want - see Working with Tracks.
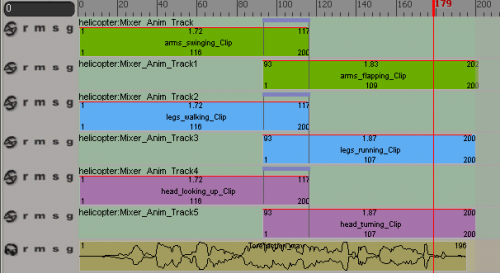
You can now drag multiple .preset, .xsi, or .eani action files at once from a file browser and drop them onto animation tracks in the mixer. The clips are created in the order that you selected the files, and follow each other consecutively on the track:
To load .preset action files, see Loading Action Source Presets.
To load or .xsi or .eani action files, see Importing Action Sources Files.
You can now change the color of any type of clip in the mixer - see Working with Clips.