There are two kinds of fcurves that are used with parameters. Both of these types are represented in the SDK by the FCurve or FCurve class (see FCurve.DependsOnFrameRate or FCurve::GetDependsOnFrameRate):
animation fcurves: fcurves that drive a parameter over time (where the x-axis represents the scene time—for example, an fcurve source that drives an object's position in X, created by setting animation keys on the posx parameter.
profile fcurves: fcurves where the meaning of the x-axis is more arbitrary (it depends on the context)—for example, an fcurve parameter added to a custom property set.
Creating and Accessing Profile FCurves
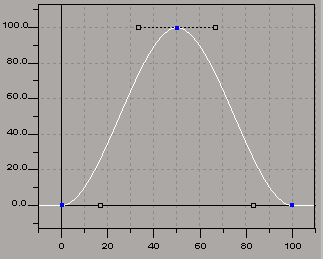
Profile fcurves only populate parameters of a specific type: FCurve parameters. These are generally only found on custom property sets and can be added with CustomProperty.AddFCurveParameter or CustomProperty::AddFCurveParameter. This adds a simple instance of an fcurve with three keys, creating a bell curve:
	// Create a custom property with a profile curve
	var oCPSet, oFCurve, oFCParam, oFCKeys;
	oCPSet = ActiveSceneRoot.AddProperty(
			"CustomProperty", false, "NewPSet" );
	oFCParam = oCPSet.AddFCurveParameter("TestFCurve");

	// The Value of the Parameter is an FCurve object
	oFCurve = oFCParam.Value;
	LogMessage(
		"FCurve has " + oFCurve.GetNumKeys() + " keys."
	);

	// Print the value of each key
	oFCKeys = oFCurve.Keys;
	for (var i=0; i<oFCKeys.Count; i++) {
		LogMessage(
			"Key " + i + " = " + oFCKeys(i).Value
		);
	}

	//INFO : "FCurve has 3 keys."
	//INFO : "Key 0 = 0"
	//INFO : "Key 1 = 100"
	//INFO : "Key 2 = 0"
Once you have a pointer to the fcurve, you can then manipulate it using the object model. For example, you could inverse the curve:
	// Inverse the curve by using an array of key,value
	// pairs with the FCurve.SetKeys method
	oFCurve.SetKeys( new Array(0,100, 1,0, 2,100) );

	/*
		You could also set each key value individually:

			oFCKeys(0).Value = 100;
			oFCKeys(1).Value = 0;
			oFCKeys(2).Value = 100;

		Alternatively, you could remove all the keys
			and then add each key manually:

			oFCurve.RemoveKeys();
			oFCurve.AddKey( 0, 100 );
			oFCurve.AddKey( 50, 0 );
			oFCurve.AddKey( 100, 100 );
	*/

	// Print the value of each key
	oFCKeys = oFCurve.Keys;
	for (var i=0; i<oFCKeys.Count; i++) {
		LogMessage( "Key " + i + " = " + oFCKeys(i).Value );
	}

	//INFO : "FCurve has 3 keys."
	//INFO : "Key 0 = 100"
	//INFO : "Key 1 = 0"
	//INFO : "Key 2 = 100"
Creating and Accessing Animation FCurves
Animation fcurves drive the values of animatable parameters by determining the parameter value at each frame. Since these values are dictated by the fcurve, that fcurve is said to be the source of that parameter's value. This is the key difference between profile and animation fcurves, in that the profile fcurve is the parameter value (as an instance of an fcurve), whereas the animation fcurve is the source that drives the numeric parameter value (as a double, float, etc.).
What you get by using the Parameter.Value or Parameter::GetValue property on an animated parameter is the numeric value for that parameter at the given frame. To get the fcurve that is driving that parameter, you need to use the Parameter.Source or Parameter::GetSource property, which returns the animation fcurve object.
The following examples demonstrate how to work with animation fcurves by showing how to create them, how to find them from your animated object, and how to manipulate them from there.
Example (part 1): SETUP—Create the object to animate and then set some keys
This part of the example sets up an animation fcurve on the position of the cube that looks something like this:
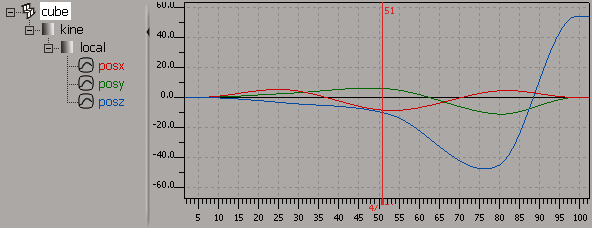
	var box = ActiveSceneRoot.AddGeometry( "Cube", "MeshSurface" );

	// Create one array for each position parameter (x,y,z)
	var keys_x = new Array(
							5,	0,
							27,	5.15951238934461,
							53,	-8.73436753361836,
							80,	4.47354844432886,
							99,	0
						)
	var keys_y = new Array(
							5,	0,
							27,	2.67822017156815,
							53,	5.56809635144552,
							80,	-11.1029681960437,
							99,	0
						)
	var keys_z = new Array(
							5,	0,
							27,	-3.76974943963522,
							53,	-11.5588639140921,
							80,	-44.9661083382855,
							99,	53.6825813319457
						)

	// Add each array as the values for the new fcurve source
	box.posx.AddFCurve2( keys_x );
	box.posy.AddFCurve2( keys_y );
	box.posz.AddFCurve2( keys_z );

	// Play the animation just to make sure it works
	FirstFrame();
	PlayForwardsFromStart();
Example (part 2): ACCESSING—Get the fcurve sources from the object using the pos parameters
	// Get the fcurve from the animated parameter using Parameter.Source
	var fcx = box.posx.Source;
	var fcy = box.posy.Source;
	var fcz = box.posz.Source;

	// Print some info about the curve
	PrintFCInfo( fcx );
	PrintFCInfo( fcy );
	PrintFCInfo( fcz );


	// --------------------------------------------------------------
	//	OUTPUT:
	//
	//INFO : "FCurve for parameter cube.kine.local.posx"
	//INFO : 	"Number of keys: 5"
	//INFO : 	"Is the fcurve being edited? ... false"
	//INFO : 		"Key[0] set at frame 5 = 0"
	//INFO : 		"Key[1] set at frame 27 = 5.15951238934461"
	//INFO : 		"Key[2] set at frame 53 = -8.73436753361836"
	//INFO : 		"Key[3] set at frame 80 = 4.47354844432886"
	//INFO : 		"Key[4] set at frame 99 = 0"
	//INFO : "-------------------------------"
	//INFO : "FCurve for parameter cube.kine.local.posy"
	//INFO : 	"Number of keys: 5"
	//INFO : 	"Is the fcurve being edited? ... false"
	//INFO : 		"Key[0] set at frame 5 = 0"
	//INFO : 		"Key[1] set at frame 27 = 2.67822017156815"
	//INFO : 		"Key[2] set at frame 53 = 5.56809635144552"
	//INFO : 		"Key[3] set at frame 80 = -11.1029681960437"
	//INFO : 		"Key[4] set at frame 99 = 0"
	//INFO : "-------------------------------"
	//INFO : "FCurve for parameter cube.kine.local.posz"
	//INFO : 	"Number of keys: 5"
	//INFO : 	"Is the fcurve being edited? ... false"
	//INFO : 		"Key[0] set at frame 5 = 0"
	//INFO : 		"Key[1] set at frame 27 = -3.76974943963522"
	//INFO : 		"Key[2] set at frame 53 = -11.5588639140921"
	//INFO : 		"Key[3] set at frame 80 = -44.9661083382855"
	//INFO : 		"Key[4] set at frame 99 = 53.6825813319457"
	//INFO : "-------------------------------"


	// --------------------------------------------------------------
	//	HELPER: This is just a convenience to print out
	//	information on the fcurve.
	//
	function PrintFCInfo( in_fc ) {
		// Make sure we have an fcurve before calling fcurve functions
		if ( ClassName(in_fc) == "FCurve" ) {
			// Print some general info about fcurve
			LogMessage( "FCurve for parameter " + in_fc.Parent );
			LogMessage( "\tNumber of keys: " + in_fc.GetNumKeys() );
			LogMessage( "\tIs the fcurve being edited? ... "
				+ in_fc.IsEditing() );

			// Print key info
			fckeys = in_fc.Keys;
			for ( var i=0; i<fckeys.Count; i++ ) {
				LogMessage( "\t\tKey[" + i + "] set at frame "
					+ fckeys(i).Time + " = " + fckeys(i).Value );
			}
		} else {
			LogMessage( "You passed me a(n) "
				+ ClassName(in_fc) + " instead of an FCurve." );
		}
		LogMessage( "-------------------------------" );
	}
Example (part 3): MANIPULATING—Remove 2 keys (1 and 3) and resample.
	// Use fcurve editing mode in case we want to undo or discard
	// any edits
	LogMessage( "Starting editing.............................." );
	fcx.BeginEdit();
		fcx.RemoveKeyAtIndex(1);
		fcx.RemoveKeyAtIndex(3);
		PrintFCInfo( fcx );
		fcx.Resample(
			fcx.GetKeyAtIndex(0), 						/* first key */
			fcx.GetKeyAtIndex(fcx.GetNumKeys() - 1), 	/* last key */
			1, 											/* 1-frame steps */
			true 										/* keep keys */
		);
	fcx.EndEdit();
	LogMessage( "Done editing.................................." );

	// Print info about modified fcurve again:
	PrintFCInfo( fcx );


	// --------------------------------------------------------------
	//	OUTPUT:
	//
	//INFO : "Starting editing.............................."
	//INFO : "FCurve for parameter cube.kine.local.posx"
	//INFO : 	"Number of keys: 3"
	//INFO : 	"Is the fcurve being edited? ... true"
	//INFO : 		"Key[0] set at frame 5 = 0"
	//INFO : 		"Key[1] set at frame 53 = -8.73436753361836"
	//INFO : 		"Key[2] set at frame 80 = 4.47354844432886"
	//INFO : "-------------------------------"
	//INFO : "Done editing.................................."
	//INFO : "FCurve for parameter cube.kine.local.posx"
	//INFO : 	"Number of keys: 9"
	//INFO : 	"Is the fcurve being edited? ... false"
	//INFO : 		"Key[0] set at frame 0 = 0"
	//INFO : 		"Key[1] set at frame 1 = 0"
	//INFO : 		"Key[2] set at frame 2 = 0"
	//INFO : 		"Key[3] set at frame 3 = 0"
	//INFO : 		"Key[4] set at frame 4 = 0"
	//INFO : 		"Key[5] set at frame 4.47354844432886 = 0"
	//INFO : 		"Key[6] set at frame 5 = 0"
	//INFO : 		"Key[7] set at frame 53 = -8.73436753361836"
	//INFO : 		"Key[8] set at frame 80 = 4.47354844432886"
	//INFO : "-------------------------------"
Duplicating FCurve animation from one object to another is a two-step process: copying from the source object or parameter to the clipboard (using the CopyAnimation or CopyAllAnimation2 commands) and then pasting the contents of the clipboard to the target object or parameter (using the PasteAnimation or PasteAllAnimation commands).
The difference between these sets of commands is that the CopyAnimation/PasteAnimation pair uses marked parameters, so the source and target is tightly controlled, whereas the CopyAllAnimation2/PasteAllAnimation2 pair can take an object as input in which case all animation matching the specified source type (fcurve, expression, etc.) is copied over.
Python Example: Copying FCurves from One Object to Another
This example demonstrates how to copy the scaling animation with the CopyAnimation command and then paste it onto another object with the PasteAnimation command.
You can also use the CopyAllAnimation2 and PasteAllAnimation command combination which is a quick way to transfer all animation under one object to another. To use it in this example, you could replace the bolded lines with these:
app.CopyAllAnimation2( disc1, c.siAnySource, c.siScl )app.PasteAllAnimation( disc2, 1 )
from win32com.client import constants as c
app = Application
app.NewScene( "", 0 )

# Create a disc and animate its scaling in X
disc1 = app.CreatePrim( "Disc", "MeshSurface" )
akeys = [ 2, 1.4, 47, 2, 84, 0.15 ]
disc1.sclx.AddFCurve2( akeys )

# Create another disc onto which we will paste this animation
disc2 = app.CreatePrim( "Disc", "MeshSurface" )

# Copy the animation from disc1 to disc2 (scaling parameters only)
app.CopyAnimation( disc1.sclx, 1, 0 )app.PasteAnimation( disc2.sclx, 1 )

# Now delete disc1 just to prove that the animation you see is
# really on disc2, then start the playback
app.DeleteObj( disc1 )
app.PlayForwardsFromStart()

# You will see that the disc still scales up and down, even though the
# original disc has been deleted.


