


The Custom ICENode Wizard is used to generate a fully functioning custom ICENode plug-in code, including:
The implementation of the evaluation algorithm is left to the ICENode developer.
You can get your Custom ICENode to appear in the Preset Manager with a special icon (thumbnail). See Customizing Icons for Custom ICENodes for more information.
To create a custom ICENode using the SDK ICENode Wizard
Click File Plug-ins to open the Plug-in Manager. (In the Tools Development Environment layout, you can click the Plug-ins tab to switch to the
Plug-in Manager view)
Plug-ins to open the Plug-in Manager. (In the Tools Development Environment layout, you can click the Plug-ins tab to switch to the
Plug-in Manager view)
To create the ICENode in the User location, click FileNewICENode.
To create the ICENode in a different location (such as a workgroup or an Add-on directory), expand the location in the Plug-in
Tree, right-click the Plugins folder and click NewICENode.
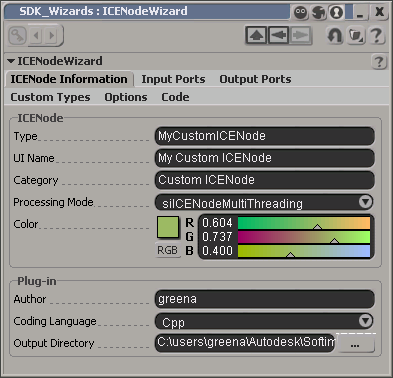
In the Type box, type a name for the node.
The first character in an ICENode name should be a letter. Subsequent characters can be letters, numbers, or underscore (_) characters.
The wizard automatically replaces spaces with underscores but leaves the spaces in the UI Name box.
If you want to use a different display name in the UI for your custom ICENode, type the display name in the the UI Name box.
By default, the UI name is the same as your ICENode name (type) but with spaces instead of underscores.
Type a category of your ICENode in the Category textbox. The category is used to classify and list the new ICENode in the Softimage UI. For example, if you type Debugging, your ICENode will appear with the native Log Values node in the ICE Tree preset manager.
Select the processing mode to use from the Processing Mode drop-down list. By default, the siICENodeMultiThreading (regular) mode is specified, but you can change this to siICENodeSingleThreading if you want to enable support for single-thread processing or to siICENodeMultiEvaluationPhase if you want to use multiple evaluation phases.
You can use the Color slider to set the background color you want to appear in the UI for your new custom node.
You can optionally change the Output Directory where the new plug-in will be generated.
Click the InputPorts tab. Here you can specify the input port definitions.
Click the OutputPorts tab. Here you can specify the output port definitions.
Click the Custom Types tab. Here you can set up new custom data types to use when specifying node port connections.
Click the Options tab. Here you can set some options for how the data will be evaluated.
Click the Code tab. Here you can add optional callbacks or debug features.