This walkthrough shows an easy workflow for working with add-ons and .xsiaddon files. In this walkthrough, we'll build a tool named MyTool and distribute it as an .xsiaddon file. The actual content of MyTool is not what is important; what's important is the workflow.
You can build add-ons in the User location, but the recommended location is a workgroup. As you will see, it is easier to test an .xsiaddon if the original add-on files are located on a workgroup.
Workgroups are often shared by many users, but for tool development, it's better to work in a private workgroup, which can be either on the local machine or a network share.
In the Softimage main menubar, choose View LayoutsTool Development Environment.
The Tool Development Environment is a layout that combines many of the most-used Softimage development tools, such as the Plug-in Manager, script editors, the SDK Explorer, and NetView.
In the Plug-in Manager, click the Workgroup tab, and then choose FileCreate.

In the Create Workgroup dialog box:
Click OK to create the workgroup. Softimage automatically connects to the workgroup, and the workgroup appears in the plug-in tree.
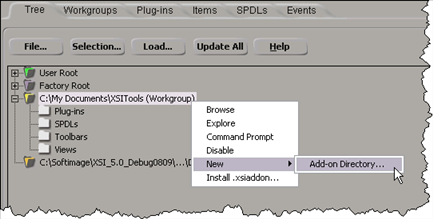
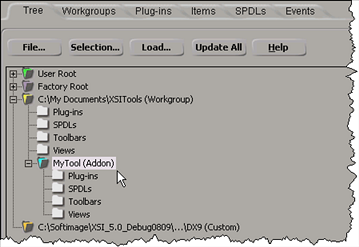
If you intend to distribute a tool, we recommend you create an Add-on directory in your workgroup. This separates your files from any other content in the workgroup, and makes it easy to package the .xsiaddon file.
Softimage includes a convenient workflow for establishing Help files and contact information for the Add-on. By using a standard naming scheme for the help files Softimage is able to offer context-sensitive help for custom tools just as it does for internal features.
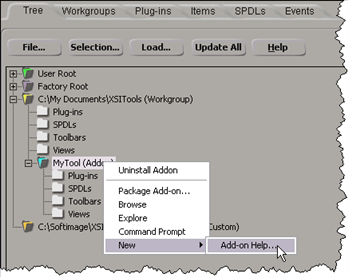
In the Plug-in Tree, right-click the MyTool add-on and choose NewAdd-on Help.
If you want to see examples of add-on help pages, click the Help tab and then click Show Me.
In the Description box, type some a brief description of the add-on.
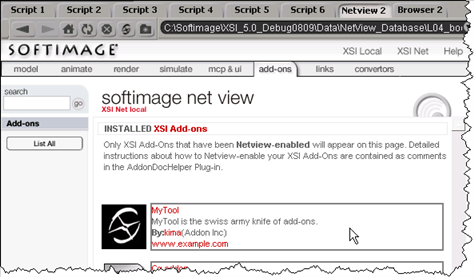
This short description is displayed on the add-ons page of XSI Local, and is inserted into the add-on help page (an HTML file).
Use the default image and template.
Image is a 56x56 JPG file that is used as an icon for the add-on.
Template is a simple HTML page. The wizard replaces the tokens %DESCRIPTION% and %ADDONIMAGE% with the description and image specified in the wizard.
Click OK to generate the help page. The wizard will open the html file in a text editor, allowing you to add more details to the description of your add-on.
The wizard does not modify the plug-in source code. The add-on help is not specified by setting the Help property of the plug-in or plug-in items.
Instead, the wizard generates four files in the Add-on directory:
Softimage looks for these files and, if they exist, uses them as the add-on help. See Documenting Add-ons.
To view the help, do one of the following:
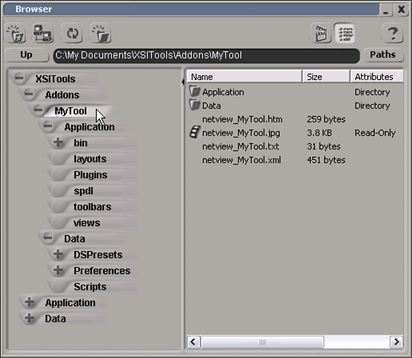
The generated help files do not appear in the plug-in tree, but you can easily access them by choosing Browse from the Add-on context menu:
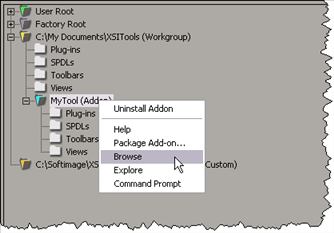
The browser shows the folders and files associated with the MyTool addon, which so far consists only of the documentation files.
An add-on can contain any number of self-installing plug-ins, shaders, toolbars, scripts, images, and other content. Basically, any Softimage customization or auxiliary file can be included in an add-on (the SDK example workgroup provide some good examples of possible add-ons).
Generating content with wizards
Softimage includes wizards for generating self-installing plug-ins such as shaders, commands, operators, properties, and events.
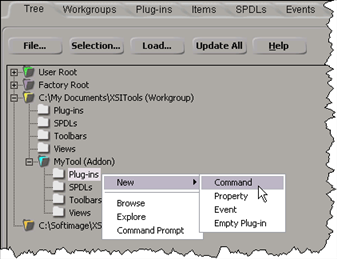
For example, to generate a self-installing command in an Add-on directory, right-click the Plugins folder in the add-on and
choose NewCommand.
Softimage also includes a wizard for creating toolbars. You can run this wizard by right-clicking Toolbars (for the Toolbar Wizard).
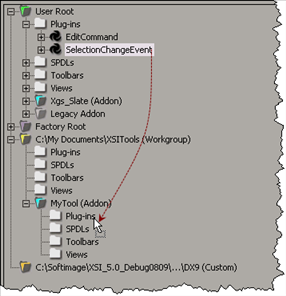
Using the plug-in tree, you can drag plug-ins, toolbars, and views from another location to your add-on.
You can also move files into the Add-on directory using Windows Explorer, a command prompt, or any other external file manager. The Plug-in Tree does not support every possible type of Add-on content, so for files like layouts, keymaps, and documentation, you need to move files through the file system.
When you add files to an addon, you must put the files in the correct folders. Softimage finds files by looking in specific sub-folders of an Add-on location. For example, toolbar (.xsitb) files must be put in the Application\Toolbars folder, so in this case, toolbars must be put in C:\XSITools\Addons\Foo\Application\Toolbars.
When you're ready to distribute your add-on, you have two choices:
If the add-on is for internal usage within your company, you can distribute the add-on by copying it to a shared workgroup location on the network. You can do this using an external file manager such as Windows Explorer.
If the add-on is to be distributed to external users, who do not have access to the same network, then you use an .xsiaddon file.
An .xsiaddon file is single file that contains a compressed version of all the files of an Add-on location.
Previous versions of Softimage had a Package Add-on dialog box that required you to add files one at a time. This dialog is still available, but now there is an easier-to-use Package Location option.
Before you package an add-on, make sure the add-on directory contains only the files and folders you want to distribute:
Note that you can exclude directories when you create the add-on package. For example, if you keep any C++ source code in a separate folder, you can just exclude the folder from the package.
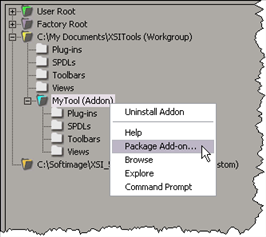
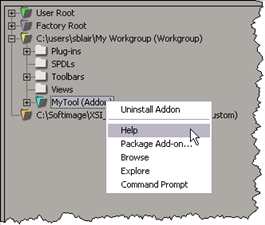
In the Plug-in Tree, right-click the MyTool add-on and choose Package Add-on.
In the Package Location Options dialog box, set the packaging options:
Source is the location of the Add-on directory. The .xsiaddon file will contain everything under the source folder.
Destination is where the .xsiaddon file will be created. You may want to add a version number to the file name, since .xsiaddon files do not support versioning.
Directories to Exclude is a semi-colon (;) separated list of folders that you do not want to include in the .xsiaddon file.
Author and Description are optional. Information entered here is saved in netview_MyTool.xml, and reused each time you repackage the add-on. The information is also displayed on the add-ons page of XSI Local.
Click OK to generate the .xsiaddon file. If the file contains .dlls or other large content it may take a few minutes to generate the output file.
The .xsiaddon file is an xml file, so it is possible to view its contents and even make minor modifications, such as filling in the Usage or Platform information.
To test the .xsiaddon, you could move it to a different computer or ask someone to try it, but you can also do it on your own computer.
Remove the original MyTool from memory, to avoid conflict errors and other confusion. Because the add-on is in a workgroup, all you have to do is unload (disable) the workgroup.
On the Workgroups tab, clear the check box beside the XSITool workgroup.
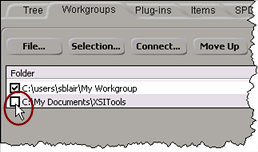
This unloads the self-installing plug-ins and other content of the Add-on. Note that some less-common workgroup files, such as keymaps and layouts, are not unloaded until Softimage is restarted.
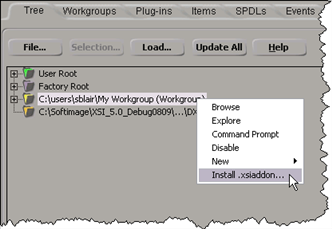
Install the MyTool add-on in the User location or in another workgroup location. Right-click the location and choose Install .xsiaddon.
In the Select Add-on File dialog box, locate the MyTool.xsiaddon file (it is in C:\My Documents\XSITools\Addons) and select it.
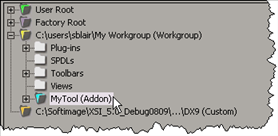
The add-on appears in the plug-in tree under the location where you installed the add-on.
Now you can test the add-on. For example, make sure that all commands, toolbars, and other content work properly.
You should also check that your help works.
In NetView, click XSI Local and then click add-ons, and verify that your add-on is listed:
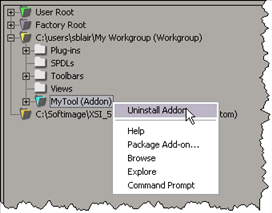
When you finish testing, uninstall the MyTool add-on and reconnect to your original workgroup.
Any time that you modify or update a tool (for example, by adding new content or new features, or by fixing a bug) you need to repackage the .xsiaddon so you can redistribute it to your users.
To repackage an add-on, just package it again, but perhaps with a different file name. Repackaging takes just a few mouse clicks, because all the information you entered when you first packaged the add-on is automatically filled in when you repackage.