In 3D views, a set of navigation controls and shortcut keys lets you change the way in which you view your scene. You can use these controls and keys to zoom in to and out of a scene, frame objects within a viewport, and orbit, track, and dolly the scene among other things.
Most navigation tools have a corresponding shortcut key so you can quickly activate them from the keyboard. However, some tools are only available from a viewport's camera icon menu. In either case, activating a navigation tool makes it the current tool for all 3D views, including object views which do not have an equivalent to the camera icon menu.

The following sections discuss the available navigation tools, listing keyboard shortcut where applicable.
Framing commands let you instantly zoom in to or out from selected objects in 3D geometry views. You can frame objects in two ways: framing selected objects or framing all objects in one or all 3D views.
You can zoom into and out of your scene or pan in all 3D views using the zoom controls.
In perspective camera views, zooming changes the Field of View Angle of the camera.
In perspective user views, zooming changes the Distance to the Center of Interest.
Choose Pan & Zoom Tool from any viewport's camera icon menu, or press the Z key to activate the zoom tool. Then, in any 3D view, do any of the following:
By default, Softimage zooms into or out from the center of the view.
You can also zoom into or out from wherever the mouse pointer is located by activating the Zoom on Cursor feature: choose
File  Preferences from the main menu to open the Preferences window, click the Tools Camera icon in the explorer pane to open the Camera property editor, and activate the Pan/Zoom Zoom On Cursor option.
There is an alternative tool that allows you to zoom in or out by dragging the mouse right or left. Some users may prefer this style of interaction.
By default, you can zoom using the mouse wheel. Scroll forward to zoom in and backward to zoom out. Press Ctrl to zoom quickly, Shift to zoom slowly, and Ctrl+Shift to zoom even more slowly.
However, you cannot use the mouse wheel in other tools, for example, to set the radius for the brush or proportional modification; instead, press R and drag the mouse to modify the radius.
If desired, you can disable the mouse wheel zoom or restrict it to the Navigation tool so that you can use the mouse wheel with other tools. See Mouse Wheel in Camera Preferences [Preference Reference].
Orbiting rotates a camera, spotlight, or user viewpoint around its point of interest. This lets you study your scene's overall "look" in any angle in any view. Orbiting is sometimes called tumbling or arc rotation.
You can set the orbit tool to orbit around selected objects or components, rather than around the normal camera interest.
From the main menu, choose File Preferences to open the Preferences window. Then click the Tools Camera item in the explorer pane to open the Camera property editor.
From the Nav section, set the Orbit Around Selection option to one of the following:
Off — the orbit tool will always orbit around the camera's point of interest.
On — if you are in object selection mode, the orbit tool orbits the camera around the selected object, rather than the normal camera interest. If you are in component selection mode, using the orbit tool orbits the camera about the selected components.
Components Only — if you are in object selection mode, the orbit tool orbits the camera around the normal camera interest. If you are in component selection mode, using the orbit tool orbits the camera about the selected components.
Pivoting is like orbiting in reverse; the point of interest rotates around its camera, spotlight, or user viewpoint. This is convenient when you want to precisely adjust the interest's position.
In perspective camera and spotlight views, dollying moves the position forward or backward without changing the Field of View or Cone Angle, unlike zooming which changes the angle without changing the position. For viewpoints and user views, dollying is the same as zooming.
Rolling rotates the camera along the viewing axis (Z). It is possible in only perspective views.
Note that you cannot keyframe camera roll from a 3D view. Instead, you have to do it from the camera's constraints property editor. For more information about keying camera roll, see Animating a Camera Roll [Cameras and Motion Blur].
Centering is similar to framing, but without any zooming or dollying. The camera is tracked horizontally and vertically so that the selected elements are at the center of the viewport.
The walk and fly tools are first-person walkthrough camera tools that combine mouse movement with a custom key map to help you navigate precisely in perspective views. When you use the walk or fly tool, the mouse pivots the camera, while the custom key map controls camera movement while a mouse button is held down. The key commands are:
You must first hold down a mouse button for any of the key commands to work.
From the main menu, choose File Preferences to open the Preferences window. Then click the Tools Camera icon in the explorer pane to open the Camera property editor.
Set the following Walk/Fly options:
Look Speed (units/sec) sets the speed at which the Walk/Fly tool "looks" when you move the mouse.
Forward/Sideways (units/sec) sets the speed at which the Walk/Fly tool moves forwards and backwards (W and S keys), or left and right (A and D keys).
Slow/Fast Multiplier specifies the factor by which speed is adjusted when you use fast (right mouse button) and slow (left mouse button) interaction.
The drive tool is a first-person walkthrough camera tool that is similar to the walk and fly tools, but has more versatile mouse controls and additional visual feedback.
When the drive tool is active, left-clicking or middle-clicking anywhere in the view displays a guide icon, which delineates the different movement zones. Dragging the mouse into any of those zones moves the camera in the corresponding direction and changes the mouse pointer to indicate the type and direction of the movement. As you move the mouse further from the center, the movement speed increases and the guide icon fades to transparency.
The type of movement depends on which mouse button you press: the left-mouse button is for turning movements and the middle-mouse button is for sliding movements, as shown below:
| Left Mouse Button (Turn Mode) |
||
|---|---|---|
| Forward + Turn Left |
Slide Forward |
Forward + Turn Right |
| Rotate Left |

|
Rotate Right |
| Reverse + Turn Left |
Slide Back |
Reverse + Turn Right |
| Middle Mouse Button (Slide Mode) |
||
|---|---|---|
| Forward + Slide Left |
Slide Forward |
Forward + Slide Right |
| Slide Left |

|
Slide Right |
| Reverse + Slide Left |
Slide Back |
Reverse + Slide Right |
In addition to the mouse commands, you can use a custom keymap to move the camera. The key commands are:
The right-mouse button pivots the camera but does not display the guide icon or activate the custom keymap.
From the main menu, choose File Preferences to open the Preferences window. Then click the Tools Camera icon in the explorer pane to open the Camera property editor.
Set the following Drive options:
Turn (deg/sec) sets the speed at which the Drive tool "turns" when you use the mouse to turn or rotate.
Up/Down (units/sec) sets the speed at which the Drive tool moves up and down (E and Q keys).
Show Guide specifies whether the Drive tool guide is displayed in the viewports when the tool is activated.
The Navigation tool combines a number of different viewport navigation tools into one.
To activate the navigation tool
You can set the navigation tool to use the same mouse button behavior as in Maya.
To set Maya mouse mapping for the navigation tool
From the main menu, choose File Preferences to open the Preferences window. Then click the Tools Camera item in the explorer pane to open the Camera property editor.
When the Maya mapping is set, the mouse controls change to the following:
Press Shift and click as follows:
Press Ctrl and click as follows:
You can reset the camera and other 3D views so that their global point of origin (X = 0, Y = 0, Z = 0) is in the center of the 3D view.
The ViewCube is a tool that provides consistent navigation across many Autodesk 3D applications. When enabled, it appears in the view that is under the mouse pointer.
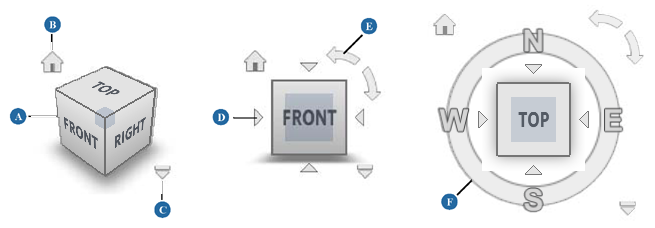
| A |
Click on a face, edge, or corner to view from the corresponding angle. Depending on your preferences, the selected elements (or all visible objects if if nothing is selected) are framed. Drag anywhere on the cube to orbit freely. Depending on your preferences, the viewpoint will snap to a face, edge, or corner viewing angle (solid lines instead of dashed lines) when it is dragged to a nearby viewing angle. |
| B |
Return to the home viewing angle. Each camera has a different home. |
| C |
Click for a menu:
|
| D |
When looking at a face, click a triangle to move to an adjacent viewing angle. |
| E |
When looking at a face, click a curved arrow to roll +/– 90 degrees. |
| F |
You can activate the compass in your preferences and then: |
By default, navigating the camera while autokeying does not set keys on the camera parameters. This is because the camera is typically not selected and the corresponding parameters are not marked during navigation. However, you can set up specific cameras and spotlights so that their parameters do get keyed automatically during navigation.
The camera navigation parameters that get autokeyed are:
The Field of View - Angle (zoom factor) or Ortho Height, depending on whether the camera has a perspective or orthogonal projection.
If the camera has a direction constraint, then the interest's position.
If the direction constraint's up vector is active, then the roll value.
Autokeying the camera parameters does not work when using the ViewCube to navigate.
Set a viewport to look through the desired camera or spotlight.
Open the camera or spotlight's properties, for example, by choosing Properties from the camera icon menu.

Key Marked Parameters, Key All Keyable, and Key Marked Keyable all work well when autokeying camera navigation. Note that you do not actually need to mark the relevant parameters.
Key Character Key Set typically does not work when autokeying camera navigation (unless, of course, you create a character key set for the camera parameters).
For more about the different keying methods, see Methods of Keying [Animation].

For more about autokeying in general, see Setting Keys Automatically [Animation].
Navigate the camera, then change frames, and repeat.
You can also play back the scene while navigating interactively using tools like Walk, Drive, and Fly.
Notes on Autokeying Camera Navigation
Here are some things to be aware of when autokeying camera navigation:
Autokeying navigation works only for scene cameras and spot lights, not for viewpoints like the Top, Front, Right, User, and Object views.
Camera commands like Reset (R), Frame All (A, Shift+A), Frame Selection (F, Shift+F), and Center Selection (Alt+C) do not set keys.
Undoing camera navigation using Alt+Z does not remove the keys that were set automatically. To remove the keys, press Ctrl+Z instead of or in addition to Alt+Z.
If a camera is free, that is, if it has no direction constraint to a camera interest object, then autokeyed rotations are continuous, that is, they can span more than 180 degrees between frames. For more information about continuous rotations, see Making Rotations Continuous [Animation].


