If you wish to isolate specific data for particular objects in your scene, you can create a custom render channel to extract it.
Unlike the built-in or preset channels, custom render channels do not automatically apply to every object rendered by the pass. Custom channels require Store In Channel shaders used in the render tree to extract and store data from specific object materials. This data is output when the channel is rendered with its pass.
You can also use Store In Channel shaders to store additional data with the preset render channels.
Creating a Custom Render Channel for the Scene
All render channels are available from the scene render options. You create your custom channels for the scene, and then you add and enable them for your pass.
You can create a custom render channel directly in the scene render options (as described in the procedure below), or you can add the custom render channel for the scene later, using one of the Store In Channel shaders while you are building your render tree (see Storing Data in a Custom Render Channel).
Open the Scene Render Options Property Editor:
The Render Manager > Scene Render Options
Choose Render > Render > Scene Options from the Render toolbar.
On the Available Channels tab, click the Add... button below the Available Render Channels grid.
In the Create Render Channel Dialog Box, enter a name for your new render channel.
Select the type of data that the channel will store: mental ray supports color, grayscale, depth, normal vector, vectors/motion vectors, and object label data types.
Adding a Custom Render Channel for the Pass
Adding a custom render channel is done the same way for all render channel types, as described in Adding a Render Channel for the Pass.
Once the render channel is added to the pass, you can specify your output format and file name for the render channel, as described in Defining a Framebuffer for the Render Channel.
Storing Data in a Custom Render Channel
Custom render channels do not automatically apply to every object rendered by the pass. To store data in your custom channel for rendering, you must connect a Store In Channel shader in the render tree of an object's material node.
The Store In Channel shader intercepts data from its connection input point in the render tree and pipes the data out to be rendered by the specified render channel.
Select the object whose material attributes you want to store in a render channel. If the material is shared by other objects in your scene, then data for all objects sharing that material will be stored and rendered.
Open the render tree or the material manager. The material manager is the tool that provides the easiest way to work with materials, image clips, shaders, and render trees all at the same time.
As you attach networks of shaders to your objects, you will probably want to use some tool shaders to help you get the exact data you need piped into the Store In Channel shader. Generally speaking, utility shaders allow you to manipulate a shader's output before it is connected to another shader's input. For more information, see Methods for Applying Shaders [Materials and Shaders].
Identify where in the render tree you want to place the Store In Channel shader.
Keep in mind that data flows "downstream" from left to right along connections from one node's output ports to the next node's input ports in the render tree.
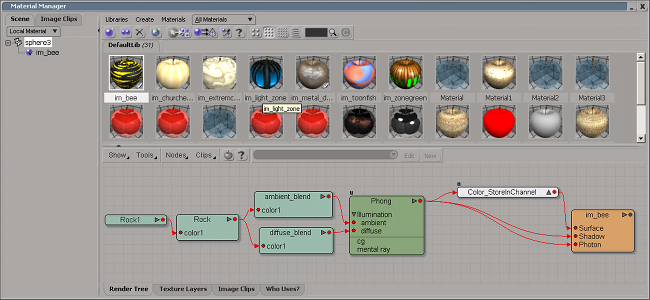
The further downstream that you connect the Store In Channel shader in a render tree, the more data gets stored and rendered in the channel. For example, if the Store In Channel shader is connected directly to the material node's Surface port, the shader will intercept data for the entire tree. If you are outputting a color render channel, this will completely isolate or "cutout" the object that uses that material.
Right-click the input port of the node to which you want to connect the Store In Channel shader.
Choose Insert  Store In Channel from the context menu. This will automatically insert a Store In Channel shader of the appropriate data type.
If a shader is already connected to the parameter, the Store In Channel shader is inserted between the input parameter and the previously connected shader.
For details on how to connect nodes in the render tree in this way, see Assigning Texture Projections to Nodes.
In the property editor of the Store In Channel shader, select a render channel from the Render Channel drop-down that will be used to render out the data.
If you have not created a custom render channel yet, then click the Add button and enter a name for the render channel. The render channel is automatically added to the scene's Available Channels grid using the appropriate data type for the output.
Add the channel to the pass and set the pass options to render the output. See Adding a Render Channel for the Pass.


