mental ray provides built-in render channels for outputting depth, motion vectors, normal vectors, labels, and pixel coverage data. Each channel has a specific data type. By default a Main render channel is declared for every pass (you can think of it as the "beauty" channel rendered for each pass) and it has a color data type.
Preset render channels allow you to isolate scene attributes that are commonly rendered in separate passes. Essentially, all you need is your default pass and you can quickly output the preset diffuse, specular, reflection, refraction, and irradiance render channels.
Built-in and preset render channels extract specific data for all objects that are rendered in a pass. If you wish to isolate data for particular objects in your scene, see Working With Custom Channels.
All render channels are available from the Available Channels grid in the Scene Render Options Property Editor, but to get output, you must add and enable the render channels for your pass.
Adding a Render Channel for the Pass
You must select and edit the pass for which you want to add render channels.
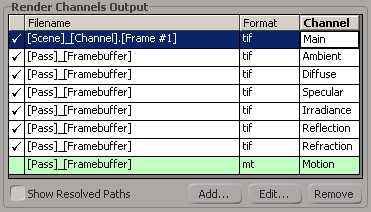
In the Render Pass Property Editor on the Output tab, click the Add... button below the Render Channels Output (Framebuffers) grid.
In the Create Framebuffer From Render Channel Dialog Box, select a built-in or preset render channel listed in the Render Channel drop-down and click OK.
In the render channels output grid, activate the channels you want to output for your pass by clicking the first cell in each row to display a checkmark. If there is no checkmark in the cell, the render channel will not be output with the pass (the only exception is the Main channel which always renders for every pass).
Defining a Framebuffer for the Render Channel
A render channel is a named description of image data with a given data type. Its framebuffer specifies where and how the channel's image data should be written out. By default, framebuffers are created using the render channel's name as a basis for a unique name. If you create two framebuffers from the same render channel named "foo", the framebuffers will be named "foo" and "foo1", respectively.
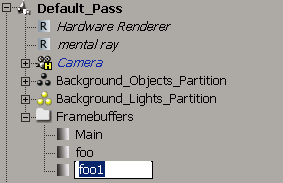
Framebuffers can be renamed (with the exception of the Main framebuffer) by opening an explorer to the Passes scope, expanding the Framebuffers folder and renaming them (select the framebuffer and press the F2 key). Render channels cannot be renamed, they can only be removed and recreated with another name.
Do the following for each render channel whose framebuffer you wish to set:
In the Render Channels Output (Framebuffers) grid, click the channel's Filename field to make the file name editable.
You can build the file name using output tokens (see Tokens and Templates), or simply type in a file name.
The output format options for a render channel (that define its framebuffer) use the Default Output Image Formats values set in your Rendering Preferences.
If you wish to override these settings for a particular render channel, select the channel in the grid and click the Edit... button.
In the Render Channel (Framebuffer) Property Editor, set the following Output Format options as needed:


