The cloth simulator uses a spring-based model for animating clothes. It uses a set of physical properties that typically define cloth and applies it to a single NURBS surface or polygon object to deform it. You can specify and control the mass of the fabric, the friction, and the degree of stiffness. This means you can create different types of behavior to simulate fabrics with different materials and various degrees of softness.
Cloth deformation is controlled by a virtual "spring net." Springs are distributed onto the cloth surface and connect the vertices of the model according to a specific rule. There are three different types of springs that make up the spring net, each controlling a different kind of deformation: shearing, stretching, and bending. For more information on these, see Controlling the Stretch with Spring Nets.

In each model, you can set clusters of points to define specific areas of a cloth to be affected by the cloth simulation or not. For example, if you wanted a character to grab a corner of a blanket, you would define the corner's points as a cluster, then activate the cluster to lock ("nail") its points so that it's not affected by the simulation.
As well, you can animate the effect of a cluster being nailed, making it easy for a cloth to be grabbed and then let go, or hang and then drop down. For more information on this, see Using Clusters for Localized Effects.
Although you can apply cloth only to single objects, you can create a garment made of multiple NURBS surface cloth patches stitched together using any number of points.
To do this, you must first assemble the different patches into a single surface mesh object. You can then use the stitching tool to create seams between different NURBS surfaces of the same surface mesh model. For more information on how to do this, see Stitching Cloth Pieces Together.
After you set up how the cloth is deformed according to its own "internal" spring-based forces, you can then affect how it's deformed using external forces like gravity and wind. See Setting Up Forces for Cloth for more information.
As well, you can have the cloth collide with external objects or with itself. The obstacles can be animated or deformed and interact with the cloth model according to the cloth's and obstacle's friction. If you change the obstacle model's geometry or animate it, the cloth simulation recalculates according to these changes. See Setting Up Cloth Collisions for more information.
The Syflex Cloth plug-in is installed seamlessly when you install Softimage. Syflex Cloth is a powerful, realistic cloth simulator that allows you to create the usual flags and tablecloths, as well as clothing and more complicated cloth setups.
Syflex Cloth (and Curve) has also been integrated into the Softimage ICE environment. A complete set of force, collision, and constraint compounds and nodes are also available so that you can set up a complete simulation - see Syflex on ICE for more information
Run the Softimage Setup program as usual — there is nothing special you need to do to install Syflex Cloth. It is installed with Softimage as a factory add-on.
The HTML documentation for Syflex Cloth is installed in the Doc\Syflex folder in your Softimage path. The main file to open is the syflex.htm file.
To access Syflex Cloth within Softimage:
Getting a Head Start with Presets
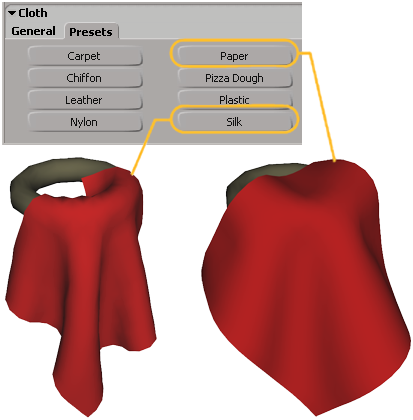
To give you a head start on creating cloth, there are a number of presets available in the Cloth property editor (as shown below). To use them, apply cloth to an object (see Creating a Cloth Simulation), click one of the buttons on the Presets page, and calculate the simulation.
Finding Cloth Elements in the Explorer
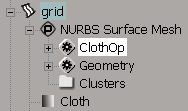
When you apply the cloth operator to an object, an operator icon (ClothOp) is added below the object's geometry in the explorer. Click this icon to open the ClothOp property editor in which you can change the cloth's simulation, mass, friction, precision, collision detection, etc.
As well, the Cloth properties are added to the object itself. Click its icon to open the Cloth property editor to change how the cloth stretches, bends, and shears. For more information on applying cloth to an object, see Creating a Cloth Simulation.
When you create clusters on the cloth object and apply the cloth cluster operator to the clusters, you'll see Cloth properties under each cluster that has this operator applied to it. Click its icon to reopen the local property editor.
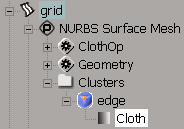
For more information on clusters and cloth objects, see Using Clusters for Localized Effects.
Previewing Cloth Simulations with Ghosting
Animation ghosting, also known as onion-skinning, lets you display a series of snapshots of animated objects at frames behind and/or ahead of the current frame. This lets you easily visualize the motion of an object, which can help you improve its timing and flow. Any type of animation can be ghosted, including objects that are simulated.
You can use ghosting to preview the cloth simulation when you change its state. If you set the ghosting to show the frames after the current frame, you can preview the result of the simulation whenever you change the object's state — without even having to run the simulation.
You can use different display modes for ghosting, such as the object's geometry, motion trails, or simple points.
For more information, see Ghosting Animated Objects [Animation].


 Toolbars