You can control from where particles are emitted by using a number of different Filter compounds, such as by weight maps, texture maps, within a volume, distance from a null or UV location on an object, by object intersections, or by particle ID.
With all Filter compounds, the particles are actually born first and then some are immediately deleted depending on the different criteria used for each compound.
Filtering Particles Based on a Weight Map
Using a weight map lets you emit particles from specific areas of the emitter object, especially when you want to emit particles using a gradient. Particles are emitted only where the weight map has values over 0.
Note that the resolution of the emitter's geometry determines how detailed the weight map will be: the higher the resolution, the greater the potential detail.
Weight maps are discussed fully in Parameter Maps.
|
|
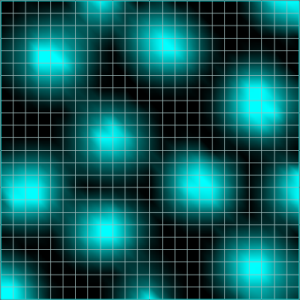
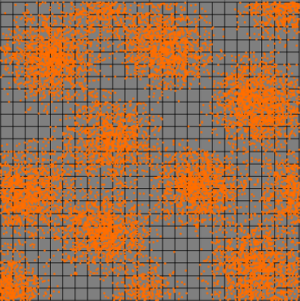
On the left, weight map with black areas at a value of 0.
On the right, particles are emitted from all areas that are not 0.
To emit particles according to a weight map
Create a particle emission — see Creating a Basic Particle Emission.
Choose the Particles  On Emission Emit from Weight Map command from the ICE toolbar.
If a weight map already exists on the emitter object, you are prompted to select it from the explorer that appears.
If there is no weight map on the emitter object, one is created for it and the Weight Map property editor opens. You can give the weight map a new name, if you like.
Weight maps are found under the emitter object's Clusters > WeightMapCls node.
Press W to activate the Paint brush tool and paint on the weight map. Press Ctrl+W to open the Brush Properties in which you can edit the paint brush tool.
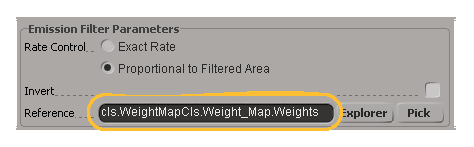
The weight map and its Weights attribute reference is automatically added to the Emission Filter Parameters in the Emit from Geometry compound, with the string in the text box looking something like this (but using your own "weight_map" name instead of Weight_Map):
Filtering Particles Based on a Texture Map
You can create a texture map on an emitter object and use it to define the particle emission using the Filter by Texture Map compound. This compound reduces the number of particles that are emitted based on the texture map luminance (brightness) values (using an image or sequence): the darker the area of the texture map, the more particles are blocked from being emitted.

|
|
On the left, texture map image with contrasting colors. The black areas have a value of 0.
On the right, particles are emitted from all areas that are not 0.
This lets you emit particles from specific areas of the emitter object, such as when you want to emit particles using a gradient or image pattern, especially an animated image sequence. And unlike with weight maps, the resolution of the geometry on which a texture map is applied is irrelevant. This means you can have more detailed particle emissions regardless of the resolution.
Texture maps consist of an image file or sequence and a set of UV coordinates. They are similar to ordinary textures, but are used to control parameters instead of surface colors. To create a texture map, you select a texture projection method and then link an image file to it, all in the texture map property.
For more information on texture maps, see Texture Maps.
To filter the particle emission using a texture map
Select an object that will be the particle emitter and choose Get Property Texture Map from any toolbar. A texture map is applied and its property editor opens.
Select the texture projection method according to the emitter object's geometry and then select an image or sequence to link to it. The texture projection maps the colors of the image to the geometry.
Create a particle emission — see Setting Up Any Type of ICE Particle Emission.
Open the ICE tree and click the Task > Particles tab in the preset manager on the left side.
Select the Filter by Texture Map compound from the Emission Control group, and drag it into the graph area.
Plug this compound's Execute on Emit output into an Execute on Emit port of the Emit compound or into a port on the ICETree node. If you do the latter, the emission is updated at each frame.

In the Filter by Texture Map compound's property editor, use the Explorer button to select the texture map on the emitter that you want to use.
You can also select the Invert option to use the inverse texture map values so that particles are emitted only where the texture map values are 0.
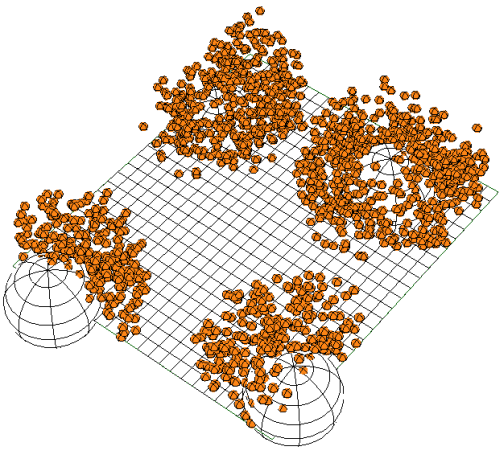
Filtering Particles Based on Object Intersections
The Filter by Object Intersection compound reduces (filters out) the number of particles based on the emitter intersecting with another object. Particles are emitted only within that intersection area.
For best results, make sure that the intersecting objects are surface objects, such as polygon meshes or NURB surfaces.
Create a particle emission — see Setting Up Any Type of ICE Particle Emission.
Click the Task > Particles tab in the preset manager on the left side of the ICE Tree.
Select the Filter by Object Intersection compound from the Emission Control group, and drag it into the graph area.
Plug this compound's Execute on Emit output into an Execute on Emit port of the Emit compound or into a port on the ICETree node. If you do the latter, the emission is updated at each frame.
Select one or more objects and drag their names from an explorer into the ICE Tree graph to create a node for it. These are the objects that will intersect the emitter in order to emit particles.
Plug each object's Value output into the Filter Geometry port on the Filter by Object Intersection compound.
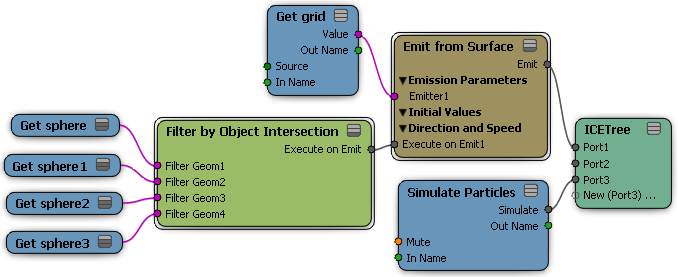
In the Filter by Object Intersection compound's property editor, you can set the Distance Threshold, which is the maximum distance (in Softimage units) around the object intersection area in which the particles are emitted.
You can also select the Invert option, which inverts the particle emission so that particles are emitted from the emitter except in the object intersection area.
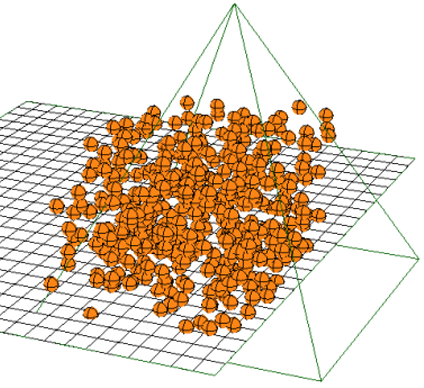
Filtering Particles Based on an Object's Volume
The Filter By Volume compound reduces (filters out) the number of particles based on whether or not they're inside an object's volume. The volume object must intersect with the emitter in order to emit particles.
Create a particle emission — see Setting Up Any Type of ICE Particle Emission.
Click the Task > Particles tab in the preset manager on the left side of the ICE Tree.
Select the Filter by Volume compound from the Emission Control group, and drag it into the graph area.
Plug this compound's Execute on Emit output into an Execute on Emit port of the Emit compound or into a port on the ICETree node. If you do the latter, the emission is updated at each frame.
Select an object with volume (such as polygon mesh or NURBS surface) and drag its name from an explorer into the ICE Tree graph to create a node for it.
This object must intersect with the emitter at the point where you want to emit particles.
Plug the object's Value output into the Volume port on the Filter by Volume compound.
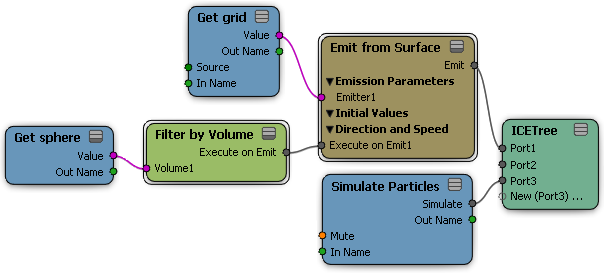
In the Filter by Volume compound's property editor, you can set the falloff profile curve and distance value to determine how the particle emission is filtered.
You can select the Invert option to invert the graph so that so that particles are emitted from the emitter except in the volume intersection area.
For more information on the parameters, see Filter by Volume [ICE Reference].
Filtering Particles Based on a Null Object
The Filter By Null compound reduces (filters out) the number of particles based on whether or not they're inside a null's icon shape. The null must intersect with the emitter in order to emit particles.
Create a particle emission — see Setting Up Any Type of ICE Particle Emission.
Click the Task > Particles tab in the preset manager on the left side of the ICE Tree.
Select the Filter by Null compound from the Emission Control group, and drag it into the graph area.
Plug this compound's Execute on Emit output into an Execute on Emit port of the Emit compound or into a port on the ICETree node. If you do the latter, the emission is updated at each frame.
Create a null and open its property editor. Select an Icon shape that has volume, such as Box, Pyramid, Arrow Rings, etc.
The null must intersect with the emitter at the point where you want to emit particles.
Select the null and drag its name from an explorer into the ICE Tree graph to create a node for it.
Plug the null's Out Name output into the Null Name port on the Filter by Null compound.
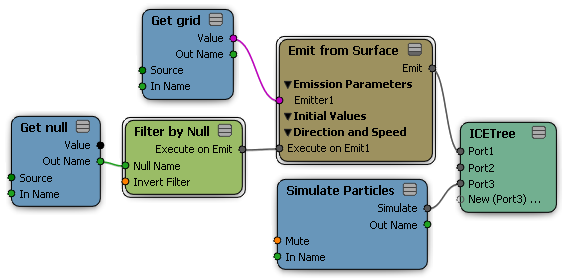
In the Filter by Null compound's property editor, you can set the falloff profile curve to determine how the particle emission is filtered over distance.
You can select the Invert Filter option to invert the graph so that so that particles are emitted from the emitter except in the null intersection area.
Filtering Particles Based on Distance to a UV Location
The Filter By Distance to UV Location compound reduces (filters out) the number of particles based on the distance of a specific UV location on a NURBS surface or curve object to the emitter. Particles are emitted only when this location on the object is within a certain distance of the particle emitter object.
Create a particle emission — see Setting Up Any Type of ICE Particle Emission.
Click the Task > Particles tab in the preset manager on the left side of the ICE Tree.
Select the Filter by Distance to UV Location compound from the Emission Control group, and drag it into the graph area.
Plug this compound's Execute on Emit output into an Execute on Emit port of the Emit compound or into a port on the ICETree node. If you do the latter, the emission is updated at each frame.
Select a NURBS surface or curves object and drag its name from an explorer into the ICE Tree graph to create a node for it.
Plug the NURBS surface or curve's Value output into the Geometry port on the Filter by Distance to UV Location compound.
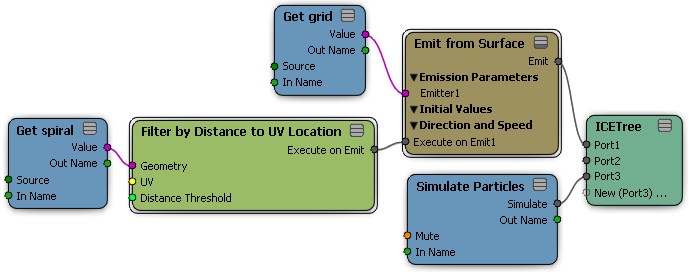
In the Filter by Distance to UV Location compound's property editor, select the UV location on the object to use and set the Distance Threshold, which is the maximum distance (in Softimage units) from this NURBS curve or surface to the particle emitter at which the particles will be emitted.
Filtering Particles Based on Their ID
When a particle is born, it has its own unique identification number (ID attribute) that stays unique throughout the simulation. This number can be used for identifying particles for different things, such as troubleshooting or scripting.
The Filter by Particle IDs compound reduces the number of particles that are emitted based on the particle's ID attribute. Particles are emitted only when their ID matches what's defined in this compound.
For more information on IDs, see Working with IDs and Indices [ICE Fundamentals].
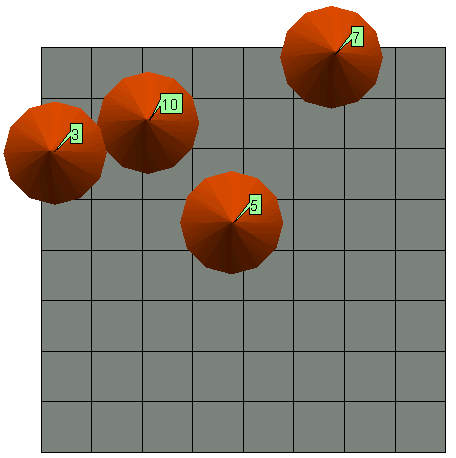
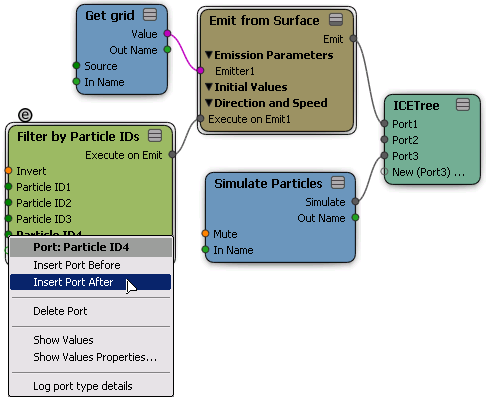
Particles are filtered so that only particles matching ID numbers of 3, 5, 7, and 10 are emitted.
Create a particle emission — see Setting Up Any Type of ICE Particle Emission.
Click the Task > Particles tab in the preset manager on the left side of the ICE Tree.
Select the Filter by Particle ID compound from the Emission Control group, and drag it into the graph area.
Plug this compound's Execute on Emit output into an Execute on Emit port of the Emit compound.
In the Filter by Particle ID compound's property editor, enter the ID value for the particles you want to filter.
You can also select the Invert option so that particles are emitted only if they don't match the Particle IDs that are defined in this compound.
To add more particle ID ports, right-click on a Particle ID port on the compound and choose Insert Port After. You can do this for as many Particle ID ports as you need.