Raster painting is the process of painting directly on an image. It is a destructive process, meaning that each time you create a brush stroke, you're directly altering the image's pixels. Once you've painted on the image, the stroke or shape cannot be moved or altered (unless, of course you paint over it), although it can be undone. In Softimage, you can paint on an image by inserting a Paint Clip operator in the FxTree, and painting on it in the Fx Viewer using various paint tools.
There are two ways to insert a raster paint clip into the FxTree. You can either select an image or sequence to add as a new paint clip, or you can insert a blank paint clip and configure it later. Raster paint clips can be RGB, RGBA, or Alpha type images, and can be 8 or 16 bit.
Once you add a raster paint clip to the FxTree, you'll notice that it has a small paint brush icon in its upper-left corner. This differentiates it both from other image operators, which you cannot paint on, and from vector paint operators, which are identified by a different icon.

To import a raster paint clip into the FxTree
Do one of the following to open a browser:
From the browser, select an image or sequence that you want to paint on and click OK. A new PaintClip operator is added to the FxTree workspace.
If necessary, double-click the operator to open its property editor and adjust its properties. For information about all of the paint clip properties, see Paint Clip [Fx Operator Reference].
To place a blank raster paint clip in the FxTree
On the Image tab of the Fx Operator selector, choose Raster Paint Clip.
Middle-click an empty area of the FxTree workspace to insert the PaintClip operator.
Enter file name and path for the operator's source image or sequence.
Once you specify a source image or sequence for the operator, its other properties are updated based on the source image's properties.
If you wish to leave the paint clip blank, and paint from scratch, this should be the name and path that the new image will be saved under.
Alternatively, you can click the ellipses (...) button to open a browser, from which you can select an image or sequence.
If you are creating a blank paint clip, set the other properties to define the clip's attributes. For information about all of the paint clip properties, see Paint Clip [Fx Operator Reference].
Managing Frames in Raster Paint Clips
Raster paint is destructive, meaning that when you paint, you alter the image's pixels permanently and irrevocably. Fortunately, as you paint, the clip's original frames, as well as all of your paint strokes are cached until you save the changes into the clip. You can undo your changes by reverting changed frames to their original state. This works for all paint clips, whether they are still images or image sequences.
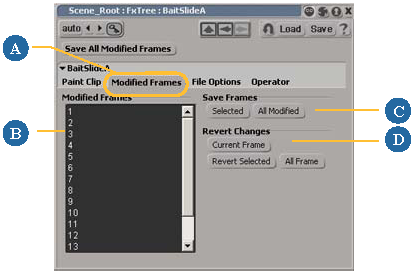
You can save and/or revert changes to raster paint clips from the Modified Frames tab of an Paint Clip operator's property editor.

You can also save modifications to raster paint clips by saving the scene. Be careful though: saving the scene saves all modifications to all frames in all raster paint clips in all FxTrees in the scene!
Unless you're about to close the scene, you'll probably want to be more selective about saving modifications to your clips.
Edit a raster Paint Clip operator that you've been painting on, as described in Editing and Previewing Paint Operators.
From the Modified Frames tab of the operator's property editor, do any of the following:
Select the frames you wish to save, as described in the previous procedure, and click the Save Frames  Selected button.
Modifications are saved into the selected frames, overwriting the original pixels.
Click the Save Frames  All Modified button.
Modifications are saved into all modified frames, overwriting the original pixels.
Saved frames are removed from the Modified Frames list. Once you save modified frames, they are permanently altered and become the original frames to which subsequent paint strokes are added.
For example, painting on a frame, saving the modifications, painting again and then reverting the modified frames will revert to the frame with the first set of paint strokes.
Click the Revert Changes  Current Frame button to revert the current frame back to its last saved state and deletes all cached changes.
Select the frames you wish to revert, as described in To select modified frames, and click the Revert Changes  Revert Selected button. This reverts the selected frames to their last saved state and deletes all cached changes.
Click the Revert Changes  All Frames button to revert all modified frames back to their last saved state and deletes all cached changes.