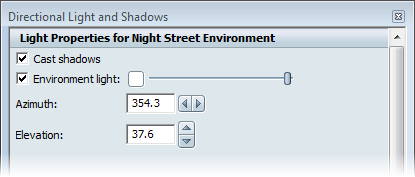
Light Properties for this Environment
This topic describes the controls found in the Directional Light and Shadows window. To open the window, select from the main menu.
These options determine where the highlight hits the surfaces, and controls the appearance of the lighting on the object.
The settings are applicable for the current environment only.
-
-
Use this control to set shadows off in the current environment, overriding the visual style setting.
-
-
Use this control to enable or disable the environment light in the current environment. Click the swatch to change the color
of the environment light. Use the slider to control brightness.Turning off environment light makes the objects look darker
but does not make the shadows disappear from the environment ground.
-
-
Click this to change the color of the environment light. Use the slider to control brightness between black and white.
-
-
Moves the environment light clockwise or counter-clockwise around the environment dome.
Specify the horizontal angle in degrees longitude (0 to 360).
-
-
Moves the environment light up or down the environment dome.
Specify the vertical angle in degrees latitude (-90 to 90).
-
-
Click the button to interactively position the environment light around the scene.
- To place the environment light higher in the sky, click anywhere in the view and drag up.
- To move the environment light down, drag down.
- To move the environment light clockwise around the horizon, drag left.
- To move the environment light counter-clockwise, drag right.
- To place the highlight at any position on a surface, hold down the Ctrl key and click at that position.
- To move the highlight around the surface to find the best position, hold down the Ctrl key and drag over the surface.
When you have moved the highlight to the desired location, click the same button, now labeled .
Note
To maintain a realistic lighting effect, Autodesk Showcase relocates the shadow (if applicable) to oppose the new position
of the highlights.
-
-
(Available if is selected.)
- Click this button and drag the shadow to move it to the desired location.
- Click the same button, now labeled when you have finished moving the shadow.
Note
Autodesk Showcase automatically relocates the highlights (if visible) to oppose the new position of the shadows to maintain
a realistic lighting effect.
-
-
Restores the original position of the environment light to directly overhead (or to the original location in the particular
environment). Shadows appear directly opposite the environment light source.
Ray Tracing Shadow Properties
These options control the appearance of the shadow in Ray Tracing created for the environment light, and cast upon all objects
in the scene.
Note
Ray Tracing shadow properties are saved with the individual Environment file if it is stored in a custom environment library.
Hardware shadow settings are global for all environments in the scene.
-
-
Adjust the virtual size of the light source to affect the shadow and highlight softness and size. (A larger size casts softer
shadows and creates larger highlights)
-
-
Set the distance, in units, that ambient shadows around the object are cast upon the ground plane.
Hardware Rendering Shadow Properties
These options are available if is selected, and are applicable for all environments.
-
-
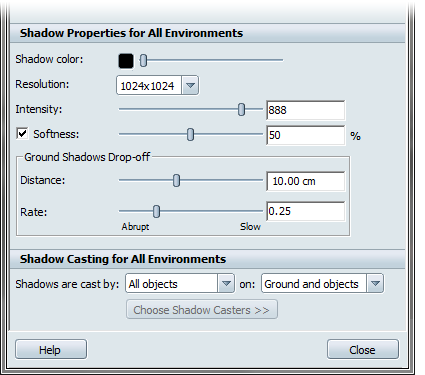
Click the color swatch to change the hue of the shadow.
-
-
Adjust the resolution of the Hardware shadow for greater or fewer details. Autodesk recommends 1024x1024. Depending on your
hardware and the complexity of your scene, there is a risk of performance degradation at higher resolutions. You may want
to turn shadows off while working with materials and objects, then turn shadows on at 1024x1024 to set the shots and choose
the light direction. Once you are ready to present or create a movie, try using 2048x2048 or 4096x4096.
-
-
Controls the strength of the color of the shadow. Enter a numeric value or use the slider for ranges of 0 (weak) to 1000 (strong).
-
-
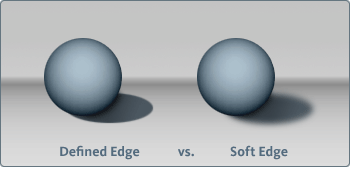
Use this control to make shadows soft or sharp. Soft shadows use more hardware resources so do not use them with a very high
resolution. Click , then enter a numeric value or use the slider for ranges from 0% to 100%. A shadow with a defined edge has a value of 0%
while a shadow with a blurry edge has a value of 100%.
-
-
Controls the intensity of the shadows based on the distance between the object and the ground.
To make objects that are far from the ground cast Hardware shadows, increase the value. To decrease the intensity of the shadows created by objects near the ground, decrease the value.
-
-
Controls the intensity of Hardware shadows based on the distance between the object and the environment light source.
To make distant objects cast dark shadows, move the rate slider towards the end. To make distant objects cast slight shadows, move the slider toward the end.
Shadow Casting for All Environments
This setting is available if is selected, and is applicable for all environments.
Shadows are cast by:
-
-
All objects in the scene cast a shadow based on where the environment light source is located.
-
-
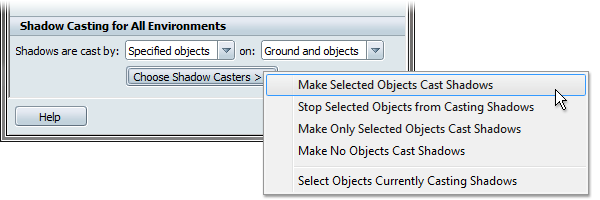
Only some objects in the scene cast a shadow.
Choose objects manually by selecting one of the following options:
- Make selected objects cast shadows
- Stop selected objects from casting shadows
- Make only selected objects cast shadows
- Make no objects cast shadows
- Select objects currently casting shadows
Shadows can be cast on the model, the environment ground or both.
Note
If an object is removed from casting shadows in the window, the object will not cast shadows from any other lights in the scene.
Troubleshooting shadows
If you cannot see hardware shadows:
- You might not have turned them on. Make sure you selected in the window.
- Your current graphics card might not support interactive shadows. Check the system requirements in the Installation Guide
to verify that your graphics card is qualified.


