This section describes additional settings that display when animation, character, and camera animation clips are selected. These settings consist of the following:
The settings that display for video and audio clips are the same settings that display when video and audio files are selected in the Scene browser.
There are no additional settings for command and constraint clips.
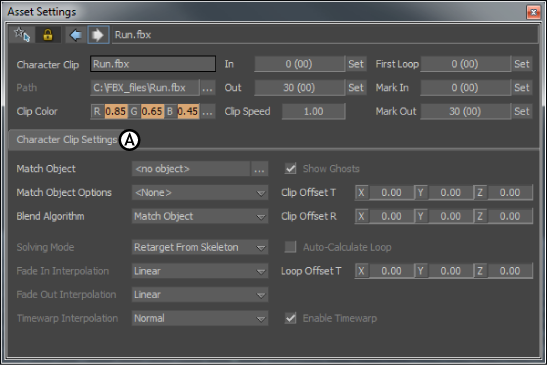
Additional clip settings (A)
Double-click an animation, character, or camera animation clip in the Story window to access the Match Object field in the Asset Settings window.
The Match Object field lets you select a match object for each selected animation, character, or camera animation clip. The match object you select affects how clips match. By default, a clip has no match object and the travelling node is used to match clips.
To select a match object, Alt-drag an object into the Match Object field. You should only select a match object from part of the track contents.
The content of the Match Object field is affected by the options selected in Match Object Options menu and in the Blend Algorithm menu. See Match Object Options field and Blend Algorithm menu for more information.

Selecting a match object A. Drag a selected node into the Match Object field B. The name of the custom match object displays in the Match Object field
Double-click an animation, character, or camera animation clip in the Story window to access the Match Object Options field in the Asset Settings window.
The Match Object Options menu lets you select options that determine the position of the match object’s ghost.
| Match option | Ghost position |
|---|---|
| <None> | Uses the travelling node to match clips instead of a match object. A match object does not display when <None> is selected. |
| Project on XZ Plane | Displays match object’s ghost on the floor (XZ plane). If more than one asset or bone is selected as the match object, the match object displays at an average distance between the assets or bones on the XZ plane. |
| Average | Displays the match object at the average distance between the assets or bones selected as the match object. When only one asset or bone is selected as the match object, the match object displays at the location of the selected asset or bone. |
Double-click an animation, character, or camera animation clip in the Story window to access the Blend Algorithm menu in the Asset Settings window.
The Blend Algorithm menu lets you select between Normal and Match Object blend options. These options activate and disable a track’s match object, which affect the way clips match.
| Option | Match behavior |
|---|---|
| Normal | Does not take the match object into account when you match clips. |
| Match Object | Uses the match objects when you click the Match Options button.For more information on matching and match objects, see Match options dialog box. |
The Solving Mode menu, which displays for selected character clips, displays the current solving mode.

Character clip settings A. Solving Mode menu
| Solving mode | Behavior |
|---|---|
| Retarget From Skeleton | This option is automatically selected when animation is retargeted from one Character to another. Retargeting occurs when the skeleton to which the clip’s animation was plotted is different than the skeleton of the Character selected in the track’s Character field. |
| Skeleton | This option is automatically selected when the selected clip is created using the same skeleton as the skeleton of the Character in the track. |
| Control Rig | This option is automatically selected when the selected clip was created using the Character’s control rig. |
The Fade In and Fade Out Interpolation menus (E and F) let you choose interpolation options for the In and Out points of selected animation, character, and camera animation clips.
| Option | Behavior |
|---|---|
| Custom | The Custom options open panes which let you create your own interpolation using function curves. When you select the Custom option from the Fade In or Fade Out Interpolation menus, the Custom Fade In Interpolation or Custom Fade Out Interpolation panes appear. See Creating Function Curves” for more information on using the settings in these panes. |
| Linear | Creates Linear interpolation at the In or Out point of the clip. Linear interpolation is the default setting for both the Fade In and Fade Out menus. |
| Smooth | Creates smooth interpolation at the In or Out point of the clip. |
| Slow | Slows a clip’s animation at the In or Out point of a clip. |
| Fast | Speeds up a clip’s animation at the In or Out point of a clip. |
Double-click an animation, character, or camera animation clip in the Story window to access the TimeWarp Interpolation menu in the Asset Settings window.
The TimeWarp Interpolation menu lets you modify the clip’s animation rate, for example, you can speed up, slow down, or reverse animation without changing its length. This menu is affected by the Enable TimeWarp option (see Enable TimeWarp option).
| Option | Behavior |
|---|---|
| Custom | Opens the Custom TimeWarp pane, which lets you edit the selected clip’s animation using function curves. The settings in this pane are similar to those in the FCurves window (see Creating Function Curves). Use the Enable TimeWarp option (see Enable TimeWarp option) to disable the result of the pane without deleting it. See Custom TimeWarp interpolation. |
| Normal | The clip plays normally. |
| Smoothed Ends | The clip’s animation begins slowly, speeds up, and then ends slowly. The length of the animation does not change. |
| Going Faster | The clip’s animation speeds up as it plays, starting very slowly and ending very fast. The length of the animation does not change. |
| Slowing Down | The clip’s animation slows down as it plays, starting very fast and ending very slowly. The length of the animation does not change. |
| Reversed | The clip’s animation plays backwards. |
| Reversed, Smoothed Ends | The clip’s animation plays backward and its speed is affected. The animation begins slowly, speeds up, and then ends slowly. The length of the animation does not change. |
| Reversed, Going Faster | The clip’s animation plays backwards and speeds up as it plays, starting very slowly and ending very fast. The length of the animation does not change. |
| Reversed, Slowing Down | The clip’s animation plays backwards and speeds up as it plays, starting very fast and ending very slowly. The length of the animation does not change. |
Double-click an animation, character, or camera animation clip in the Story window to access the Enable TimeWarp option in the Asset Settings window. The Enable TimeWarp option lets you disable or activate the result of the Custom TimeWarp pane.
Double-click an animation, character, or camera animation clip in the Story window to access the Show Ghost option in the Asset Settings window.
The Show Ghost option lets you show or hide the ghosts of a selected clip. Ghosts are hidden by default. This option displays when an animation, camera animation, or character clip is selected.
The ghosts affected by the Show Ghost option include a selected clip’s model, clip vector, and match object ghosts. The Show Ghost option controls the visibility of these ghosts as a group.
Also, clip ghosts can display only if the ghost visibility options of the clip’s track is active. See Ghosts options for more information on track ghosts.
Double-click a character or animation clip in the Story window to access the Clip Offset T settings in the Asset Settings window.
The Clip Offset T settings let you translate a selected clip’s clip vector in the Viewer window. You can also translate a clip’s clip vector by manipulating it in the Viewer window. See Moving clips for more information.
Double-click a character or animation clip in the Story window to access the Clip Offset R settings in the Asset Settings window.
The Clip Offset R settings let you rotate a selected clip’s clip vector in the Viewer window. You can also rotate a clip’s clip vector by manipulating it in the Viewer window. See Moving clips for more information.
Double-click a character clip in the Story window to access the Auto-Calculate Loop option in the Asset Settings window.
The Auto-Calculate Loop option lets you turn off or on the automatic calculation of the loop offset. To change the loop translation offset, use the Loop Offset T settings (see Loop Offset T settings).
Double-click a character clip in the Story window to access the Loop Offset T settings in the Asset Settings window.
The Loop Offset T settings let you change the loop’s translation offset.
The loop offset is calculated automatically by default. Changing a loop’s translation offset causes the animation to jump at the beginning of each loop. For example, when you loop a basic run cycle, a Character runs forward in a straight line. If you change the loop’s translation offset, the Character jumps at the beginning of each loop.
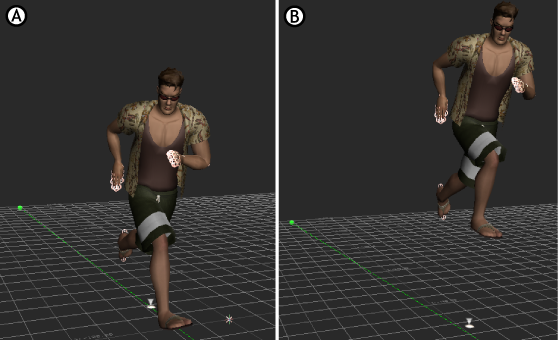
Creating loop offsets A. The loop offset is calculated automatically, Surfer runs in a straight line. B. The loop is offset along the Y and X axes, causing Surfer to jump at the beginning of each loop.
 Except where otherwise noted, this work is licensed under a Creative Commons Attribution-NonCommercial-ShareAlike 3.0 Unported License


