This menu provides the following sub-menus:
- Actor
- Definition
- Controls
Actor sub-menu
This sub-menu provides the following options to edit the properties of the :
-
-
Locks the current position and rotation of the selected and its Marker set. You can also turn on this option from window properties.
-
-
Manipulates the using Inverse Kinematics. By default, this checkbox is turned off to manipulate individual body segments on the .
-
-
Simultaneously scales and translates the limbs of an . By default, this checkbox is turned on. Turn off this checkbox to independently change the size or length of a limb.
-
-
Positions the in its default stance position. You can use this pose to reset and modify the position of the . only resets rotational offsets. These offsets remain, if you translate or scale the model.
-
-
Rejoins any detached limb segments of an without resetting the size or stance of the . This may be necessary when adding position offsets to an or when translating source markers further than their initial definition. Some limbs may detach to reach all the markers
defined by its Marker set.
-
-
Resets the scale of the selected to its default size. If a scaling offset affects the position of a segment, then resets the scale of the , but leaves the segment at its new location.
-
-
Select this option when the is in a T-stance to calculate and size each segment of the based on the selected Marker set and source markers.
-
-
Returns all pivot points to their original positions.
-
-
Resets the , , and options, simultaneously. This option returns the to its default stance position, reconnects any detached limb segments, and resets the scale of the to the default size.
-
-
Displays the properties of current character in the window. The properties shown in the window are the same as the options in the .
-
-
Lets you switch between the current character and its Actor. If you select , then the window changes to the tab. The option is enabled in the menu, only when the source of the current character is an .
Definition sub-menu
This sub-menu provides the following options to edit the skeleton definition properties:
-
-
Locks the current setup of the skeleton, as it is mapped in the tab. The skeleton definition must be valid before it can be locked.
-
-
Lets you change the name of the HumanIK character.
-
-
Deletes the current HumanIK character.
-
-
Locks or unlocks the skeleton for selection. When this option is active, you cannot select the skeleton.
-
-
Lets you select the skeleton, but locks the position and rotation so that you cannot transform it.
-
-
-
-
Resets the definition and/or solving properties of current character back to their default values. Selecting creates the same result as clicking the button in the window pane.
-
-
Enables the mirror matching mode. When this option is turned on, the tab checks for a mirror match on the opposite side of the body for every bone that you map. For example, if you map the L_upperLeg
bone, then the tool automatically checks the skeleton for an R_upperLeg bone and automatically maps that bone if exists.
By default, mirror matching mode supports the following pairs of substrings:
| Left side |
Right side |
| Left |
Right |
| L (followed by a single space) |
R (followed by a single space) |
| L_ |
R_ |
| _L |
_R |
If you use a different substring in your bone naming conventions to indicate the left and right sides of the body, then select
 to add your own strings.
-
-
Displays the window, which lets you add pairs of strings to the list that the tab checks for mirror matching bone names. If you use a different substring in your bone naming conventions to indicate the
left and right sides of the body, then select this option to add your substrings.
-
-
Displays the window, which lets you map bones by applying a naming template of your own. If your current character is locked, then clicking
this option displays a message to unlock your character.
-
-
Displays the window to save your skeleton details.
-
-
Lets you switch between the current character and its . This option is enabled in the menu, only when the source of the current character is an . If you select this option, then the window changes to the window. See
Actor Controls window.
-
-
Lets you select what style of Control Rig effectors to work with.
-
-
Resets the to its default T-stance pose.
NoteThe Stance for a biped and quadruped character is different.
-
-
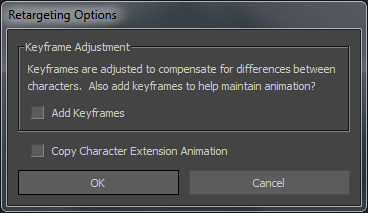
Copies keyframe animation from the Control rig of the character selected as the Source to the Control rig of the current
character. Selecting this option displays the dialog box. The options in this dialog box lets you decide whether you want to allow added keyframes during retargeting,
and whether you want to copy the Character Extension animation.
Turning on the option is recommended, if you are concerned with retargeting your original animation as precisely as possible. While the
retargeting process copies animation nearly exactly, slight adjustments to the data are required to compensate for differences
between the source and target characters. If you can tolerate these slight changes and you do not want any added keyframes,
then disable the option.
See
Retarget animation from one character to another and
Retargeting animation character-to-character for more information.
-
-
Renames the control rig for the current character.
-
-
Deletes the control rig for the current character.
-
-
Lets you lock or unlock FK markers for a selection. When activated, you cannot select the FK markers. Disable this option
to select FK markers.
-
-
Locks or unlocks FK markers for transformation. When this option is active, you cannot transform the FK markers, although
you can still select them.
-
-
Determines the state of the effector pinning and how your character behaves in conjunction with Pull values during manipulation.
This option is active by default, which means that each Pull value of effector is ignored during character manipulation. You
can only view your Pull settings when you play the animation.
To view the effects of Pull while applying transformations to your character, disable . Effector pinning is also disabled since the behavior of a character is based on each Pull values of effector rather than
its effector pinning.
is only effective in or mode.
-
-
Determines how a character behaves when it is manipulated in relation to the Stiffness values.
is active by default, which means that the character does not use the Stiffness values during character manipulation. Stiffness
settings are only applied when you play your animation.
is only effective when in the or mode.
-
-
Displays the Control rig(s) in a scene. Selecting a Control rig displays the and dialog boxes.
- Select to reset the Control rig hierarchy to the default structure. See Control rig hierarchy for more information about the default rig.
or
- Select to keep the current Control rig structure, including any reparenting or customization created previously.
If the structure of the Control rig does not match the character, then the effectors are created or disabled, as needed, to
make the Control rig fit. For example, if you connect a Control rig from a character that contains fingers which do no fit,
then the finger effectors are disabled. If the character had an original Control rig, then it is detached and replaced with
the new Control rig. The original Control rig is still available and listed in the browser, but no longer connected to the character.
-
-
Displays the Control rig that is currently attached to your character. Select the Control rig from the list to detach it from
your character.
NoteDetaching a Control rig does not delete it from your scene.
-
-
Displays the window. It lets you select a custom configuration file to be used as the new default layout for the tab.
-
-
Reloads the tab configuration file. Use this option to view the changes made to your configuration file, after it is loaded using the
command.
 Except where otherwise noted, this work is licensed under a Creative Commons Attribution-NonCommercial-ShareAlike 3.0 Unported License