


Lets you define the structure of a character.
The names of all objects that MotionBuilder recognizes as part of the structure of a character model are listed to the left. To define an object as part of your character, select it from the skeleton of your character (in the Viewer window, Scene browser, or Schematic view) and Alt-drag it into the corresponding slot of the Mapping List.
For example, to define the Spine, Alt-drag the Spine object from the character skeleton into the Spine slot of the Mapping List. This is how you tell MotionBuilder “On this character model, this is the hips bone” and so on.
The object you place in each slot of the Mapping List can be a joint, bone, null, or any other object from your model skeleton.
You can also automatically map objects in all the slots by dragging a Character asset on top of your model. This automatically matches the joints or bones in your character skeleton with the appropriate slots, provided your skeleton follows the naming conventions in the Mapping List. See Character mapping for more information on mapping out the structure of a character.
To link your model to a motion source successfully, define a joint or bone object in each slot in the Base group of the Mapping List.
Depending on the method used to create your model, you might also have to specify a Reference object and additional Auxiliary, Spine, and Roll objects.
Slots that define particular body areas of a character are organized into groups that you can expand or collapse as you complete the Character mapping process. The Mapping List is divided into the following slots or groups of slots:
While you do not need a Reference object during the mapping process, define an object in this slot to translate, scale, and rotate your entire model. The Reference object acts as the root of your entire model. The ideal reference object is a null or joint parented to the hips of your model.
You should define a Reference object in the following circumstances:
The Left Foot Floor and Right Foot Floor slots are for markers or other objects that represent the floor. You can specify different markers for each foot. Use these slots with the Feet Floor Contact settings (see Toes Floor Contact Setup properties).
The Left Hand Floor and Right Hand Floor slots are for markers or other objects that represent the floor for the left or right hand of your character. You can specify different markers for each hand. Use these slots with the Hands Floor Contact settings (see Feet Floor Contact Setup properties).
The Base group of slots let you define the basic set of bones that are required for any skeleton loaded into MotionBuilder. Map objects into this group of slots in order for MotionBuilder to understand the structure of your character model and its skeleton.
You can name the bones of a skeleton according to the naming conventions in MotionBuilder to map objects to these slots automatically. You can also manually map bones to these slots, but either way, these 15 Base bones must be defined.
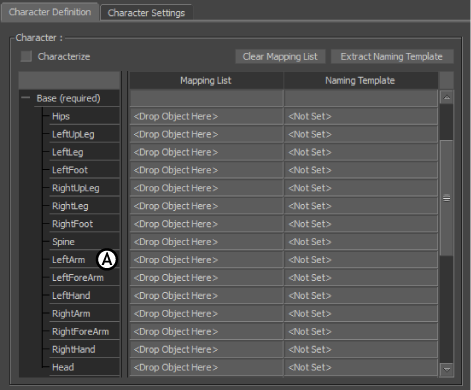
Base group of (required) objects in the Mapping List
Refer to the following table for a description of each slot in the Base group. See Bone naming conventions to view a simple skeleton illustrating the placement of these bones.
| Base slot | Description |
|---|---|
| Hips | The joint or bone that drives the hips of your model. |
| LeftUpLeg/RightUpLeg | The joint or bone that drives the upper left/upper right leg of your model. The LeftUpLeg/RightUpLeg joint or bone must be the child of the Hips joint or bone. |
| LeftLeg/RightLeg | The joint or bone that drives the left/right knee of your model. The LeftLeg/RightLeg joint or bone must be the child of the LeftUpLeg/RightUpLeg joint or bone. |
| LeftFoot/RightFoot | The joint or bone that drives the left/right foot of your model. The LeftFoot/RightFoot joint or bone must be the child of the LeftLeg/RightLeg joint or bone. |
| Spine | The joint or bone that specifies the chest of the destination skeleton. You can use this slot with the optional Spine slots for characters with a spine. Do not position the Spine joint or bone in the same position as the hips or poor mapping might result. |
| LeftArm/RightArm | The joint or bone that drives the left/right arm of your model. The LeftArm/RightArm joint or bone must be the child of the Spine joint or bone. |
| LeftForeArm/RightForeArm | The joint or bone that drives the left/right elbow of your model. The LeftForeArm/RightForeArm joint or bone must be child of the LeftArm/RightArm joint or bone. |
| LeftHand/RightHand | The joint or bone that drives the left/right hand of your model. The LeftHand/RightHand joint or bone must be the child of the LeftForeArm/RightForeArm joint or bone. |
| Head | The joint or bone that drives the head of your model. The Head joint or bone must be the child of the Spine joint or bone. |
The slots in the Auxiliary group are optional. They let you enhance your character by defining objects for the base of the toes and fingers, the neck, and the shoulders.
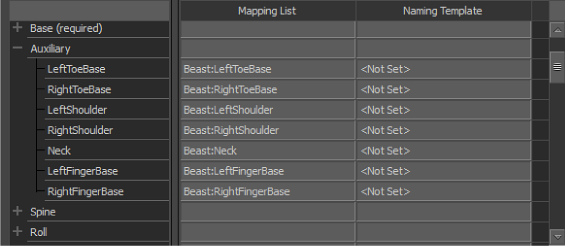
Auxiliary group of slots in the Mapping List
The following table describes each slot in the Auxiliary group.
| Auxiliary slot | Description |
|---|---|
| LeftToeBase/RightToeBase | The joint or bone that drives the left/right toes of your model. This joint or bone must be the child of the LeftFoot/RightFoot joint or bone. |
| LeftShoulder/RightShoulder | The joint or bone that drives the left/right shoulder of your model. This joint or bone must be the child of the Spine joint or bone, and must be the parent of the LeftArm/RightArm joint or bone. |
| Neck | The joint or bone that drives the neck of your model. This joint or bone must be the child of the Spine joint or bone, and must be the parent of the Head joint or bone. |
| LeftFingerBase/RightFingerBase | The joints or bones that drive the left/right fingers of your model. This joint or bone must be the child of the finger base. |
The Spine group of slots let you specify a spine with up to ten vertebrae (nine optional spines + 1 required Spine = 10). See Defining a spine for more information.
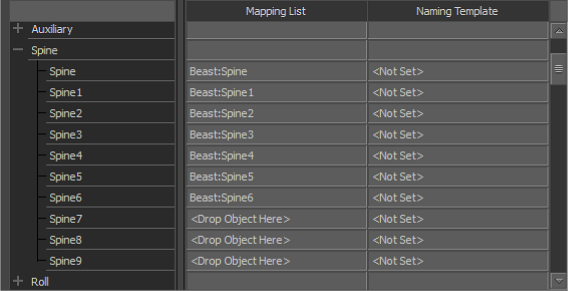
Spine group
The slots in the Roll group let you define objects that influence the roll of the bones in the arms and legs.

Roll group
When you create your model skeleton, it is recommended to add roll bones to the skeleton structure. Roll bones let you achieve more realistic envelope deformations by specifying a percentage of the roll axis movement on specific bones (see Modifiers in the Character Settings > Modifiers group of options.).
To transfer the roll properly, your bones or joints must be arranged as described in the following table:
| Roll slot | Description |
|---|---|
| LeftUpLegRoll/RightUpLegRoll | The joint or bone that rolls the LeftUpLeg/RightUpLeg. The LeftUpLegRoll/RightUpLegRoll joint or bone must be the child of the LeftUpLeg/RightUpLeg joint or bone. |
| LeftLegRoll/RightLegRoll | The joint or bone that rolls the LeftLeg/RightLeg. The LeftLegRoll/RightLegRoll bone or joint must be the child of the LeftLeg/RightLeg joint or bone. |
| LeftArmRoll/RightArmRoll | The joint or bone that rolls the LeftArm/RightArm. The LeftArmRoll/RightArmRoll joint or bone must be the child of the LeftArm/RightArm joint or bone. |
| LeftForeArmRoll/RightForeArmRoll | The joint or bone that rolls the LeftForeArm/RightForeArm. The LeftForeArmRoll/RightForeArmRoll bone or joint must be the child of the LeftForeArm/RightForeArm joint or bone. |
Depending on your model skeleton and the amount of control you want over your animation, you might want to split translation and rotation of the hips between two different joints or bones.
The Special group of slots contains the Hips Translation slot that lets you define a second object for translating the hips of your model. If you define a Hips Translation object, the hips translation data goes to that object, while the hips rotation data goes to the original Hips object defined in the Base group.

Special group with Hips Translation slot
The object defined in the Hips Translation slot should be a child of the Reference object in your character.
If you choose not to define an object in the Hips Translation slot, both translation and rotation data are sent to the object defined in the Hips slot. See Hips Translation Mode.
You can also select the method used to transfer rotation and translation to the Hips Translation and Hips objects using the Hips Translation Mode option in the Character Solving properties.
The slots in the Left Hand and Right Hand groups let you define objects to add realistic hand and finger movements to your character. These groups contain slots for thumb, index, middle, ring, and pinky finger objects, as well as slots for an extra finger.

Left Hand group
The number of each slot corresponds with each finger joint. For example, slots numbered with a “1” correspond to the finger or toe’s first joint while slots numbered with a “4” correspond to the last joint of a finger. The last joint or bone in each finger should be mapped to the fourth slot so that the finger tips are properly defined.
To use these slots, your model skeleton must have hands with fingers.
The slots in the Left Foot and Right Foot groups let you define the feet of your model and add realistic foot and toe movements to your character. To use these slots, your model skeleton must have feet with toes.
The Foot groups follow the same naming conventions as the Hand groups, so they contain slots for the thumb (big toe), index (second toe), middle (third toe), ring (fourth toe), and pinky (baby toe), as well as slots for an extra toe.
For example, the following figure shows the Left Foot slots in the Mapping List for a Beast character.
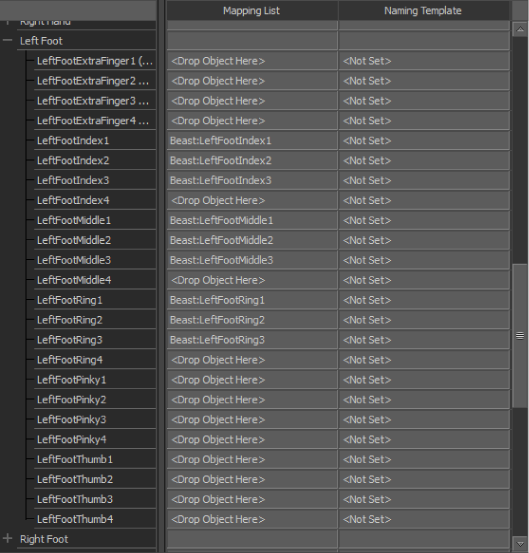
Left Foot group of slots
The number of each group of slots corresponds with each toe joint. For example, slots numbered with a “1” correspond to the toe’s first joint while slots numbered with a “4” correspond to the last joint of the toe. Each last joint or bone of the toe should be mapped to an end slot to define toe tips properly.
See Defining toe behavior for more information.
The Left In-Hand and Right In-Hand groups contain optional slots for defining the bones within each hand. These are the joints or bones that link the first joint or bone of each finger to the LeftHandBase or RightHandBase slots.
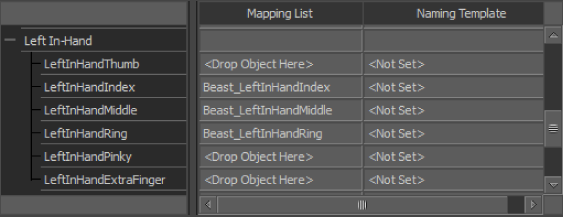
Left In-Hand group
For example, the following figure shows a skeleton with bones that are defined in the Left In-Hand optional slots.
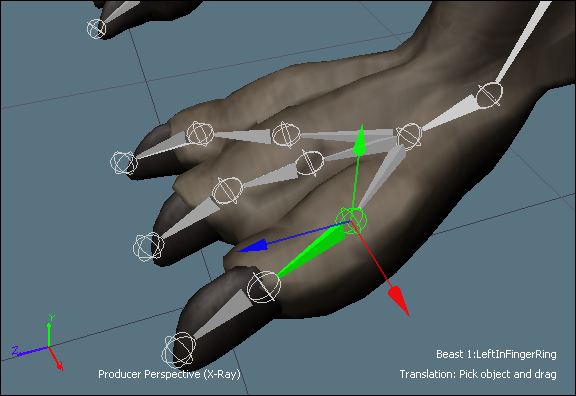
Model with left In-Hand bones
The Left In-Hand and Right In-Hand groups contain in-hand slots for each finger (thumb, the index, middle, ring, and pinky), as well as a slot for an extra finger.
Each Left In-Hand/Right In-Hand object must be between the LeftFingerBase/RightFingerBase object and the first joint or bone of each finger. For example, the LeftInRing object must be the child of the LeftFingerBase object. The LeftInRing object must parent the LeftHandRing1 object.
The Left In-Foot and Right In-Foot groups contain optional slots for defining the bones within each foot. These are the bones that link the first joint of each toe to the LeftToeBase or RightToeBase.
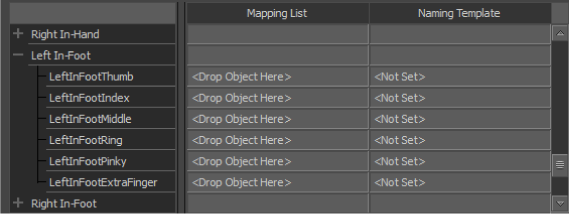
Left In-Foot group
For example, the following figure shows a skeleton with bones defined in the Left In-Foot optional slots.
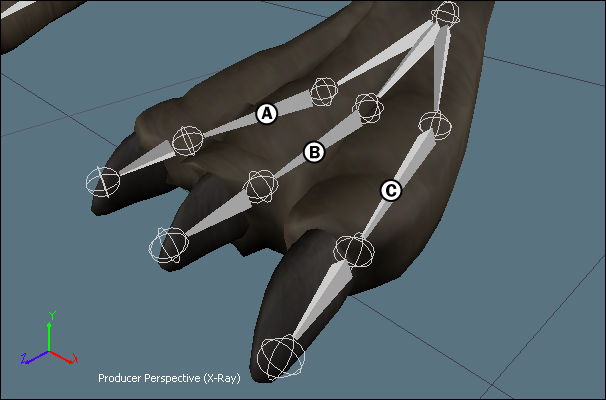
Left In-Foot objects A. LeftInFootIndex B. LeftInFootMiddle C. LeftInFootRing
The Left In-Foot and Right In-Foot groups contain in-foot slots for each toe (named thumb, index, middle, ring, and pinky), as well as a slot for an extra toe. The naming of these slots is based on the Left In-Hand and Right In-Hand groups as these groups are similar. The LeftInFootThumb slot represents the big toe on the left foot, the LeftInFootIndex represents the second toe on the left foot, and so on.
Each Left In-Foot/Right In-Foot joint or bone must be between the LeftToeBase/RightToeBase and the first joint or bone of each toe. For example, in the following figure, the LeftInFootRing object (B) must be the child of LeftToeBase (A) and the LeftInFootRing object (B) must parent the LeftFootRing1 object (C).
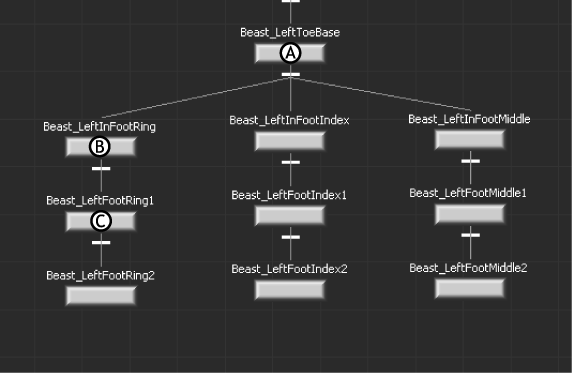
Hierarchy of Left In-Foot objects A. LeftToeBase object B. LeftInFootRing object C. LeftFootRing1 object
The Neck group contains ten slots that let you define multiple neck bones. A biped commonly uses only one neck joint or bone, while a quadruped commonly uses many neck joints or bones.
The slots in the Props group let you add up to five prop objects, such as a weapon, umbrella, cane, or other items associated with your character.

Props group
Lets you add the LeftShoulderExtra_Bone and the RightShoulderExtra_Bone asscoiated with your character.
 Except where otherwise noted, this work is licensed under a Creative Commons Attribution-NonCommercial-ShareAlike 3.0 Unported License