The Pose settings appear on the right half of the Ragdoll Animation pane. By default the Pose settings are empty. To display the Pose settings, select a pose in the Pose list.
In the following figure, the settings display for the selected “Trip” pose.
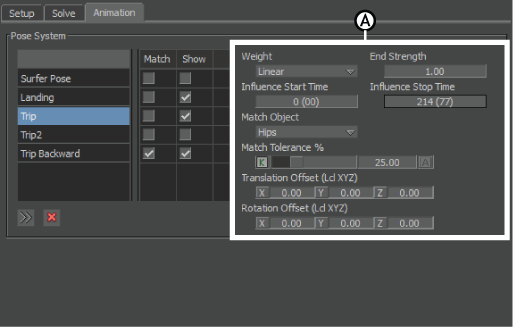
Ragdoll Animation pane A. Pose settings
When you are pose matching, use the Weight menu to select the manner that the character uses to reach the specified pose before impact. The Weight menu settings represent an animation FCurve with the goal of reaching the pose.
| Pose weight | Description |
|---|---|
| Custom | When you use this setting, a Custom tab is added where you can modify the pose matching FCurve to create custom effects. See Custom Weight. |
| Linear | The linear setting is a good place to begin your pose solve. The animation curve is a constant straight line curve that creates an average reach to the pose match. |
| Smooth | Averages all keyframes to create smooth movement. The curve is an S-curve that is equal at top and bottom so that the pose match is attained evenly. |
| Slow | The Slow curve is a downward arc that bends up toward the end so the pose match is attained gradually. (Concave) |
| Fast | The Fast curve is an upward arc that bends down toward the end so the pose match increases towards the end. (Convex) |

Weight curves A. Linear B. Smooth C. Fast D. Slow
Use the End Strength field to enter a value to specify how flexible or rigid you want the solve to match your pose.
Use the Influence Start and Stop fields to set an interval for the character to match a pose during a solve.
| Option | Description |
|---|---|
| Start | Sets the moment when the influence of the pose takes over. |
| Stop | Sets the moment when the influence of the pose diminishes. |
The Match Object menu lets you specify a center of mass from which the solve matches the pose. Choosing a Match object is like setting an animation pose as the pose becomes the driving force of the animation. In most cases, the Hips or the Chest are used as a Match object.
For more information on how poses influence animation, see Poses.
Use the Match Tolerance slider to set a range of flexibility that the character joints have when performing a solve using a Guide pose. The Match Tolerance slider lets you set a limit on how hard the solve “tries” to make your character match the specified Guide pose. When you use this setting, you can give each Guide pose an individual level of importance in the solve.
Match Tolerance rings visually represent the Match Tolerance values in the Viewer window. They appear as white rings on a joint and indicate possible rotation combinations that the body part can reach. You can think of them as the percentage of the degrees of freedom that are available to the character.
To view Match Tolerance rings, select any joint on a Guide Pose in the Viewer window.

Match Tolerance rings on a guide pose A. at 10% B. at 40%.
Use the Translation offset X, Y, and Z fields to set coordinates for a Translation offset to position poses in your scene.
Use the Rotation Offset X, Y, and Z fields to set coordinates for a Translation offset to position poses in your scene Both Global and Match poses.
 Except where otherwise noted, this work is licensed under a Creative Commons Attribution-NonCommercial-ShareAlike 3.0 Unported License


