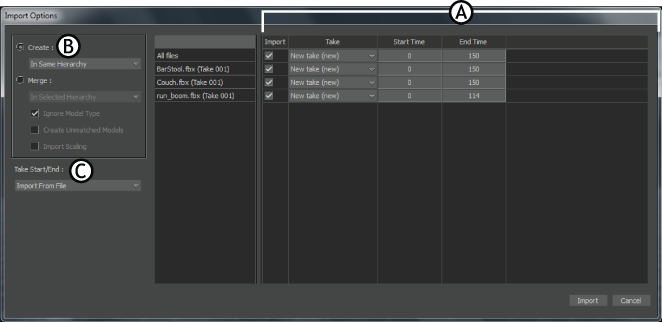
Depending on the file format you select, you may be importing motion data, a skeleton structure, or scenes. The file format also determines the import options and dialog boxes that appear.
If you select a motion file or skeleton file format, the Import Options dialog box displays when you click Open.

Import Options dialog box A. Import table B. Create or Merge area C. Custom import options
The Import Options dialog box has the following three areas:
The Import Options dialog box also displays when you select Options from the Import context menu. The Import context menu appears when you drag one or more recognized motion file formats over the Viewer window. When you drag, all motion files must be of the same format.
The Import table lists all the selected files for import, their start and end frames, samples, sample rate, and other options. The Import Table is the same for all data formats except scenes and .fbx files.
The top row, called All Files lets you change the value of a given column for all files at the same time. Values for each file are clamped to their absolute minimum or maximum. For example, if you enter 30000 as the sample rate, the sample rate for all files is set to this maximum.
| Column | Description |
|---|---|
| Files to Import | Lists all the selected files dragged from the Asset browser or selected using the Import File dialog box. |
| Import column | Use the Import check boxes to select which files to import. |
| Take column | Displays the name of the take where each animation is imported. If you import to a take that already has animation, it is replaced by the take you are importing. If you want to import to a new take, select New Take from the list of takes. You can also rename the take using this field. |
| Start and End | The Start and End time codes are expressed in the same time format as is shown in the Transport Controls. You can change the start and end time of each imported file to ensure, for example, that each animation starts at frame 0. |
| Samples | Displays the number of samples found in each imported file. You can change the duration by changing the number of samples. |
| Sampling Rate | The Sampling Rate field shows the frame rate from the imported file. Change the value in this column to speed up or slow down your animation based on the file’s original sampling rate. Select Custom to use the adjacent Custom field to enter your own frame rate. |
| Custom | The Custom column lets you enter your own frame rate for the imported file. |
The options in the Create or Merge area change if you select an object before attempting to import files.
For example, if you select an object before performing File > Import, the available create and merge options change. All Create options are listed in the following table:
| Create Option | Description |
|---|---|
| In Same Hierarchy | Imports all motion files into the same hierarchy, over many takes. |
| In Separate Hierarchies | Creates a separate hierarchy for each motion file. Each file is imported into a separate take. |
The default choice, either Create or Merge, changes as well. If an object is selected, Merge is selected. If no object is selected, Create is automatically selected The available Merge options also change if an object was selected before merging. All merge options are listed in the following table:
| Merge Options | Description |
|---|---|
| In Selected Hierarchy | Finds the root node and merges data into the entire hierarchy. Only available when one model is selected. |
| In All Models | Imports motion into the hierarchies of all models in your scene. This is the only merge option when nothing is selected. |
| In Selected Models Only | Merges data with only the selected nodes or models. |
| In Selected Model and Children | Imports into a hierarchy starting with the selected node, treating the selected node as a root node. This is useful for importing only arm, leg, or upper body motion. Only available when one model is selected. |
| In Prefix Group | Finds the top node with the same prefix and imports the motion as if you selected In Selected Hierarchy. If the selected node has the prefix, this merge option is the same as selecting In Selected Model and Children. If no nodes are found with the prefix, this merge option operates the same as In Selected Hierarchy. Only available when one model is selected. |
When importing files, Import checks the names, node type, and structure of the selected hierarchy. Activate Create Unmatched Models to create nodes to match the hierarchical structure of the imported file.
When disabled, data imports only to recognized nodes. If any differences are found between what you are importing and what is selected, the import stops.
The Custom import options are found beneath the Create and Merge options, and lets you access additional options that depend on the file format that you are importing. This is covered in a section of its own: Custom import options.
 Except where otherwise noted, this work is licensed under a Creative Commons Attribution-NonCommercial-ShareAlike 3.0 Unported License