The Blend options affect blends that occur when two cuts from different tracks overlap.
Match Pivot matches the position and rotation of two ghosts based on a specific pivot point, called a stabilizing object. This process creates a smooth blend without jumps or other anomalies in the animation sequence.
A stabilizing object is a sensor, a node from a skeleton, or a model from a hierarchy of models that stabilizes the entire blending object and corrects problems such as foot sliding. The stabilizing object must be part of the blending object.
Alt-drag the stabilizing object into a blend or interpolation in the Result track during the Match Pivot process. Match Pivot rotates the character along the Y-axis and translates the character along the X- and Z-axes so that the location of both characters match.
Match Pivot is only available when the Timeline indicator is over a blend or interpolation containing a pivot.
It is best to use Match Pivot for an edit that has many blends in need of stabilizing. Match Pivot always matches the first part of the last cut to the last part of the first cut that frames your blend or interpolation.
To use Match Pivot, you must define a stabilizing object (which must be part of the blending object) and the Timeline indicator must be within a blend or interpolation. Match Pivot updates automatically if you drag a stabilizing object into the blend or interpolation in your Result track.
You can perform one Match Pivot per blend or interpolation in your Result track. You cannot use Match Pivot with poses. See Match Selection” if you are using poses.
Removes the pivot point from the current blend. This button is only available when the Timeline indicator is over a blend or interpolation containing a pivot.
Snaps the blending object to the take of the skeleton in the Current Take field.
Local blending is a special method of blending takes. It creates blends by replacing the motion plotted to part of a hierarchy in one take with motion from another take. Local blending lets you blend part of the body, such as an arm or the torso, with the rest of the body.

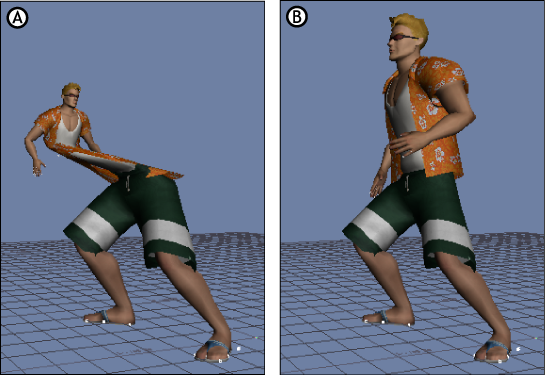
A. Local Blending option disabled B. Local Blending option activated
For example, the previous figure shows a character before and after the Local Blending option is active. One cut animates the character’s lower body, while another cut animates the character’s upper body. When the Local Blending option is disabled, the animation of the upper body and the lower body do not blend properly. When the Local Blending option is active, the animation blends without distorting the character.
All the takes you use during a Local blend must contain motion data plotted to the same skeleton. For best results, the take in the Current Take field should be the same as the take in the Result track’s Take menu. You should select a stabilizing object for your local blend if the blending object is made up of the bones or nodes of a character’s leg.
Local blending can occur only when the Local Blending option is active.
Offsets all tracks in the Cut area so that there are no blends or interpolations between your cuts. Tile All Cuts and Ghosts automatically triggers the Adjust Take Start & End feature to adjust the start and end times of the Result take and of the Current take.
After you create an animation cycle, you should test it to make sure that the last pose matches the first pose. You can accomplish this by creating an edit and using the Tile All Cuts and Ghosts feature.