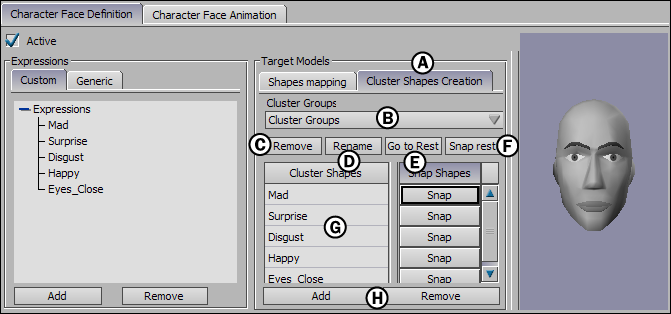
The Cluster Shapes Creation pane lets you create shapes using clusters. You can then use these cluster shapes in the Shapes Mapping pane. For more information on creating cluster shapes, see Creating cluster shapes.

Character Face Settings A. Cluster Shapes Creation pane B. Cluster Groups menu C. Remove button D. Rename button E. Go to Rest button F. Snap rest button G. Cluster Shapes list H. Add and Remove buttons
Lets you select which shapes display in the Shapes list. You can select the model’s shapes in different views, or you can select generic when defining custom expressions.
By default, the Cluster Groups menu is empty. Before you can select anything in the menu, you must drag groups of selected clusters into the Cluster Groups menu.
Displays the selected cluster group in its rest pose. By default, the rest pose is the position of selected clusters when you drag them into the Cluster Groups menu.
Lets you redefine your model’s rest pose. To change the default rest pose, move the clusters and click Snap Rest. A dialog box asks you to confirm changing the default rest pose.
Displays the new shapes of the selected cluster group and each shape’s Snap button. The Cluster Shapes list lets you create shapes using selected groups of clusters.

Cluster Shapes list A. Snap buttons