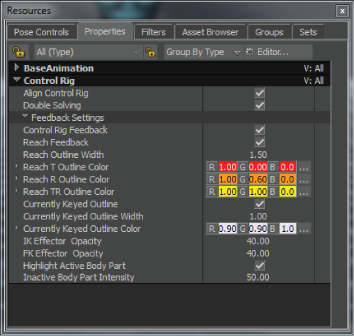
The Control Rig group of properties display in the Properties window when you have a Control rig selected in the Scene browser.

Control rig properties
When activated, this option forces the IK and FK systems that make up the Control rig align together, showing you the final solving for the character’s bones. This option is activated by default.
See Aligning Control rigs for more information.
Lets you use complex character setups in which one part of the character directly or indirectly drives another part of its own body, or part of another character. This option makes MotionBuilder evaluate character solving repeatedly so that body parts driven by other body parts are always positioned correctly.
For example, you can set up a character carrying a weapon so that the left hand drives the weapon, and the weapon drives an Auxiliary effector of the right hand. This creates a situation in which the left hand indirectly drives the right hand. With Double Solving activated, the position of the left hand (and the weapon) is solved first, then another round of solving determines the position of the right hand.
When Double Solving is disabled, the position for all body parts is calculated simultaneously, so any body part constrained by another body part may not reach the expected position.
If you plan to manipulate characters in Expert mode and use the Pull settings, Double Solving is calculated correctly only if one side of the character-driving-character set up has Pull values. For example, if a character is set up so that the right hand pulls the left, or if two characters are set up so that the first character pulls the second, Double Solving is not affected. However, if you set up the left hand to pull back on the right, or the second character to pull back on the first, activating Double Solving will not give the expected result since reaching both Pull goals simultaneously is not possible. You may notice a decrease in MotionBuilder's performance if you have a complex scene where several characters use Double Solving and influence each other's body parts.
This group of properties lets you show, hide, and change the way visual feedback is displayed on the Control rig.
| Property | Description |
|---|---|
| Control Rig Feedback | Shows or hides all visual feedback elements on the Control rig. |
| Reach Feedback | Shows or hides the Reach feedback outline that displays on effectors with Reach values defined. |
| Reach Outline Width | Changes the width of the outline that displays when an object has Translation Reach, Rotation Reach, or both values defined. When Reach is set to zero, no outline displays. |
| Reach T Outline Color | Changes the color of the outline that displays around objects with Translation Reach values defined. By default the Reach T Outline is red. |
| Reach R Outline Color | Changes the color of the outline that displays around objects with Rotation Reach values defined. By default, the Reach R Outline is orange. |
| Reach TR Outline Color | Changes the color of the outline that displays around objects with Rotation and Translation Reach values defined. By default, the Reach TR Outline is yellow. |
| Currently Keyed Outline | Shows or hides the pale blue outline that displays on effectors that are keyframed at the current time. You can change the color of this outline using the Currently Keyed Outline Color property. |
| Currently Keyed Outline Width | Changes the width of the outline on currently keyed objects in the Control rig. By default, the Currently Keyed Outline has a Width value of 1. |
| Currently Keyed Outline Color | Changes the color of the outline that displays on currently keyed objects in the Control rig. By default, the Currently Keyed Outline displays in light blue. |
| IK Effector Opacity | Changes the opacity of IK effectors. By default, IK effectors have an opacity value of 40. When set to zero, the markers are wireframe. The higher the value, the more opaque the effectors become. |
| FK Effector Opacity | Changes the opacity of FK effectors. By default, FK effectors have an opacity value of 40. When set to zero, the markers are wireframe. The higher the value, the more opaque the effectors become. |
| Highlight Active Body Part | When activated, active body parts are highlighted and inactive body parts are faded. When disabled, the entire Control rig displays with uniform highlighting. You can change the level of intensity on inactive effectors using the Inactive Body Part Intensity property. |
| Inactive Body Part Intensity | Adjusts the intensity of color for inactive body parts. When you are in Body Part keying mode, all effectors that are not part of the selected body part display with faded coloring. This property lets you adjust the level of fading on those inactive body part effectors. |