The Character Settings pane lets you adjust character mapping between a selected data source and your characterized character.

Character Settings pane
The Character settings contain the following main areas:
Lets you select the type of motion source you want to drive your character. After selecting the Input Type, then select the specific source from the Input Source menu.
Lets you choose the specific motion source you want to drive your character.
You can choose between the following four input types and one output type.
| Option | Function |
|---|---|
| Actor Input | Actor Input lets you choose an Actor as the motion source. Actors are used as a link between a character and motion data. |
| Character Input | Character Input lets you select another character as the source of motion data. For example, you can load one characterized character with animation plotted to its skeleton, then select that character as the input source to drive another character in the same scene. |
| Control Rig Input | Control Rig Input lets you use a Control rig to manipulate, position, and keyframe your character. You can use Control rigs to create keyframe animation or to modify existing animation. To modify existing animation on a character skeleton, first create a Control rig and plot that animation to the Control rig. |
| Control Rig Output | Control Rig Output lets you transfer animation from your model skeleton to a Control rig so you can edit it. |
| Stance Input | Stance Input resets a selected character to its stance. In some situations, you might need to redefine your Mapping List and characterize again. For example, if you have irregular envelope deformations caused by characters with conflicting bone rolls, you would need to map between the two characters. Or, you might have a source that is much larger or smaller than the model to which you are mapping. In these cases, select Stance Input, disable Characterize, drag the necessary bones or joints into the list again, then activate Characterize. |
Use Active to enable the link between your model and the input type and source. Once active, you can use the options in the Character Properties area to adjust how your character reacts to the input source.
Active also enables the Control rig and lets you use the Character Controls window to begin animating your character.
Plot Character transfers animation from the selected input source to your model skeleton or Control rig.
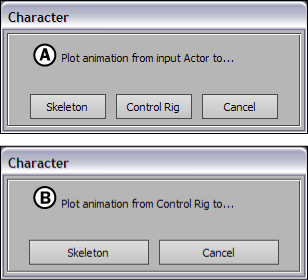
Depending on what you select as the input type and source, the dialog box that appears when you click Plot Character presents different options.
For example, in the following figure, the first dialog (A) displays when your input source is an Actor and the second dialog (B) displays if your input source is a Control rig. When your input source is an Actor or another character, you can also plot directly to your model skeleton.

Plotting options for different input sources A. Actor input source B. Control rig input source
The Reset All Properties button lets you reset all the mapping options in the Character settings pane to their default values. You can choose to reset all solving and definition properties, only solving properties, or only definition properties.
Solving properties include Pull, Resist, Reach, and Stiffness, while Definition properties include Hand Contact Positions and Feet Contact Positions.
The Character Properties area lets you browse and adjust all of the properties associated with a selected character. You can change how your character reacts to the input source, how the Control rig behaves, whether floor contact for hands and feet are active, and many other properties.
There are seven Property views that list the same options as the Default view. Each view is organized to make it easier to find certain properties. For example, the Pull view only lists properties that pertain to effector pulling in the Control rig.
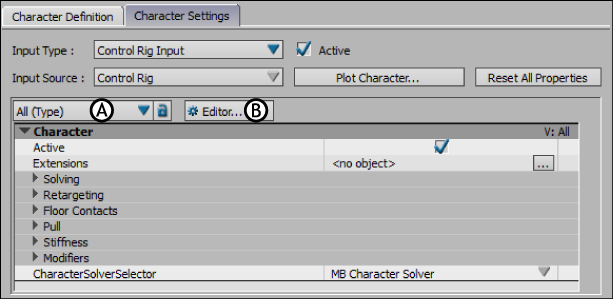
Use the Property View menu to select the view containing properties you want to work with. You can also click the Editor button to start creating your own view.

Character Settings pane A. Property views menu B. Editor button
The Character Properties area includes the following main groups of properties: