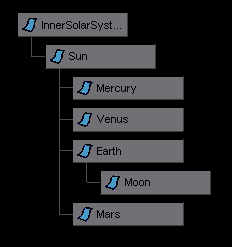
The scene hierarchy is the grouping of child nodes under parent nodes.
While you could create a scene without establishing a hierarchy, you will find that it makes modeling and especially animation much easier.
You can view and edit the scene hierarchy with the Outliner or the Hypergraph.
When you transform a parent, its children are transformed with it. This lets you, for example, model a leg by making the thigh the child of the hip, the knee the child of the thigh, the shin the child of the knee, the foot the child of the shin, and so on. Rotating one join rotates the rest of the leg under that joint.
Suppose you animate a planet to orbit the center of the workspace. If you make a moon the child of the planet, it follows the motion of the planet.

Though the moon is the child of the planet, you can also give the moon motion that’s independent of the planet. For example, you can make it orbit the planet. If you later change the orbiting motion of the planet, the moon continues to follow the planet’s motion, but stills retains its original orbiting motion.
Among Maya users, establishing hierarchy is often called parenting objects. When make node B the child of node A, we say you have parented node B to node A.
(This might be somewhat confusing at first, since “parenting” something does not mean “making it a parent” but rather means “making it a child”, but that’s the way it is.)
To control multiple objects with one node, you can group objects together under a new transform node. By grouping objects, you can move, shade, texture, and do many other actions to all the objects at the same time.
You can also use the scene hierarchy to organize objects to make them easier to work with, even if you’re not animating them.
 Except where otherwise noted, this work is licensed under a Creative Commons Attribution-NonCommercial-ShareAlike 3.0 Unported License