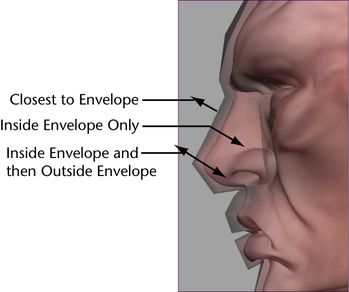
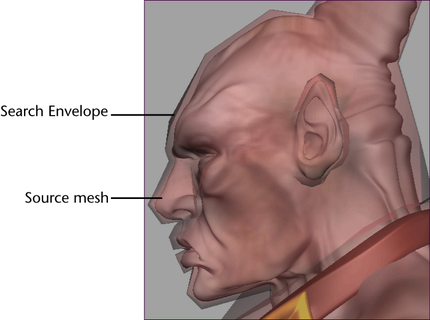
The search envelope is a user-editable piece of geometry that defines the search volume or threshold of the transfer map generation operation.
This attribute sets the size (%) of the target meshes’ search envelope. If you set the Search Envelope to 10, then the size of the envelope will be 10% larger than its target mesh.
You can edit the search envelope’s vertices to fine tune its shape and coverage.
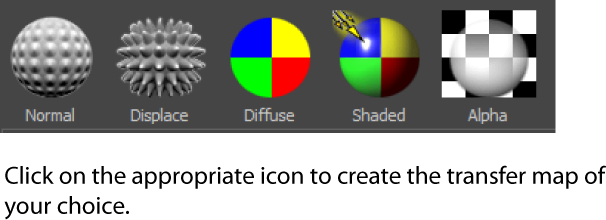
Select a map type from the list of icons available. The section for the selected map type appears. You can create as many maps as you need.
Your settings (for example, the map sections that you have created and checked) are saved with each session of Maya.
Normal maps capture the surface normal information of the source meshes. The texture is sized and positioned depending on the UV parameterization of each mesh.
When on, a normal map is generated. Enter the filename and path to which you want to save the map.
Creating and applying a normal map to a surface allows a lower density surface to include finer detail, giving the appearance of a much higher density surface.
Sets the file format for the normal map you want to create. See File formats.
When you select a file format from the drop-down list, Maya automatically appends the appropriate file extension to the filename of the normal map. For example, if you select gif from the drop-down list, .gif is automatically appended to the filename.
Similarly, if you enter path/mapname.gif as your filename, the file format option is automatically set to gif.
When on, all source materials (such as bump maps) are included in the normal map. Use this attribute to obtain a view of normals after they have been modified (e.g. after a bump map has been applied), as they would appear in the final render.Turn this option off to view normals are they are in the actual geometry.
If you plan to create several maps with the same width and height, you can reuse your settings by entering them in the Maya Common Output section of the Transfer Maps window.
If you uncheck this option, the Map width and Map height attributes appear within the Normal Map section of the window. For more information regarding these attributes, see Maya Common Output .
To add an alpha channel to a color or normal map, see Create texture maps with the Transfer Map tool.
Displacement maps alter the surface of the geometry to simulate 3D surface details. It is created by capturing the height or vertical distance between two points on a surface into a texture map. Displacement occurs along the surface normals according to the intensity of the pixels in the texture map.
When on, a displacement map is generated. Enter the path and filename to which you want to save the map.
Geometry that is displacement mapped typically has a higher density of geometry that captures more detail. This is useful for objects viewed in silhouette. Due to their complexity in surface detail, displacement maps take longer to render. For more information, see Displacement maps.
Sets the file format for the displacement map you want to create. See File formats.
When you select a file format from the drop-down list, Maya automatically appends the appropriate file extension to the filename of the displacement map. For example, if you select gif from the drop-down list, .gif is automatically appended to the filename.
Similarly, if you enter path/mapname.gif as your filename, the file format option is automatically set to gif.
If you plan to create several maps with the same width and height, you can reuse your settings by entering them in the Maya Common Output section of the Transfer Maps window.
If you uncheck this option, the Map width and Map height attributes appear within the Alpha Map section of the window. For more information regarding these attributes, see Maya Common Output .
Diffuse color maps contain one or more materials that are sampled into a single color channel. A diffuse color map captures how the target mesh reflects (or scatters) color in many angles. This is useful when you want to create the effect of color spreading freely over a surface.
When on, a diffuse color map is generated. Enter the path and filename to which you want to save the map.
Sets the file format for the diffuse color map you want to create. See File formats.
When you select a file format from the drop-down list, Maya automatically appends the appropriate file extension to the filename of the diffuse color map. For example, if you select gif from the drop-down list, .gif is automatically appended to the filename.
Similarly, if you enter path/mapname.gif as your filename, the file format option is automatically set to gif.
If you plan to create several maps with the same width and height, you can reuse your settings by entering them in the Maya Common Output section of the Transfer Maps window.
If you uncheck this option, the Map width and Map height attributes appear within the Diffuse Color Map section of the window. For more information regarding these attributes, see Maya Common Output .
To add an alpha channel to a color or normal map, see Create texture maps with the Transfer Map tool.
Lit and shaded maps contain all the scene lighting information (including diffuse lighting) for the source objects. Samples of the illumination in the source mesh are stored in the lit and shaded color map to be applied to the target mesh.
When on, a lit and shaded map is generated. Enter the path and filename to which you want to save the map.
A lit and shaded color map captures how the target mesh reflects (or scatters) light, shadow and color in many angles. This is useful when you want to create the effect of light and color that spreads freely over a mesh.
Sets the file format for the lit and shaded color map you want to create. See File formats.
When you select a file format from the drop-down list, Maya automatically appends the appropriate file extension to the filename of the lit and shaded color map. For example, if you select gif from the drop-down list, .gif is automatically appended to the filename.
Similarly, if you enter path/mapname.gif as your filename, the file format option is automatically set to gif.
If you plan to create several maps with the same width and height, you can reuse your settings by entering them in the Maya Common Output section of the Transfer Maps window.
If you uncheck this option, the Map width and Map height attributes appear within the Lit and Shaded Color Map section of the window. For more information regarding these attributes, see Maya Common Output .
To add an alpha channel to a color or normal map, see Create texture maps with the Transfer Map tool.
When on, an alpha map is generated. Enter the path and filename to which you want to save the map.
To add an alpha channel to a color or normal map, see Create texture maps with the Transfer Map tool.
Sets the file format for the alpha map you want to create. See File formats.
When you select a file format from the drop-down list, Maya automatically appends the appropriate file extension to the filename of the diffuse color map. For example, if you select gif from the drop-down list, .gif is automatically appended to the filename.
Similarly, if you enter path/mapname.gif as your filename, the file format option is automatically set to gif.
If you plan to create several maps with the same width and height, you can reuse your settings by entering them in the Maya Common Output section of the Transfer Maps window.
If you uncheck this option, the Map width and Map height attributes appear within the Alpha Color Map section of the window. For more information regarding these attributes, see Maya Common Output .
Specifies how the texture you want to create will appear on the target object.
Select one of the following options:
Use UV Space when your source and target meshes are of different proportions or different shapes. For example, if you are creating both a male and a female character and need to transfer surface attributes from one to another. Even though both meshes have arms, the arms are sufficiently different that spatially based transfers give poor results. Ensure that you define UV space mapping for both meshes.
Specifies the number of samples per pixel taken from the source mesh for the map and determines the quality of the texture map. Increase the sampling quality for more details in your texture map. However, before tweaking the sampling quality value, you must first ensure that your source object is of high quality. For example, if you are creating an ambient occlusion transfer map, you should first tweak the number of occlusion rays of your source object to ensure that it provides high quality detail before modifying the Sampling Quality attribute.
When this option is enabled, faces with reverse UV winding order do not contribute to the creation of the transfer map. A typical application of this feature is the creation of mirrored normal maps for a character. See Creating and using mirrored normal maps on a character or object.
 Except where otherwise noted, this work is licensed under a Creative Commons Attribution-NonCommercial-ShareAlike 3.0 Unported License


 -click the object names in this list to:
 Maya supports source objects with hardware shaders derived from MPxHwShaderNode. You can then use the