Untangles the border of the currently selected UV shell, such as an edge that loops around itself. Straighten UV Border provides more control than the Map UV Border operation in these circumstances.

Pushes the selected border area outward or inward by the specified amount. A value of zero forces the edge to be straight. Each Curvature unit is .01 on the UV coordinate scale.
Maya curves the border outward or inward depending on whether the value is positive or negative. However, you cannot tell in advance whether to use positive or negative. With the polyStraightenUVBorder node opened in the Channel Box or Attribute Editor, try positive and negative values and check the results in the UV Texture Editor.
Affects the shape of the straightened border by blending it with the original border shape. You can use this setting to constrain the effect of the above two settings. Set to one, Maya keeps the original shape and overrides the other settings. Set to zero, Maya does not consider the original shape when straightening. Values between zero and one proportionally blend the original shape with the curvature created by the other settings.
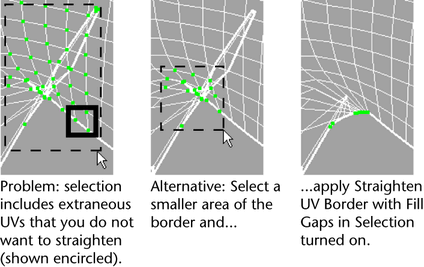
The Fill gaps in selection options helps you straighten UVs that are missing from your selection because they are difficult to select.
The UV Gap Tolerance setting is the threshold of when Maya selects and straightens the unselected UVs. For example, if there are three unselected UVs in the middle of two selected UVs, UV Gap Tolerance must be 3 or higher in order for Maya to select and straighten the middle UVs. The following illustration shows an example.

 Except where otherwise noted, this work is licensed under a Creative Commons Attribution-NonCommercial-ShareAlike 3.0 Unported License