Use the editor to create various types of texture maps. For more information, see Transfer Maps.
Note
- All editor target objects must have clean, non-overlapping UVs.
- NURBS and Subdivision Surfaces are not supported as source or target meshes. The editor can only generate texture maps for polygonal geometry.
- By default, if multiple target objects are loaded in the editor, then a single map is generated for all the targets. However, if you want to create separate maps for each of your
target objects, then you need to perform the bake operation for each target separately.
- You can use display layers or quick select sets to separate and keep track of your source and target meshes.
- You can use file referencing to bring high resolution geometry into your scene to be used as source meshes.
For a description of the editor options, see Lighting/Shading > Transfer Maps.
To create a map of one object’s mesh attributes and then bake that map onto another object
- Select Lighting/Shading > Transfer Maps.
The window appears.
- In the scene view, select the object you want as your target. This is the object to which you want to bake the texture map.
- In the section of the editor, click the button.
The object you selected in the scene view is now the current target for your object transfer map operation.
- In the scene view, select the object that you want as your source. This is the object that has the mesh attributes for which you want to create a texture map.
- In the section of the editor, click .
The object you selected in the scene view is now the source mesh for your transfer map operation. By default, all the unselected
meshes in your scene are loaded as the source meshes.
Tip
A shortcut to this procedure is to first select the object that you want as your target and then select Lighting/Shading > Transfer Maps. This way, the object that you selected is automatically listed in the section of the editor. All other unselected meshes in your scene are also automatically loaded as the source meshes.
- From the list of icons, select the types of output map you want to generate when you create your texture map and click on the appropriate icon.
See Output maps.
- Set the output options for each of your texture maps.
If you plan to create several maps with the same width and height, you can reuse your settings by entering them in the Maya Common Output section (or section) of the window.
Otherwise, if you uncheck the option (or option) for your texture map, the and attributes appear in the texture map section that you are currently working on.
See Maya Common Output.
- Select one of the following:
- Click if you want to generate the texture maps and then close the editor.
- Click to generate a texture map and leave the window open.
- Click to disregard any changes to the editor settings.
To create a normal map using the editor’s default settings
- Load your source and target meshes into a new Maya scene.
- Make sure that your source and target meshes are positioned on top of each other in the scene view.
- Select your target mesh in the scene view.
- Select Lighting/Shading > Transfer Maps.
The mesh you selected is automatically loaded as a Target and all other meshes in your scene are loaded as Sources.
- In the section, click on from the list of icons to create a map.
- Set the following attributes in themap section:
This determines the name of the texture map file as well as where the map will be saved.
This determines the file format of the normal map you generate.
Note
If you want to render your normal map in mental ray for Maya, you must save the normal map as one of the supported formats:
EXR, Maya IFF, JPEG, MI, PNG, YUV, RLA, SGI, PIC, TIM, TGA, and BMP. You must also turn on the option in the Render Settings: mental ray tabs, Options tab, section, sub-section. For more information, see Render Settings: mental ray tabs.
Select .
- Check the option so that you can share and reuse your settings when you create more than one map with the same width and height.
- Scroll to the section and expand the section to set your common map attributes. Set the following options:
This specifies the resolution for the texture map.
Note
The Maya scene view only supports tangent space maps and they are only visible in the scene view when in mode.
- Select a medium .
- Select in .
- Keep the rest of the options at their default settings.
- Scroll to the section to specify how the texture map you are going to create will be linked to the target mesh. To view the results of
the texture map within Maya, enable : /: .
- Bake the normal map.
Tip
- You can use display layers or quick select sets to separate and keep track of your source and target meshes.
- You can use file referencing to bring high resolution geometry into your scene to be used as source meshes.
To create a left-handed tangent space normal map
- In order to create a left-handed tangent space normal map, you must do the following:
- Open the for the target meshes’ shape node.
- Expand the section and select under .
For more information regarding the left handed tangent space, see Tangent Space.
Advanced normal map generation
To create a custom search envelope
- Select Lighting/Shading > Transfer Maps.
Theeditor appears in the scene view.
- In your scene view, select the polygonal mesh that you want to define as your custom search envelope.
- In the section, click .
The selected mesh is loaded into the editor as a target mesh.
-
 -click on the mesh’s name In the section and select from the context-sensitive menu that appears.
The polygon mesh you selected is now the search envelope for your operation.
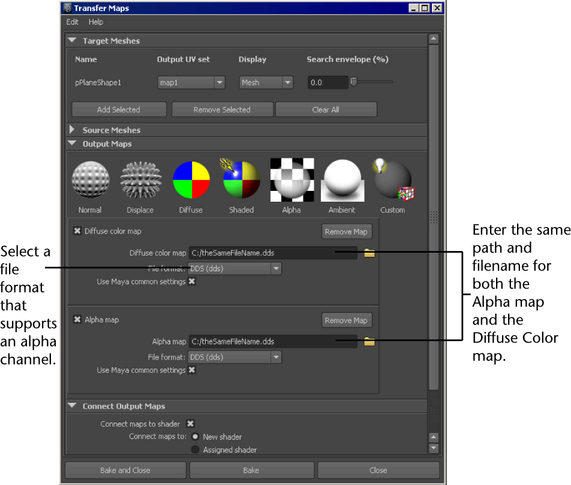
To create a texture map with an alpha channel
- Transfer maps allow you to pack any scalar output (for example, alpha or displacement) into the alpha channel of the texture
map being used for a vector output (for example, color or normal). Therefore, you can create, for example, a color map with
alpha, or a normal map with displacement, or a color map with displacement, and so forth.
- Select a file format that supports an alpha channel (for example, .dds, .exr, .tif).
- Enter the same path and file name into the two output you want to combine into a single texture map. The path and file names
are case sensitive.
- Bake the map.
Note
If the option is enabled, Maya attempts to connect the combined map to the shader. However, many of the combinations that are generated
using this method require a custom (hardware) shader for correct display in the scene view.