For texture-specific attributes, see the 3D texture name: Brownian, Cloud, Crater, Fluid Texture 3D, Granite, Leather, Marble, Rock, Snow, Solid Fractal, Stucco, Volume Noise, Wood.
Corrects the color or intensity of a texture.
-
-
If you map a texture to a material in such a way that it that does not cover the entire surface, the file node’s shows through. To select a different color, click the color bar to open the . To change the texture’s coverage, use the placement options.
-
-
Scaling factor applied to the texture’s channel. For example, you can color-correct a texture that appears too green by setting the to a shade of blue.The default color is white (no effect).
-
-
Offset factor applied to the texture’s channel. For example, you can brighten a texture that appears too dark by setting the to a shade of grey. The default color is black (no effect).
-
-
Only has an effect if the texture is used as a bump or displacement. Scaling factor applied to the texture’s channel. The default value is 1 (no effect).
-
-
Only has an effect if the texture is used as a bump or displacement. Offset factor applied to the texture’s channel. For example, if the value is -1 and the value is 1, the channel is inverted. The default value is 0 (no effect).
-
-
Off by default. The alpha (mask) output depends on the luminance of the color channels. Bright areas of the texture are more
opaque when compositing, and dark areas are more transparent.
Note
You cannot use for , , or textures.
-
-
attributes scale the size of the filter and let you specify the amount of blur in the texture map. Use it as an anti-aliasing
technique used to refine file textures, reduce flickering, or to achieve special effects.
By default, is set to a value of 1.0 to help prevent such aliasing effects. The effect of is related directly to eye space. As the object moves further away from the eye, the more the texture blurs.
For more information, see Texture filtering.
-
-
Controls the texture blur in texture space (not eye space). Use for a blurred effect instead of anti-aliasing. Maya adds a constant value to the setting. The default value is 0. Increasing the value increases the texture blur. For example, 1.00 completely blurs the
texture.
Tip
A and of 0.00 results in no blur effect, but a small amount of blur can help reduce moiré and aliasing effects in texture maps.
-
-
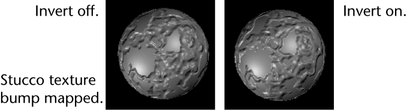
Reverses all texture colors (black becomes white, white becomes black, and so on). is off by default. For example, you can change a bump or displacement map’s raised regions to depressions and vice versa
by setting on or off.
- ,
-
Wrap repeats or tiles the texture completely over the object. If off, everything outside the 3D placement cube displays the
texture’s default color. is on by default.
Tip
Some nodes, such as the Reverse utility, repeat themselves to achieve the effect of , so that it extends infinitely. Others, such as a Marble texture, extend outwards without repeating.
To adjust texture placement on all objects at once, turn on, transform the texture placement icon, then turn off to see the results. Turning on also means that if you transform any of the objects during an animation, the 3D texture transforms accordingly.
-
-
Controls how much of the texture’s is mixed into the texture . A value of 0 means the does not affect the texture . As you increase the value, more and more of the mixes in. This attribute does not work unless is turned off and is turned on.
To blend colors and textures using the slider
- Change the (in the section of the texture’s ), or map another texture to the .
- Make sure and are off and turn on.
- Drag the slider to change the value.
-
-
Applies a color map to the texture and lets you add or subtract colors from a texture’s default settings. Maya maps the U
value to the original texture’s hue, and the V value to the original texture’s intensity. ( is similar to the Shading Map material and uses the Rgb to Hsv.)
To remap a texture
- Click the button under the section. The texture colors change and a appears. Adjust the texture colors and attributes if necessary.