For more information about shadows, see Shadow in Maya.
The color of shadows produced by the light. Use a colored shadow to simulate shadows produced by transparent, colored surfaces (for example, colored glass). The default setting is black.
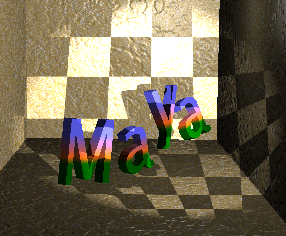
You can also map textures to shadows to create interesting effects. The following example shows a Checker texture mapped to the Shadow Color of a Spot Light.

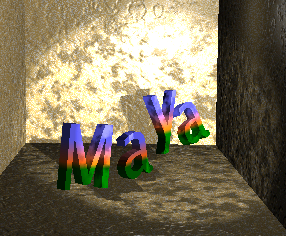
If you decide to map a texture that has color (such as the Stucco texture in the following example), change the texture’s color to black and white if desired.

The Depth Map Shadow Attributes control the appearance of depth map shadows produced by the light.
For more information about depth map shadows, see Depth map shadows.
The resolution of the light’s shadow depth map.
If the Resolution is too low, shadow edges appear jagged or pixelated. Increasing the Resolution also increases rendering times, so set it to the lowest value that produces shadows of acceptable quality.
As a starting point, set Resolution to the rendering resolution. If the light moves during an animation, you may need to increase the Resolution to avoid flickering shadows. The slider range is 16 to 8192. The default value is 512.
If off, Maya calculates the distance from the light to the nearest shadow casting surface for each pixel in the depth map. If the distance from the light to another shadow casting surface is greater than the depth map distance, that surface is in shadow.
A pixel in the dmap can be forced to approximate a large area of the scene. Although you can reduce this effect by increasing the Resolution, you are only making the problem smaller. This also increases rendering times. A better solution is to turn on Use Mid Dist.
If on, for each pixel in the depth map, Maya calculates the distance from the light to the nearest shadow casting surface and the distance from the light to the next nearest shadow casting surface and averages them.
If the distance from the light to another shadow casting surface is greater than the depth map distance, that surface is in shadow. Use Mid Dist is on by default.
If on, Maya automatically scales the depth map so that it only fills the area of the light’s illumination that contains shadow casting objects.
For example, if shadow casting objects are only in the center of a spot light’s beam, the depth map only covers the region occupied by those objects. Because the Resolution is an absolute resolution (that is, pixels, not pixels per inch), decreasing the size of the depth map effectively increases the resolution of the depth map and the quality of the shadows without increasing rendering times.
If off, you can manually scale the depth map within the area of the light’s illumination using the Focus attribute (for point lights and spot lights) or the Width Focus attribute (for directional lights). Use Auto Focus is on by default.
The angle (Focus) or width (Width Focus) to scale the depth map within the area of the light’s illumination. (You can scale the depth map automatically by turning on Use Auto Focus.)
Because the Resolution is an absolute resolution (that is, pixels, not pixels per inch), decreasing the size of the depth map effectively increases the resolution of the depth map and the quality of the shadows without increasing rendering times.
Focus is only available for point lights and spot lights if Use Auto Focus is off. The slider range is 0 to 360. The default value is 90.
Width Focus is only available for directional lights if Use Auto Focus is off. The valid range is 0 to infinity. The default value is 100.
Use Light Position is only available for directional lights. If on, only objects in front of the directional light's icon are lit and cast shadows. If off, objects both in front of and behind the directional light's icon are lit and casts shadows.
Use Light Position is only available for directional lights. Use Light Position is off by default.
Controls the softness of shadow edges. (The softness of shadow edges is also influenced by the size of the shadow and the Resolution.) Increasing Filter Size also increases rendering times, so set it to the lowest value that produces acceptable results. A Filter Size of 3 or less is usually sufficient. The valid range is 0 to infinity. The slider range is 0 to 5. The default value is 1.
The slider range is 0 to 1, but you can type in a higher value. The default value is 0.001.
Controls the graininess of shadows appearing in illuminated (light) fog. Increasing Fog Shadows Samples also increases rendering times, so set it to the lowest value that produces acceptable results. Shadows that are cast from very narrow objects into illuminated fog may shift during an animation. In this case, increase the Vol Shadow Samples value. The default value is 20.
Lets you save a light’s depth maps to disk and reuse them during subsequent renders. By saving depth maps to disk, and reusing them later, you can decrease the time it takes to render the scene (see Reuse depth maps). Depth maps are saved in the renderDate/depth directory.
The name of the depth map file that Maya saves to disk. The name of the depth map may also include the scene name (if Add Scene Name is on), the light name (if Add Light Name is on), and the frame extension (if Add Frame Ext is on). Shadow Map File Name is only available if Disk Based Dmaps is set to either Overwrite Existing Dmap(s) or Reuse Existing Dmap(s). Depth maps are saved in the renderDate/depth directory. The default depth map name is depthmap.
Only available when Disk Based Dmaps is set to Reuse Existing Dmap(s). The path and name of a macro script that Maya runs to update a depth map when it reads it from disk. Add Use Macro is useful mainly for troubleshooting.
The macro gets all the information for creating or processing depth maps on disk. The following example is written in Perl. The macro post-processes or creates the maps. You can modify or create maps of any width or height. Maya looks at the sizes specified in the IFF Z-depth map file and uses them. The macro is called each time a map is going to be read from disk. For example, the map may be called several times in the case of a point light, which can use up to six maps.
The arguments are named so that new arguments can be added easily. The arguments currently supplied to the script by Maya are:
mapname=FullPathMapName,middistmapname=FullPathMidDistMapName,
lightname=LightShapeNameUsed,pathname=ShadowMapPathUsed,
readanimextname=RedExtUsed,curranimextname=CurrExt,
lastdumpanimextname=lastExtDumped,bias=biasValue
An example of a Perl script macro is as follows:
#!/bin/perl
# # Example of a callback macro called before reading shadow maps from disk #
# # One argument with fields separated by '&'
# each field being 'variableName=variableValue
#
# Creates a vartab hash table out of the ARGV[0] argument
#
# print "\n------------------\n",$ARGV[0],"\n------------------\n";
if( $#ARGV == 0 )
{
	@fields = split( /\,/, $ARGV[0] );
	$nbfields = $#fields + 1;
	foreach $field( @fields )
	{
		@varvalue = split( /\=/, $field );
		$vartab{$varvalue[0]} = $varvalue[1];
	}
	$mapname = $vartab{"mapname"};
	$middistmapname = $vartab{"middistmapname"};
	$lightname = $vartab{"lightname"};
	$pathname = $vartab{"pathname"};
	$readanimextname = $vartab{"readanimextname"};
	$curranimextname = $vartab{"curranimextname"};
	$lastdumpanimextname = $vartab{"lastdumpanimextname"};
	$bias = $vartab{"bias"};
	print "\tmapname = ",$mapname,"\n";
	print "\tmiddistmapname = ",$middistmapname,"\n";
	print "\tlightname = ",$lightname,"\n";
	print "\tpathname = ",$pathname,"\n";
	print "\treadanimextname = ",$readanimextname,"\n";
	print "\tcurranimextname = ",$curranimextname,"\n";
	print "\tlastdumpanimextname = ",$lastdumpanimextname,"\n";
	print "\tbias = ",$bias,"\n";
#
# List the shadow map files to be postprocessed
#
	print "\n";
	if ( -e $mapname ) {
		print "PostProcess shadow depth map file ",$mapname,"\n";
	}
	if ( -e $middistmapname ) {
		print "PostProcess shadow depth map file ",$middistmapname,"\n";
	}
#
# return 0 to confirm everything is ok
#
	exit 0;
}
Only available for spot lights.
If on, Maya generates a single depth map for the spot light. A single depth map is usually sufficient if the Cone Angle is less than 90, but if the Cone Angle is large, the Resolution may not be high enough to produce high quality shadows (shadow edges may appear jagged). If the Cone Angle is large, turn off Use Only Single Dmap. Use Only Single Dmap is on by default.
If off, Maya generates up to five separate depth maps for the spot light. Each depth map extends from the light in one of six possible directions: positive or negative X-axis directions, positive or negative Y-axis directions, and positive or negative Z-axis directions. The resolution of each depth map is the Resolution.
The spot light also produces high quality shadows even if the Cone Angle is large. Rendering times may also increase because Maya is generating several depth maps for the light. However, you can control the number and direction of depth maps that Maya generates by turning the Use XYZ+- Dmap attributes on or off.
These attributes are only available for spot lights (if Use Only Single Dmap is off) and point lights. The default setting for all attributes is on.
Control the number and direction of depth maps Maya generates for the light. For example, if X+ Dmap is on, Maya generates a depth map for the light in the direction of the positive X-axis.
Maya can generate up to five depth maps for a spot light and up to six depth maps for a point light. However, you usually only need the light to cast shadows in a few specific directions. By turning off depth maps in certain directions, you can help reduce rendering times. For example, if there is a point light at the top of the scene, and all shadow casting objects are below the light, you can turn off Use Y+ Dmap (assuming the scene uses a Y-up coordinate system) and Maya does not generate a depth map in the direction of the positive Y axis (up).
Control the appearance of raytraced shadows produced by the light.
For more information about raytraced shadows, see Raytraced shadows.
Controls the softness of shadow edges by setting the size (Shadow Radius or Light Radius) or angle (Light Angle) of the light. For example, a large light produces softer shadows than a small light. The light radius is also used for light glows to determine the occlusion/visibility (for point and spot lights).
The Shadow Radius attribute is only available for ambient lights.
The Light Radius attribute is only available for point lights, volume lights and spot lights. The slider range is 0 (hard shadows) to 1 (soft shadows). The default value is 0.
The Light Angle attribute is only available for directional lights and volume lights. The slider range is 0 (hard shadows) to 180 (soft shadows). The default value is 0.
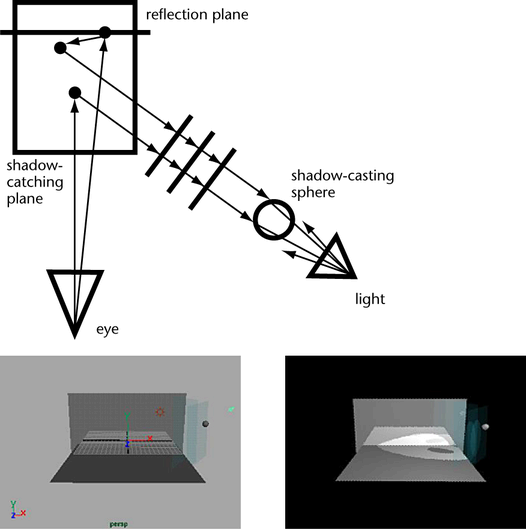
Ray depth specifies the maximum number of times a light ray can be reflected and, or refracted and still cause an object to cast a shadow. Transparent objects between those points in which the ray changes direction will have no affect on the light ray's termination. This can best be visualized by example in which the ray traced shadow is visible on both the ground plane and reflection plane. If the ray depth is set to 1, the shadow will only be visible on the ground plane. If the ray depth is set to 2, the shadow will be visible on both the ground plane and the reflected plane.
