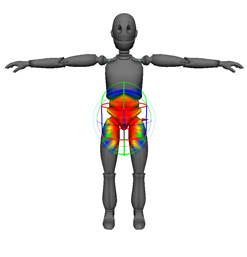
The interactive method of smooth skin binding lets you set initial weights on the mesh based on volume manipulators. The volume objects give you a visual idea of the sphere of influence for each joint you are binding.
To smooth bind skin and set initial weights using manipulators
 , set the options you want, then click Bind Skin.
The Interactive Skin Bind Options let you define the initial shape and size of the volume manipulators. For example, to create manipulators that are the same approximate length as the bone objects, set the Minimum Weight to 0. This also gives the manipulators a default volume based on the surrounding mesh. You can also use the Volume Type drop-down list to set whether the manipulators are shaped like capsules or cylinders.
A volume manipulator displays on the selected joint (or the highest joint in a selected hierarchy), and the Interactive Skin Binding Tool settings display.

If you see jagged deformations when you initially bind, this indicates an area where vertices are not yet included in the sphere of influence of any volume manipulator. As you adjust the shape and size of the volume manipulators to include those collapsing vertices, the jagged artifacts disappear.
You can immediately start to drag the edges of the manipulator to adjust its shape until it reflects the amount of influence you want. See Adjust interactive bind manipulators for more information.
When you finish establishing the rough skin weights using the manipulators, you can go on to paint weights and fine-tune the weighting for the mesh.
When you use interactive binding, the Normalize Weights mode for the mesh is automatically set to Post normalization. This mode is required for interactive binding because weights are always normalized when you deform the mesh and not while you adjust manipulators. You can use the Display Weights options to set whether you view normalized weights as you adjust the manipulators. See also Display Weights and Normalize Weights mode.