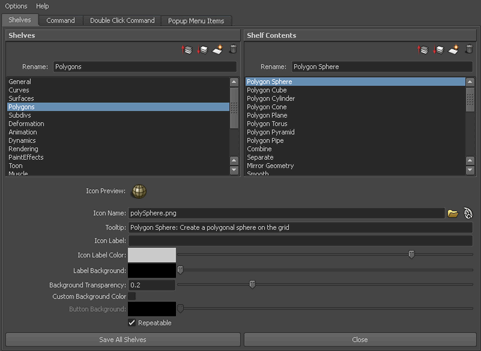
The provides a dialog box with which you can create and edit shelves.
You can access the by selecting or by  any item on the Shelf.
Tabs and controls
-
-
The section displays existing shelves. Select a shelf name here to display its contents in the section. You can rename a shelf by typing a name in the field. You can also create, delete, and reorder shelves using the appropriate icons in the upper-right corner of the section.
-
-
The section displays the items contained in the shelf selected in the section. You can rename shelf items by typing a name in the field. You can also create, delete, and reorder shelf items using the appropriate icons in the upper-right corner of the
section.
-
-
Displays the current image assigned as the selected shelf item’s icon.
-
-
Displays the name of the current image assigned as the selected shelf item’s icon. You can choose an image for an icon by
clicking the folder icon next to the field and navigating to the file you want to use. Alternatively, you can choose from existing Maya icons by clicking the
Maya icon and choosing from the list of available files.
-
-
Specify a brief description of the tool. This description appears with the icon in the icon or text modes, as well as in the
tooltip (the pop-up description when the mouse hovers over the icon).
-
-
Type a label for the icon. This text appears over top of the icon to distinguish it from other items that use the same icon.
-
-
Select a color for an Icon Label text by clicking the colored box and selecting a color from the Color Chooser. You can adjust
the shade by moving the slider.
-
-
Select a background color for the . This background appears over top of the icon, but behind the . You can use it to make the more legible over the icon itself.
-
-
Allows you to adjust the transparency of the .
-
-
Turn this on to customize the background of the selected shelf item’s icon.
-
-
Select a background color for the selected shelf item’s icon in the . This option is only available if is on.
-
-
Turn this on to allow the command to be repeated from Edit > Repeat.
-
-
Click the or tab to view and edit the MEL / Python code that is activated when the shelf item is clicked or double-clicked respectively.
-
-
Click the tab to view and add custom right-click menu items to the currently selected shelf. You can create new menu items, rename
/ reorder / delete existing menu items, and assign behavior to menu items by entering MEL or Python scripts in the panel.
-
-
Click to save all changes immediately and write the information to the user shelves directory. The file name for a shelf file has
the prefix shelf_.
-
-
Click to accept your changes but not write them to the disk immediately. If your UI preference is to save shelf changes only when
explicitly requested, the changes stay in effect only for the current session. Otherwise your changes are saved the next time
you save a file or quit the application.
Options menu
-
-
Displays only the icon. This is the default.
-
-
Displays only the shelf item names.
-
-
Displays the label below the icon.
-
-
Displays the label beside the icon.
-
-
When this option is on, your changes to the shelves are saved when you exit Maya. This is the default.
-
-
When this option is on, your changes to the shelves are only saved when you select in the window. If you don’t save your changes, then they are lost when you exit Maya.
 any item on the Shelf.
