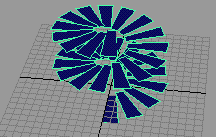
The following example illustrates how to use animation snapshot to create a model that resembles a staircase.
A a simple planar surface appears in your scene.

This will be the bottom step of the staircase. If desired, scale the plane and move its CVs to make the plane look more like a step.

Items in the Maya main menu switch to the Animation menu set.
 (Linux and Windows) or
  (Mac OS X) to display the step’s pivot point.
 or
or  again to exit pivot point mode.
This creates the end position of the step’s vertical travel.
 .
.
These settings will create snapshot copies of the animated geometry at a regular intervals for the entire Time Slider range. The By Time value sets the time interval when snapshots are taken.
If, instead, you turn on Start/End for the Time Range option, you can enter a Start Time and End Time (time range) for the animated geometry.
Wait several moments for the operation to complete.

The original object and animation is unchanged. In the Outliner, the copies of the steps exist under a new group, snapshotGroup.