You can paint textures with the 3D Paint Tool using two types of brushes: Artisan brushes and Paint Effects brushes.
Artisan brushes use grayscale images to define the brush profile (or shape). You can select from 40 predefined brush shapes, or you can create your own shapes using any image format supported by Maya. You can paint, erase and clone textures using Artisan brushes.

Paint Effects brushes are defined by specific combinations of attribute settings and can be simple (like pen, pastel, oil paint, and pencil brushes) or they can simulate growth to get their look (like flowers, feathers, hair, and fire brushes). You can select the default Paint, Smear, or Blur brush to paint with, or you can select any preset brush from Visor or your shelves.

Polygonal and subdivision surfaces must have non-overlapping UVs that fit within 0 to 1 in the texture space. In general, Automatic Mapping produces UVs that can be used for painting. For details, see Polygon modeling overview a and Subdivision Surface Modeling ( www.autodesk.com/maya-docs-archive ) .
 ). For information on tool settings, see 3D Paint Tool.
Warning: Some surfaces have no file texture assigned to the current attribute.
Also, the brush outline displays an X ( ) across it when you move the brush over the surface to indicate that you are unable to paint on the selected attribute texture.
If you are painting Single Channel (grayscale) attributes such as bump, or diffuse, the color you paint is automatically converted to grayscale.
The brush operation you select defines whether you are going to apply paint to the texture, or whether you are going to erase, clone, smear, or blur paint already applied to the surface.
You can apply paint to the texture using Artisan Paint brushes or Paint Effects Paint brushes. To erase or clone you use Artisan brushes. To smear or blur you use Paint Effects brushes.
To select an Artisan brush to Paint, Erase, or Clone
Maya automatically selects the brush profile selected when you last used the Artisan Paint brush. (If the last profile was a custom brush, the operation remembers only that it was a custom brush, not which custom brush. If the custom brush was changed for either the Erase or Clone operations, it changes for the Paint operation and for any other operation with the custom brush profile selected.)
Use the Rotate To Stroke option to change the orientation of brush profiles that are not uniformly round. This option is not available for the Clone operation.
To select a Paint Effects brush to Paint, Smear, or Blur
Paint - The brush becomes the last selected Paint Effects brush with a Brush Type set to Paint. If no Paint brush was previously selected, the default Paint Effects paint brush is used.
Smear - The brush becomes the last selected Paint Effects brush with a Brush Type set to Smear. If no Smear brush was previously selected, the default Paint Effects smear brush is used.
Blur - The brush becomes the last selected Paint Effects brush with a Brush Type set to Blur. If no Blur brush was previously selected the default Paint Effects blur brush is used.
 and select the brush from Visor. The paint operation changes to Paint EffectsPaint, Smear, or Blur, depending on the Brush Type defined for the brush preset. Paint EffectsErase is not supported.
 in the 3D Paint Tool settings and make the changes to the brush settings in the Paint Effects Brush Settings window. Any changes you make to the settings are remembered the next time you select the Paint EffectsPaint brush.
You can save these settings as a new preset by following the instructions under Create new brush presets, starting at step #3. To create the icon for preset (step #8), go into canvas mode, paint a stroke, grab the icon and return to the scene view without leaving the 3D Paint Tool.
To select the last selected Paint Effects brush
 in the 3D Paint Tool settings and paint. The Paint Operation changes to Paint EffectsPaint, Smear, or Blur, depending on the Brush Type defined for the last selected brush preset.
You can erase the strokes you paint by painting over them with the ArtisanErase brush. When you erase, you remove the color from the painted pixels, revealing the last saved texture.
To set the background texture to erase to, turn off Update on Stroke and click the Save Textures button. Flooding with the operation set to Erase restores the texture to its last saved version. You cannot erase when Update on Stroke is turned on, since the texture is constantly saved.
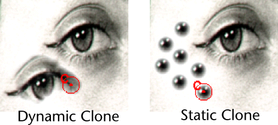
You can clone an area of the texture (duplicate it) and then paint that sample elsewhere on the texture or on other textures. There are two cloning approaches: dynamic and static.
With dynamic cloning, the clone source moves as you paint. In the following DynamicClone example, a small area of the top eye was set as the clone source. Painting below the eye gradually reproduced the top eye. In the StaticClone example, the pupil was cloned and stamped.

To clone an area of the texture and paint with it
The brush outline displays an X across it  when you move the brush over the surface to indicate that you are unable to paint on the selected attribute texture until
you set a clone source.
Maya automatically selects the brush profile selected when you last used the Clone operation. However if the last profile was a custom brush, the operation remembers only that it was a custom brush, not which custom brush. Changing the custom brush for one operation changes it for any other operation with the custom brush profile selected.
By default, the Clone Brush Mode is set to Dynamic. With dynamic cloning, the cloned area changes as you paint, moving alongside your stroke and maintaining a constant distance from the stroke path. This is an effective way to copy areas from existing textures.
If you paint over the clone source during a stroke, the original paint sample is used for the rest of the stroke, but the next stroke uses the updated clone source paint sample.
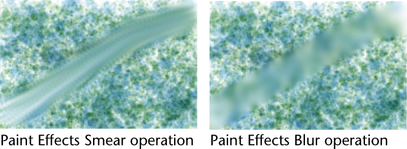
Smearing with a Paint EffectsSmear brush blends adjacent colors together along the stroke path.
Blurring with a Paint EffectsBlur brush softens the edges of adjacent colors by averaging their color values.

You can use the default Paint EffectsSmear or Blur brushes or select any Paint Effects brush with a Brush Type set to Smear or Blur. To select the default Smear or Blur brushes, click Reset Brushes and in the Paint Operations section, select Paint EffectsSmear or Blur, as appropriate. Use the Blur Intensity option to adjust the blur effect.
Using the Set Erase Image button you can set the current paint layer as what to erase back to.
Example of using Set Erase Image
You can reset the Artisan and Paint Effects brushes to their default profiles and settings by clicking the Reset Brushes button. The default brushes will now be used the next time you select these operations.
You can undo as many strokes as defined in the Undo category of the Preferences window (Window > Settings/Preferences > Preferences).