After you create a constraint, Maya creates a constraint named for the type of constraint. For example, rigidNailConstraint1 is the default name given to a Nail constraint. To adjust a constraint’s attributes in the Attribute Editor, you must first select the constraint in the Outliner or the constraint icon in the workspace.

The Rigid Constraint Attributes section of the Attribute Editor displays read-only Force and Solver Id attributes. The Force shows the X, Y, and Z components of the current force pulling towards one or both objects connected to the constraint. The Solver Id is the constraint index number the solver uses to calculate dynamics for this constraint. You can query the value of these attributes in expressions and MEL commands.
Adjust the initial position and orientation
You can adjust the initial position of all rigid body constraints. You can adjust the initial orientation of only Hinge and Barrier constraints.
To adjust a constraint’s position
To adjust a Hinge or Barrier constraint's initial orientation:
Change or turning off the constraint type
You can change the constraint type or turn a constraint off or on after you create it. Before you change the constraint type, be aware of these issues:
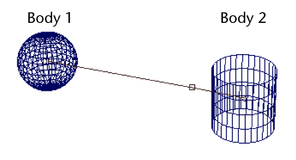
Suppose you create a pin constraint between two objects. The pin is positioned as follows. The small square represents the pin’s location.

Before making the pin constraint, the sphere was selected first and the cylinder second. In the context of the Relative To attribute, the sphere is therefore Body 1 and the cylinder is Body 2.
You then animate the movement of the cylinder in a direction perpendicular to the constraint line icon. The constraint forces the sphere to swing around the cylinder. If you key Constrain off for several frames, the sphere is no longer constrained to the cylinder. It moves in its own direction using the force previously applied to it by the constraint.
When you key Constrain on again in a later frame, the sphere will once again be tied to the cylinder. You can set the location and orientation of the pin by setting the Relative To attribute. This influences how the objects interact with each other’s movement.