This allows you to paint strokes with Paint Effects brushes. For more information, see Paint in 3D.
These are the options in the Paint Effects settings editor that you can use to define Stroke Settings.
Lets you preview the rendered look of your strokes interactively in the scene view; you don't have to view them in the Paint Effects panel. You can also edit brush attributes and see the changes happening to the stroke (Paint Effects shape) in the scene view.
To model the stroke objects, you need to convert them from Paint Effects to polygons.
To draw all Paint Effects as polygons, select Display > Rendering > Paint Effects Mesh Display. To draw selected strokes as polygons, select them and turn on Draw as mesh in the strokeShape Attribute Editor (or, turn on Draw as mesh in the Paint Effects Tool settings editor).
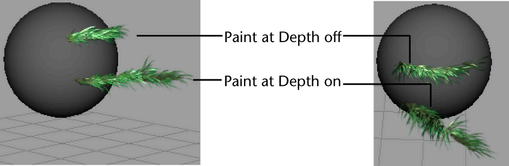
When Paint at depth is off, the depth values of the paint change as you drag the brush into the scene. If the stroke has tubes, the tubes “grow” from the surface you paint. This is the default.
When Paint at depth is on, the depth value of the stroke is determined when you first click the brush, and is then fixed at that value. If the stroke has tubes, the tubes “grow” from the plane orthogonal to the path at each step. This is useful for creating effects where you want tubes to sprout out from the path (for example, a fountain, smoke from a chimney, or a tail). The Paint Effects Tool cursor changes to project ortho-normal to the view, to indicate you are painting at depth.
You cannot change this setting after painting the stroke.
Set the display quality of the wireframe for the next stroke. The higher the percentage, the more closely the stroke wireframe represents the rendered stroke. The results of this option depends on the Simplify Method defined for the template brush. You can select to have the display percent affect the number of tubes per step, the number of segments, or both.
You can change this setting after painting the stroke. For more information, see Modify stroke display quality.
Set the distance (in world units) you want the next stroke offset from the object or plane you paint the stroke on. Offsetting the stroke is not the same as translating it. When you offset the stroke, the stroke is created normal to and a uniform distance from the stroke path, so if the surface is convex, the stroke will be bigger than the stroke path. Similarly, if the surface is concave, the stroke will be smaller than the stroke path. The cursor changes to reflect the displacement value.
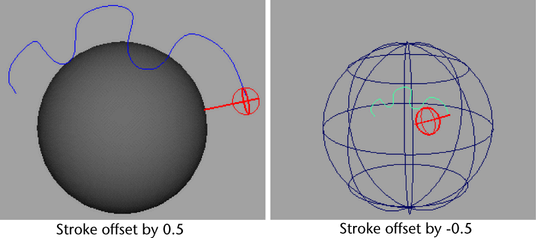
You can use the m hotkey (ModifyDisplacement under Brush Tools in the Hotkey Editor) to interactively change the stroke offset. For information on other Paint Effects hotkeys, see Use default Paint Effects hotkeys.
You can change this setting after painting the stroke. For more information, see Modify existing strokes.
Set the minimum pressure at which the pressure mapping will start to take effect. The minimum attribute value that you can paint is determined by multiplying the Pressure min by the value set for the mapped attribute. For example, if you map Tube Length to pressure, and the tube length for the stroke is 3, and the Pressure min is 0.5, no matter how lightly you press on the stylus, the tube length will never be less than 3 x 0.5, or 1.5. Use the lowest minimum pressure possible to increase the range of the mapping.
Set the maximum pressure at which the pressure mapping will take effect. The maximum attribute value that you can paint is determined by multiplying the Pressure max by the value set for the mapped attribute. For example, if you map Tube Length to pressure, and the tube length for the stroke is 3, and the Pressure max is 2, when you press as hard as possible, the tube length will be 3 x 2, or 6.


