


When you paint a stroke, the template brush attributes are copied to a new brush, which is attached to the stroke. To change the look and behavior of the stroke, you can do the following:
| You can... | For details, see... |
|---|---|
| Modify stroke settings in the Attribute Editor or Channel Box. |
|
| Modify the settings of the brush in the Attribute Editor or Channel Box. |
|
| Copy the brush settings for the stroke to the template brush. |
Copy brush settings from existing strokes to the template brush |
| Apply the brush settings from an existing brush, brush preset, or the template brush to the stroke brush. |
|
| Make strokes share the same brush. |
|
| Remove brush sharing. |
|
| Simplify stroke path curves (remove irrelevant CVs). |
|
| Change the shapes of strokes. |
|
| Modify the pressure mappings along the stroke by modifying the stroke pressure curve. |
|
| Erase, smear, or blur existing strokes. |
|
| Set up a modifier to influence all Paint Effects lines/entities |
Modify stroke settings for existing strokes
After painting a stroke, you can change the stroke settings defined for the Paint Effects Tool (display quality, surface offset, pressure mappings), but you can also change a number of other settings.
You can only modify settings for strokes painted in the scene painting view or the scene view. You cannot modify settings for strokes painted on the Paint Effects canvas.
To modify stroke settings for an existing stroke
For descriptions of the strokeShape attributes, see strokeShape node.
To modify settings for several strokes at the same time (for example to change the Display Percent), select all the strokes (Edit > Select All by Type > Strokes), open the Attribute Spreadsheet, click the Shape Keyable tab, then modify the settings. For information on using the Attribute Spreadsheet to modify settings, see the Basics guide.
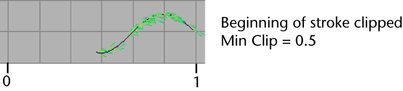
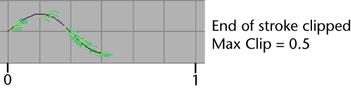
You can reveal a segment of a stroke by “clipping” the stroke end bounds in the End Bounds section of the strokeShape Attribute Editor. Only the portion of the stroke within the range defined by the Min Clip and Max Clip values displays. You can use these options to animate the stroke (for example, a trickle of water, a burning fuse, a vine growing over an object).
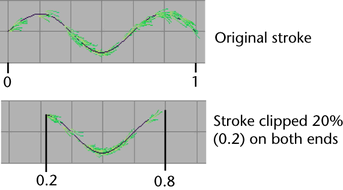
Min Clip—Specify the point along the stroke that defines the beginning of the stroke segment. When the Min Clip value is 0, the beginning of the stroke is not clipped.
Max Clip—Specify the point along the stroke that defines the end of the stroke segment. When the Max Clip value is 1, the end of the stroke is not clipped.
Modify the direction of the normal
On strokes with tubes, the tubes grow along the normal. You can define the direction of the normal in the Normal Direction section of the strokeShape Attribute Editor. For descriptions of these attributes, see Normal Direction.
Modify pressure mappings for existing strokes
If you use a stylus with pressure mappings when you create a stroke, Paint Effects assigns pressure values to UV points along the underlying stroke path curve. These mappings and values are stored with the stroke and can be modified. You can adjust the Pressure Mapping, Pressure Min and Pressure Max settings, (for details, see Set up to paint in 3D), but you can also adjust the pressure values in the Pressure Mappings section of the strokeShape Attribute Editor. Pressure values range from 0 to 1, where 1 is the maximum pressure.
It is not uncommon for a stroke to have more than 100 pressure values. Although you could individually adjust each value in this pressure array, you can also use a pressure curve to quickly adjust them. For details, see Modify stroke pressure values interactively.
Copy brush settings from existing strokes to the template brush
You can copy the brush settings of any stroke to the template brush. Once the settings are in the template brush, you can modify them before painting your next stroke, or apply them to other existing strokes.
To copy settings from a stroke to the template brush
Apply brush settings to strokes
You can apply brush settings to a stroke from an existing brush (one that is attached to another stroke), a brush preset, or the template brush.
When you apply brush settings to strokes, the brushes attached to each of the strokes remain unique, even though they have the same settings—changes to one do not affect any other. If you want the strokes to share the same brush, use the Paint Effects > Share One Brush option. For details, see Make strokes share the same brush.
To apply preset brush settings to the last stroke
To apply preset brush settings to selected strokes
To copy settings from one stroke and apply them to another
Make strokes share the same brush
Although by default each stroke has a unique brush attached to it, you can force strokes to share a single brush. When strokes share a brush, any changes you make to the brush affect all the strokes that brush is attached to. This is particularly useful if you have many strokes sharing the same look and behavior, for example, the strokes used for hair on a head.
When you attempt to share a brush with several strokes, the stroke attached to that brush must have been the last stroke selected. (The stroke last selected is also called the primary selection object and highlights green by default.) For example, if you want to share the brush attached to strokeFern1 with strokeGrass2, strokeGrass3 and strokeGrass4, you must first select the three Grass strokes, then select strokeFern1.
To make strokes share the same brush
When you modify the attributes of this brush for any one stroke, the changes are reflected on all the strokes sharing that brush.
Paint Effects creates a new brush for each stroke using the settings of the shared brush. For example, if you remove brush sharing from three strokes sharing a brush named ferns1, the first created stroke retains the brush named ferns1, and new brushes named ferns2 and ferns3 are created and attached to the other two strokes.
The stroke path is defined by an underlying stroke path curve which is comprised of CVs. Just like using the Pencil Curve Tool, painting a stroke can create irrelevant or too many CVs. You can simplify the curve by removing misplaced CVs, making the path through the CVs smoother.
Simplifying stroke path curves using the following method is not the same as rebuilding the curve. The following method attempts to preserve the appearance of the stroke and its tube, while the rebuilding method does not.
Simplifying the stroke curve removes CVs from the curve. You can also smooth the curve without removing CVs using the Smoothing attribute in the stroke’s strokeShape node. For details, see Modify stroke settings for existing strokes.
To check that the stroke curve has few CVs
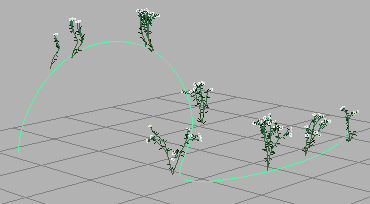
You can change the shape of Paint Effects strokes by transforming the CVs on the underlying stroke path curve.
Before changing the shape of a stroke, simplify the stroke curve to reduce the number of CVs on the stroke path curve. For details, see Simplify stroke path curves.
You can not directly modify the shape of Paint Effects curves painted on polygon meshes. However, you can perform basic CV edits by selecting the Paint Effect curve’s upstream 2D curve node.
To change the shape of a stroke

Modify stroke pressure values interactively
If you use a stylus with pressure mappings when you create a stroke, Paint Effects assigns pressure values to UV points on the underlying stroke path curve. These values are stored with the stroke. You can adjust each value individually in the Attribute Editor (see Modify pressure mappings for existing strokes), however, this could prove unwieldy given that strokes commonly have more than 100 pressure values.
Alternatively, you can interactively modify the pressure values using stroke pressure curves. A stroke pressure curve is a visual representation of the pressure values along the stroke. By moving control points of the pressure curve towards or away from a stroke, you change the pressure values on the stroke.
In the following example, Tube Length is mapped to pressure for the stroke. A pressure curve for the stroke was edited to produce new pressure values, and therefore new tube lengths.
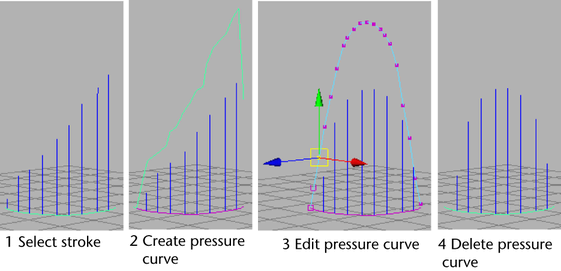
To modify pressure values interactively
 . The Make Pressure Curve Options window appears.
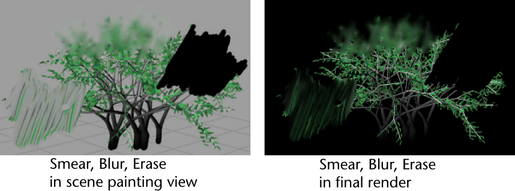
You can erase, smear, and blur paint in your scene using any brush by setting the brush type to Erase, Smear or Blur, respectively. These brushes affect existing strokes using the shape of the brush you erase, smear, or blur with. For example, if the brush has leaves, the paint smears, blurs, or erases where the leaves are painted.
Erase brushes paint alpha values of 0. The stroke will appear black in the scene painting view and in the final render, which may not produce an erased effect. However, the stroke will create a “hole” in the alpha matte, which may be useful for some compositing workflows.
To erase, smear, or blur paint in the scene painting view
Create some smear and blur type brush presets and save them on a shelf for easy access. For information on storing brushes, see Create new brush presets.