Render pass Attribute Editor


Use this node to set your options for your render pass.

Render Pass Options

Renderable

Select this option to set the render pass as renderable. When set as renderable, the render pass (frame buffer) is defined in mental ray and written to disk upon rendering completion.

Type

Select the desired render pass type from the drop-down list.

Numbers of Channels

Set the number of channels for your render pass output. Some render passes support all types of channels, while some others only support a limited number of channels.

Frame Buffer Type

Select the framebuffer type from the drop-down list.

Color Profile

Use this option when you are using color management in your scene. See Using color management in your scene for more information regarding color management.

Select the color profile that should be used when writing the render pass to disk.

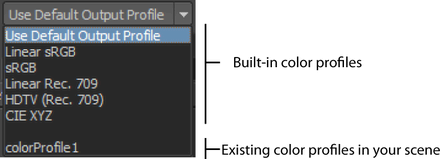
There are two sections available in the Color Profile drop-down box. Under the first section, there is a list of built-in color profiles. Under the second section, there is a list of any existing color profile nodes that are currently in your scene.

Note

See Color Profile for a list of available color profiles.
Click the colorProfile node icon to create a colorProfile node and connect it to your current renderPass node.

Note

If you select the Use Default Output Profile option under the list of built-in color profiles, Maya will use the color profile setting that you selected under the Default Output Profile option in the Render Settings: Common tab.

Tip

In order to use color management in your scene, you must select the Enable Color Management option in the Render Settings: Common tab.

Filtering

Enable this option to use the same filter settings as selected in the Render Settings window. This option is used for anti-aliasing and should be enabled in most cases.

Pass Group Name

Use this attribute to sort your render passes into logical file groups. The pass group name that you enter in this field is appended to the image file name when you include the <RenderPassFileGroup> render token in your File name prefix attribute in the File Output section in the Render Settings: Common tab.

For example, group your diffuse, specular and shadow passes into a pass group called Illumination. When rendering with openEXR, add the <RenderPassFileGroup> render token to your File name prefix attribute. All passes with Pass Group Name set to Illumination are concatenated under the Illumination exr file.

A render pass node may also have several of the following attributes, depending on the pass type:

Note

The terms hidden and visible refer to whether or not an object is associated with the pass through one or more pass contribution maps.

Use Transparency

When this option is disabled, transparency is disabled for all objects in the scene. Refractions are controlled separately, see Hidden Geometries Visible in Refractions and Hidden Geometries Produce Refractions for more information.

Holdout

Allows hidden objects to occlude. This option is useful for some compositing workflows.

Hidden Geometries Visible in Reflections

Enable this option to make hidden objects appear through visible reflective objects.

Hidden Geometries Visible in Refractions

Enable this option to make hidden objects appear through visible refractive objects.

Hidden Geometries Produce Reflections

Renders the reflections of visible objects through hidden objects.

Hidden Geometries Produce Refractions

Renders the refractions of visible objects through hidden objects.

Attenuate According to Transparency

Framebuffer values are modulated by material transparency. Only available for render pass types where it is pertinent. For example, if you render a 50% transparent surface and the object behind it is opaque, the diffuse for the opaque object is dimmed by 50% and written as is, since the object is being seen through a transparent surface.

Min Reflection Level / Max Reflection Level

The minimum and maximum number of times a light ray can be reflected. The maximum value is clamped by the Max Trace Depth value set in the Render Settings window, Quality tab.

Min Refraction Level / Max Refraction Level

The minimum and maximum number of times a light ray can be refracted. The maximum value is clamped by the Max Trace Depth value set in the Render Settings window, Quality tab.

Shadows

Use this option to turn shadows on or off for the selected pass.

Hidden Geometries Cast Shadows

When this option is enabled, objects that are not included by pass contribution maps will continue to cast shadows even though they are not visible in the scene.

Normalized 2D Motion Vector render pass attributes

The Normalized 2D Motion Vector pass node also includes these attributes:

Automatic Max Pixel Disp. / Max Pixel Disp.

If the Automatic Max Pixel Disp. option is selected, Maya calculates the maximum image resolution. For example, if the image resolution is 640x480, the biggest axis of the image, 640, is used.

Otherwise, if the Automatic Max Pixel Disp. option is disabled, Maya uses the value specified in Max Pixel Disp.

Min. Disp. Range / Max. Disp. Range

Specify how the motion vector should be remapped. For example, the default is 0 for the minimum and 1 for the maximum, with a maximum displacement of 256. Therefore, any value less than 0 is remapped to 0. Any value greater than 256 is remapped to 1, and a displacement of 128 is remapped to 0.5.

Extract Magnitude

If enabled, the length of the 2D vector is placed in the z-component. The length is also normalized; so, if the length is 256, the value written in blue channel would be 1 (assuming that the displacement value is 256).

Camera Depth render pass attributes

The Camera Depth pass node also includes these attributes: Near clipping plane / Far clipping plane, and Minimum buffer value and Maximum buffer value.

Use the attributes to normalize the camera depth value. For example, using the default values, any value less than 0 is normalized to 0 and any value greater than 1000 is normalized to 1. Alternatively, you can also use these attributes to clip objects out of the scene. You must enable the Remap Depth Values option in order for the near and far clipping planes and minimum and maximum buffer values to take effect.

Ambient Occlusion render pass attributes

Use Local AO Settings

Select this option to use the values set in the Ambient Occlusion pass attribute editor. This option is off by default.

Rays

Number of ambient occlusion rays used for the computation of each ambient occlusion value. A higher value gives a smoother image.

If you set this attribute to 0 or to a negative value, Maya will use the global Rays setting in the Ambient Occlusion section of Render Settings: Indirect Lighting tab.

Bright Color

The color used when no occluding objects are found. Default color is white.

Dark Color

The color used when total occlusion occurs. Default color is black.

Spread

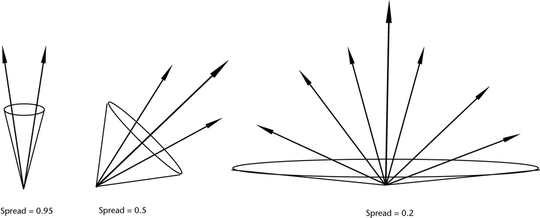
Defines how large an area of the hemisphere above the point is sampled. The value defines the cosine of the angle of a cone around the sampling direction which is narrower for small values and wider for large values. Values range from 1.0, for a cone that is a single direction, to 0.0 for a cone that covers the entire hemisphere.
Maximum Distance

The range within which occlusion is calculated. Setting this value to 0 samples the entire scene. For non-zero values, only objects within the Maximum Distance are considered. Objects outside of this distance do not occlude at all and objects that are closer occlude more strongly as the distance approaches zero.

Reflective

This option is disabled by default. When disabled, sampling is performed in a cone area based around the surface normal. If enabled, sampling is instead distributed around the reflection direction, which generates reflective occlusion. This can enhance the realism of reflection mapping.

Cache Points

Sets the number of points to be used for interpolation if Caching is enabled via the Ambient Occlusion section in the Render Settings: Indirect Lighting tab. If you set this value to negative, Maya uses the global Rays setting in the Render Settings. If you set this value to 0, Maya ignores the cache if present.

Occlusion in Alpha

Enable this option so that the scalar occlusion value is put in the returned color's alpha component, regardless of the Output Mode. The other color components remain as before. This option is particularly useful for the Bent NormalsOutput Mode.

Output Mode

Defines the return color for the Ambient Occlusion pass node. Select from one of the following options.

Occlusion

Standard occlusion behavior. No bending of normals.

Sampled Environment

Enables environment sampling. The color returned is a result of the following: average of colors sampled from the environment map * bright color + dark color.

Bent Normals (world)

Bent normals are enabled and calculated in world space and returned as RGB values where red=x, green=y, and blue=z. Note that in this mode, the normals stored on the surface are not bent. Instead, the bent normals are the output of this node.

Bent Normals (camera)

Bent normals are enabled and calculated in camera space and returned as RGB values where red=x, green=y, and blue=z. Note that in this mode, the normals stored on the surface are not bent. Instead, the bent normals are the output of this node.

Bent Normals (object)

Bent normals are enabled and calculated in object space and returned as RGB values where red=x, green=y, and blue=z. Note that in this mode, the normals stored on the surface are not bent. Instead, the bent normals are the output of this node.