Using this feature, you can control the color profile associated with inputs to and outputs from the rendering process. Certain
scene elements can have color profile information attached to them, namely, file textures, render passes, mental ray textures,
and mental ray file output passes. Additionally, you can specify the color profile used for internal rendering color calculations.
Note
This feature is currently only supported for the mental ray for Maya renderer.
You can enable color management through the Render Settings: Common tab and select your default input and output color profile. In order for color management to work, you must select in the tab of your window. Simply selecting a color profile under the scene elements or creating a node in the does not enable color management.
Tip
Enabling color management can increase processing time.
You can associate color profiles with different elements:
- Texture / node
- Indicates the color profile that the texture source uses.
- Render Pass
- Indicates the color profile to be used when writing the render pass to disk.
- node
- The attached color profile will dictate the color profile for use when the image is written to disk.
Note
You must enable under the node for the attribute to be enabled.
To apply color management to your scene
- Open the window and select the tab.
- Select the option. The color profile attributes become active.
- Select a from the drop-down list. This is the default color profile for file texture / nodes.
- Select a from the drop-down list. This is the default color profile for writing render passes or images to disk.
- Select the render pass node for which you want to enable color management.
Note
The same procedure can be used to associate a color profile with other scene elements such as a file texture. Simply replace
node with your scene element.
- In the render pass , use the drop-down list to select the color profile to use when writing the render pass to disk.
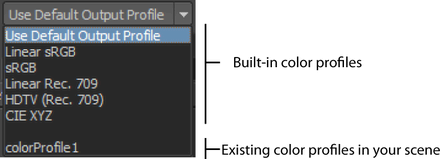
There are two sections available in the drop-down list.
Under the first section, there is a list of built-in color profiles. Under the second section, there is a list of any existing
color profile nodes that are currently in your scene.
Note
- If you first select an existing node, then change your mind and select a built-in color profile instead, the node still exists in your scene. It is simply disconnected from your scene element.
- If you select the default option under the list of built-in color profiles, Maya will use the setting (for render pass or nodes) or the setting (for file texture / nodes) that you selected under the : tab.
Creating a color profile node
Color profile nodes are useful when you want to apply the same setting to multiple targets, for example, if the same color
profile applies to multiple textures. This way, you can create a node, customize it and associate it with several scene elements.
Tip
All nodes that you have created are visible through the , under the tab.
To create a colorProfile node (method 1)
- Select the texture to which you want to connect a color profile node.
- In the , click the node icon.

A node is created and connected to the node that you have selected. The node appears in the along with its associated node and you can edit its attributes.
Note
The same procedure can be used to create a node and connect it to other scene elements such as render passes. Select the applicable scene element in step 1.
To create a colorProfile node (method 2)
- Open the Hypershade.
- Under the section of the tab, click .
- Select the scene element to which you want to connect your node.
-
 the node and select .
Tip
Using this method, you can connect your node to multiple scene elements in one step. For example, you can use a MEL script to select all of your render passes, then the node and select to connect your node to all of your passes.
Note
The node and up to 10 of its connected scene elements are displayed in the at one time. If your node is connected to more than 10 scene elements, you can access these additional scene elements using the .