


These are descriptions of the options in the defaultFurGlobals node. All options are used by the Maya Software renderer when rendering Fur. However, some options are not required when rendering Fur in mental ray for Maya, since mental Fur is not a post-process pass. If an option is only used by the Maya Software renderer, it’s indicated in the option’s description.
These are the options in the Fur Render Options section.
Select how you want hair distributed across surfaces.
If you select Globally or Per Fur Description, hairs are distributed evenly across furry surfaces by taking the largest piece of furry geometry in the scene, assigning it a value of 1, then calculating values proportional to that surface for all the other furry surfaces in the scene. Then each surface receives a proportion of the density value set in the fur description assigned to the surface, based on the calculated area value.
For example, if the Density is set to 10,000, the largest furry surface will receive 10,000 hairs, whereas a surface in the scene that is half that size will receive 5,000 hairs.
Each surface receives the same number of hairs specified by the Density value for the fur description. This works if your character is made up of a single surface, or distinctly different surfaces. In these cases, you can use Baldness to roughly control relative densities within a single fur description.
This option is the equivalent of turning on Area Value in previous versions of Fur. For models made up of multiple patches, this gives an even distribution on hairs across different sized surfaces.
The density of each fur description is distributed evenly over all surfaces with fur descriptions attached, regardless of which fur description is attached.
Select which equalizer maps you want to use for this render. An equalizer map compensates for the uneven distribution of fur caused by uneven parameterization so that fur is evenly distributed across the surface.
A default equalizer map is created at the frame specified in Use Frame. It is used throughout a sequence, even if the fur is rendered in sections or over a render farm. If Default Equalizer Maps is selected, at render time Maya searches for maps with the correct name and frame extension defined in Use Frame. If no default equalizer maps exist, then they are created; if they exist, the time stamp is checked against the scene time stamp. If the scene is newer, the maps are rewritten.
If you select Custom Equalizer Maps, you can see the Custom Equalizer attribute that appears in each fur description at the bottom of the list of attributes in the Attribute Editor. This attribute is grayed out when the Custom Equalizer Maps option is not selected. The Use Frame number is used to initially generate the maps.
The Custom Equalizer attribute can be mapped or painted like any other fur description attribute. If you don’t make any changes to a particular fur description, the default equalizer map is generated and used. When you paint the attribute for the first time, the map is initially set to the default equalization. That’s because when you select Custom Equalizer Maps, default equalizers are automatically generated and a copy is saved for each fur description. The path of the Custom Equalizer Map files is displayed in the Fur Description in Details > Maps.
(This is only respected by the Maya Software renderer.) Keeps the intermediate fur files built by Fur in the process of creating the final fur images. These intermediate files (fur files and shadow maps) are in the furFiles directory and the furShadowMap directory.
If you turn this option off, the intermediate files are deleted when the render is complete.
Select how Maya saves fur maps when you save a scene.
Saves fur maps only if the fur character is not referenced. When this option is selected, Maya uses the fur maps from the referenced file, even if you save the scene with a new name. If the character is not referenced and you save a copy of the scene with this option selected, Maya creates a copy of the fur maps.
These are the options in the Advanced Options section (subsection of Fur Render Options section).
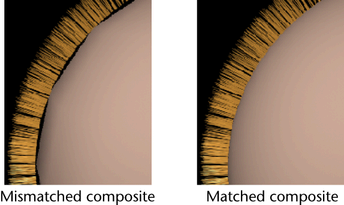
(This is only used by the Maya Software renderer.) The tessellation factor Fur uses for NURBS surfaces is sometimes higher than the default tessellation factor used by Maya for the NURBS surface. This sometimes results in mismatched composites.
Use this option to set the tessellation factor of the NURBS surface used by the Fur renderer.
These are the options in the Fur Image Rendering section (subsection of Advanced Options section). These options are only used by the Maya Software renderer.
These are the options in the Reference Paths section of the Fur Render Settings window. Use these options to render using existing files created using Advanced Fur Rendering. If you want to use fur files created during an actual render, the Keep Temp Files in Fur Render option must be on when you perform the render. These options are only used by the Maya Software renderer, with the exception of Equalizer Maps, which mental ray for Maya supports.
You can access menu items relating Advanced Fur Rendering through MEL commands and procedures. An advantage of using the MEL procedures over commands is that the Fur Global attributes will get updated automatically (Read Fur Files, Read Shadow Files, Read Image Files, Equalizer Map option). For more information, see MEL scripts for Advanced Fur Rendering.
For use with the Maya Software renderer only. When you create fur files using Advanced Fur Rendering, this field automatically displays the path where the fur files were stored. This is where the fur files are read from when you turn on Read Fur Files.
To read fur files created when you perform an actual render, you must type the location (the subdirectory of the current project) and filename and process ID of the files in this field. For example, if you rendered a scene called furryscene that created the fur files called furryscene278_1_1.0001.sbs, furryscene278_1_1.ass, furryscene278_1_1.hair, furryscene278_1_1.shadow, furryscene278_1_1_equal.0001.sbs, you would type the following in the Fur Files Path field:
For use with the Maya Software renderer only. When you create shadow maps using Advanced Fur Rendering, this field automatically displays the path where the shadow maps were stored. This is where the shadow maps are read from when you turn on Read Shadow Maps.
To read shadow maps created when you perform an actual render, you must type the location (the subdirectory of the current project) and prefix of the shadow map file in this field. For example, if you rendered a scene that created the shadow map file called furryscene_spotLightShape1.0001.smap, you would type the following in the Shadow Maps Path field:
For use with the Maya Software renderer only. When you create fur images using Advanced Fur Rendering, this field automatically displays the path where the fur images were stored. This is where the fur images are read from when you turn on Read Fur Images.
To read fur images created when you perform an actual render, you must type the location (the subdirectory of the current project) and prefix of the fur image file in this field. For example, if you rendered a scene that created the fur image files called furryscene.0001.iff and furryscene_z.0001.iff, you would type the following in the Fur Images Path field:
mental ray for Maya Fur render settings
These options are for use with the mental ray for Maya renderer.
Determines the rendering method used to render fur in the mental ray for Maya renderer.
Fur is rendered as a volume shader, consuming less memory and render time in many cases while maintaining the quality of rendering with the Hair Primitive method. The Volume method can be rendered with mental ray Scanline rendering or Rapid Scanline rendering. For more information, see Render Settings: mental ray tab in the Rendering guide.