


Smooth Mesh Preview lets you quickly and easily see how your polygonal mesh will appear when smoothed.
By default, polygonal meshes display with the Smooth Mesh Preview setting turned off. You can turn on the Smooth Mesh Preview setting for any polygon mesh so it displays either the original mesh (as a wireframe outline referred to as cage mode) and a preview of the smoothed version simultaneously or only the smoothed preview version by itself. The cage term is used because it allows the smoothed version to appear
You can modify components on the mesh in either of the preview display modes. Any modifications occur on the original mesh and subsequently appear on the smooth preview as well.
When the Smooth Mesh Preview version of the mesh is rendered, the original version will be rendered. If you want the Smooth Mesh Preview version to be rendered you can convert it to a fully smoothed mesh using Modify > Convert > Smooth Mesh Preview to Polygons or create a subdiv proxy from the smooth mesh preview settings using Proxy > Subdiv Proxy.
To preview a polygonal mesh using Smooth Mesh Preview
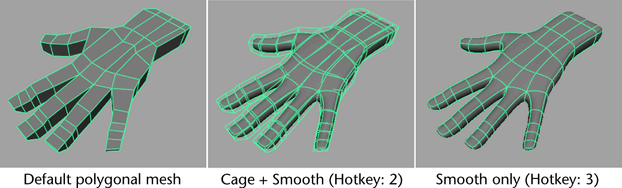
This turns on the Smooth Mesh Preview feature and sets the display mode to Cage + Smooth Mesh, a display mode which displays both the original mesh as a wireframe (cage) and the smooth mesh preview version in shaded mode simultaneously. You can select components on either the wireframe cage or the shaded smoothed preview and view the resulting effect.
This turns on the Smooth Mesh Preview feature and sets the display mode so that only the Smooth Mesh is displayed. You select and edit components directly on the smoothed preview and the changes are reflected back onto the original mesh.
To edit a polygonal mesh when Smooth Mesh Preview is turned on
Turn on Smooth Mesh Preview to either Cage + Smooth Mesh mode (Hotkey: 2) or Smooth Mesh mode (Hotkey: 3).
When working in Cage + Smooth Mesh mode you can set the Edit options to select components on the Cage, Smooth Mesh, or Both by selecting the desired option in the Smooth Mesh Preview section of the polyShape node within the Attribute Editor. For more information on the Smooth Mesh Preview settings see Smooth Mesh.
Select Window > Settings/Preferences > Color Settings and then select the Active and Inactive tabs to set the active and inactive color settings found within the Smooth Mesh Preview section of Colors preferences window.
To display the subdivisions on a polygonal mesh when using Smooth Mesh Preview
The subdivisions are displayed for that level of smoothing on the mesh.
Converting the Smooth Mesh Preview to polygons converts the preview version to a smoothed version of the mesh by copying the Smooth Mesh Preview attributes to a polySmooth node.
To convert the Smooth Mesh Preview to polygons
The original version of the polygon mesh (Cage) is smoothed using the Smooth Mesh Preview settings.
The Smooth Mesh Preview options are set in the Smooth Mesh Preview section of the polyShape node in the Attribute Editor. For more information on the Smooth Mesh Preview settings see Smooth Mesh.