Asset templates are XML files that let you create a common, interchangeable user interface for assets. For each template, you can create multiple custom views of the published attributes. Each view can be customized with its own layout, attribute labels, and descriptions (tooltips).
After you have created an asset and defined its published attributes, you can save a template of the published attribute and published node names. (See Create an asset template.) The next time you create an asset of the same kind, you can load the saved template to set up the new asset with the same published names. (See Assign a template to an asset.)
You can also set up all assets that use the same template to display the same icon in the Hypergraph and Outliner. (See Mark an asset with a custom icon.)
Templates are referenced by the asset using the asset’s Template Name attribute, which tells the asset which template to use. (See also Template naming conventions.) Each template file stores a set of published attribute names that the assigned asset requires. This lets you quickly and easily create other assets of the same kind without missing any of the required attributes. Saving templates as separate files lets you establish a library of templates that you can reuse across a pipeline, independent of specific scene files.
Once you have assigned a template to an asset in your scene, you can bind the asset’s attributes to the template’s unbound attributes.
For example, you can set up all of the spot lights in your scene using the same asset template, giving all spot light assets a common interface. Since all of your spot light assets have the exact same set of published attributes, you can easily swap controls and animation between them using Replace Reference or Transfer Attribute Values. (See Replace referenced assets and Transfer attribute values between assets).
Using templates to create a common interface for assets is optional. However, if you save templates, you can also define multiple views, or layouts, for each template. Template views let you completely customize the asset interface, changing the grouping, organization, and naming of attributes in the Asset Editor, Attribute Editor, Outliner, and Channel Box.
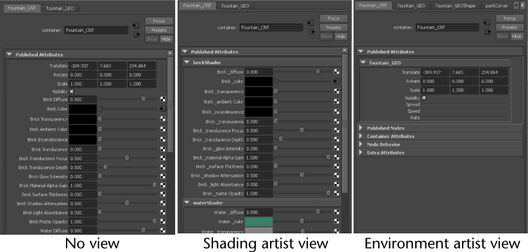
The following illustration shows the Attribute Editor for a fountain asset first with no views assigned, then with two different views created for the shading artist and the environment artist on a team. Each artist is supplied with only those attributes they will need when working with the fountain asset.
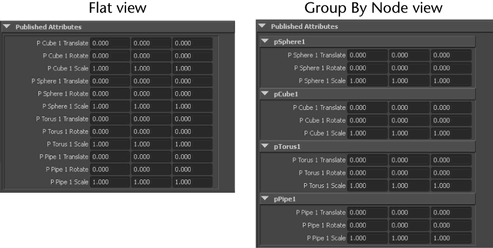
Even if you do not save templates or define custom views, the asset View Mode attribute gives you two options for organizing the layout of published attributes in the various windows and editors. The Group By Node view organizes published attributes by node, with one collapsible frame per node. The Flat view lists nodes in the order they were published.
For all views, Maya automatically creates the appropriate interface tools in the layout (for example, numeric attributes display with sliders and appropriate Min and Max values) based on each attribute type you have included in the template. For more information on customizing views, see Customize a template view.
For more detailed technical information about asset templates, refer to Parts of an asset template and Template file format.
Template views let you define the way an asset’s published attributes are displayed in Maya windows and editors. Depending on your production requirements, you can create multiple views for each template. (See Add a view to an asset template)
A template view is essentially a set of published asset attributes that you have grouped and organized together for a specific purpose. Creating a set of different views for one template lets you create a different user interface for any purpose your pipeline requires. (See Customize a template view.)
For example, you can create custom template views to do the following:
Re-organize the asset display, changing the grouping and order of attributes.
You can specify the attributes you want each user to have access to by creating a template view for that user. For example, you might create a view for the modeler, one for the rigger, and one for the animator on your team.
You group the controls and attributes that each user needs into an interface designed specifically for them. Since each user can modify only the attributes you have included for them, there is no danger of team members accidentally overwriting attributes not related to their work.
Set up a view for each task that team members need to accomplish within a project. You can streamline the workflow for each user by including only the attributes they will require for an assigned task within a template view. Users can switch between different views as they complete work on the project and save time searching for the attributes they need.
For information on setting up your own customized views, see Add a view to an asset template and Customize a template view.
Binding sets allow you to create a mapping of the published names and the attributes they are bound to and store them in an asset’s template. You can then use this mapping to autobind future assets that use the same template. This allows you to avoid publishing every attribute individually. For more information, see Create a binding set.
When you create a binding set, Maya creates a set of entries in the template file that automatically associate all published names with the node names to which they are currently bound. You can open the template file externally and replace these names with regular expressions if you want your binding set to work more generally.
For example, you could use binding sets and autobind to do the following:
Open an existing asset and apply your template to it. Autobind the asset. Any previous unbound attributes or attributes bound differently than the binding set mapping are published and bound (or re-bound) to match the template.
After creating the first character of a set, you can create an asset and publish the appropriate attributes to that asset. You can then create a binding set of the current asset. When you create the second character of the set, apply the same template and autobind the asset. All the attributes are published and bound according to the template. Then you can fix any remaining unbound attributes.
After creating an asset and publishing the appropriate attributes, create a binding set. Even after the current project is over, you can re-use this binding set as the base same asset in the next generation version. You can then autobind the next generation asset and repeat this procedure indefinitely.


