In the Trax Editor, nCache nodes are represented by nCache clips. With these cache clips, you can clearly view the relationships between your nCaches and edit your cached simulations in a nonlinear manner. This allows you to visually manage, manipulate, and direct all your objects’ caches at the same time.
nCloth caches only store the XYZ positions of an nCloth object’s vertices, not the translation, rotation, or scale of the nCloth’s Transform node.
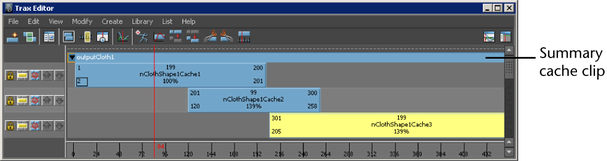
All the selected object’s cache nodes are loaded into the Trax Editor as cache clips. Each clip is placed on its own track, and all your object’s cache clips are grouped under your object’s cache label: outputCloth for nCloth caches, nParticleShape for nParticle caches, and fluidShape for fluid caches.

To select your object from Trax
 -click the cache clip and choose Select Geometry from the context-sensitive menu that appears.
All the current object’s caches appear as clips in the track view.
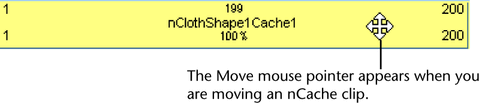
To move multiple nCache clips in time
All the current object’s caches appear as clips in the track view.
 -
- the cache clips you want to move.
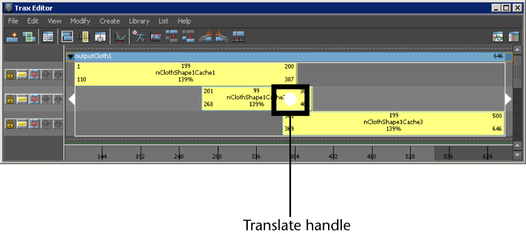
The selected cache clips move forward or backward in time, changing their Start Frame values.
To move all of an object's nCache clips in time
All the current objects’s caches appear as clips in the track view.
All your object’s cache clips move forward or backward in time, changing the Start Frame of all your object’s cache clips.
Lock, solo, or mute nCache tracks
All the current object’s caches appear as clips in the track view.
 to the left of the nCache track you want to lock.
The Lock button freezes the nCache track. When a track is locked, you can not edit its cache clips, but its cached simulation is present during playback. You can lock an nCache track so that you do not accidentally modify its cache clips.
 to the left of the geometry cache track you want to solo.
The Solo button isolates the nCache clips on the selected track so that they are the only caches used during playback. Soloing is useful when you want to isolate and review the effect of a specific track’s cache on your simulation.
All the current object’s caches appear as clips in the track view.
 to the left of the geometry cache track you want to mute.
The Mute button hides the cached simulation of a selected track without removing that track from the Trax Editor. Muting is useful when you want to view a simulation without the effect of a certain track’s cache.
Enable or disable nCache clips
Enabling or disabling nCache clips also enables or disables their corresponding cache nodes and Attribute Editor tabs.
To enable or disable individual nCache clips
All the current object’s caches appear as clips in the track view.
-click the selected cache clip. In the context-sensitive menu that appears, turn on Enable to make your cache clip active or turn off Enable to make your cache clip inactive.

Enable or disable all of an object's nCache clips
You can enable or disable all of an object’s nCache clips by enabling or disabling the object’s nCache. See the procedure below.
To disable all of an object's nCaches
All your current object’s active cache nodes and cache clips are disabled and are now not used by their object on playback.
To enable all of an object's nCaches
All your current object’s inactive cache nodes and cache clips are enabled and are now used by their object on playback.
To enable or disable individual nCaches
The nCache node and its corresponding cache clip become active and are now used by their object on playback.
The nCache node and its corresponding cache clip become inactive and are now not used by their object on playback.


