For more information on the Plug-in Manager, see Plug-in Manager in the Basics guide.
To create an CgFX Shader material
The new shading material appears in the Hypershade, and the CgFXShader material node appears in the Attribute Editor.
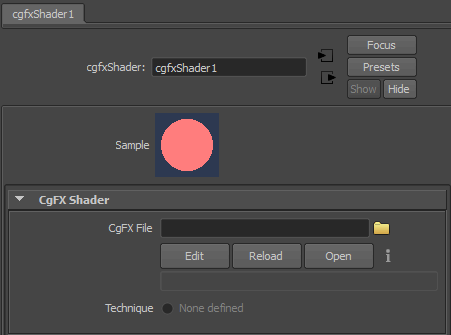
Once the .cgfx file is connected to the CgFXShader node, the plug-in automatically loads attributes (if any exist) into the Extra Attributes section in the Attribute Editor.
Adding placement into CgFx shaders
Cgfx shaders do not automatically support texture placement which is found inside Maya (place2DTexture or place3DTexture node) because CgFx is a node which uses a programmable shading language. Using this language means that the texture transform cannot be set from outside. Instead, it needs to be explicitly coded into the shader. If such parameters are in the shader, then the automatic UI generation creates the UI elements. You should then connect the appropriate attributes from the texture placement node(s) to the attributes on the shader.
Reloading, Editing and Viewing CgFx files
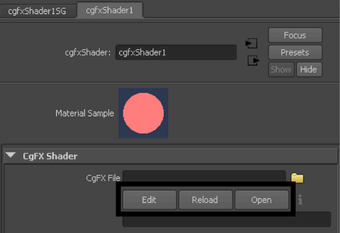
In the Attribute Editor of the cgfxShader node, you can use the Reload, Edit and Open buttons to work on the FX file you’ve specified.
Orientation for the texture co-ordinate system

Set the MAYA_TEXCOORD_ORIENTATION environment variable to either OPENGL or DIRECTX to define the MAYA_TEXCOORD_ORIENTATION_OPENGL or MAYA_TEXCOORD_ORIENTATION_DIRECTX macros respectively. When the macro is defined, it is set to 1.
For Maya 2011 and below, both macros are undefined and the shader should assume a DirectX texture co-ordinate orientation.
For Maya 2012, by default, the MAYA_TEXCOORD_ORIENTATION_OPENGL macro is set to 1. You can change this by setting the environment variable MAYA_TEXCOORD_ORIENTATION to DIRECTX before starting Maya.
Setting the MAYA_TEXCOORD_ORIENTATION environment variable to DIRECTX may be useful when using the Default renderer or the Hardware renderer along with shaders that have been written for previous versions of Maya and that have not been modified to support the OPENGL texture coordinate orientation. When the MAYA_TEXCOORD_ORIENTATION environment variable is set to DIRECTX in Maya 2012, the following occurs:
This changes both the generation of the UV co-ordinates and the loading of the texture image such that if a shader uses UV coordinates to sample a texture, then the rendered image will be the same in both coordinate systems. However, when UVs procedurally generated by the shader (as opposed to ones coming from a UV source stream generated by Maya) are used to sample a texture, the plug-in must be able to handle both conventions. The brix.cgfx example included in $(MAYA_ROOT)/presets/CgFX/example provides an example of how this should be done:
/******************** pixel shader *********************/
#ifdef MAYA_TEXCOORD_ORIENTATION_OPENGL
     float GBalanceCorr = 1.0f - GBalance;
 #else
     float GBalanceCorr = GBalance;
#endif

    float v = ((float4)tex2D(stripeSampler,float2(IN.BrickUV.x,0.5))).x;
    float4 dColor1 = lerp(SurfColor1,SurfColor2,v);
    v = ((float4)tex2D(stripeSampler,float2(IN.BrickUV.x*2,GBalanceCorr))).x;
    dColor1 = lerp(GroutColor,dColor1,v);
    v = ((float4)tex2D(stripeSampler,float2(IN.BrickUV.x+0.25,0.5))).x;
    float4 dColor2 = lerp(SurfColor1,SurfColor2,v);
    v = ((float4)tex2D(stripeSampler,float2((IN.BrickUV.x+0.25)*2,GBalanceCorr))).x;
    dColor2 = lerp(GroutColor,dColor2,v);
    v = ((float4)tex2D(stripeSampler,float2(IN.BrickUV.y,0.5))).x;
    float4 brix = lerp(dColor1,dColor2,v);
    v = ((float4)tex2D(stripeSampler,float2(IN.BrickUV.y*2,GBalanceCorr))).x;
    brix = lerp(GroutColor,brix,v);
       return IN.DCol * brix;
}
Therefore, a CgFX shader might appear to work correctly when using the Hardware renderer and yet give an incorrect result with the Default and Viewport 2.0 renderer. In this case, adding a DepthMask = false state assignment to some of the shader passes may workaround the issue.

For example, you can use the following code to declare the directional light attribute in both Maya and another application without causing any compatibility issues:
#if defined(MAYA_CGFX) || defined(XSI)
// Declares the « dirlight0 » with attribute annotations for Maya or XSI
float4 dirlight0 : Direction <
     string UIName =  "Distant Light 0 Direction";
     string Object = "DirectionalLight";
     string Space = "World";
> = {-1.0f, -1.0f, 0.3f, 0.0f};
#else
// Declares the « dirlight0 » with attribute annotations for another application:
....
#endif
The lines between #if defined(MAYA_CGFX) || defined(XSI) and #else are only parsed when loaded by Maya/XSI.
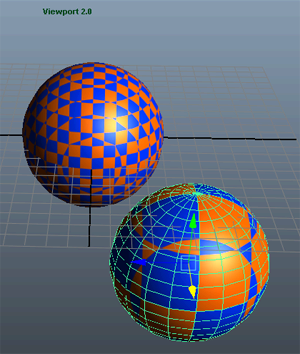
When using Viewport 2.0, if you enable the Consolidate world option under Renderer > Viewport 2.0 >  , CgFx plug-ins that depend on local vertex position may not behave as expected.
In the example below, the check3d.cgfx shader applies the 3D checkerboard pattern to the object relative to the position of the surface in the local space of the object, and therefore may produce unexpected results in Viewport 2.0. The same shader is applied to both spheres but the checkerboard pattern moves when you tumble the scene or select the spheres when Consolidate world is turned on.