Use the Playout menu to play out media to a VTR.
The following two graphics represent the Playout menu.


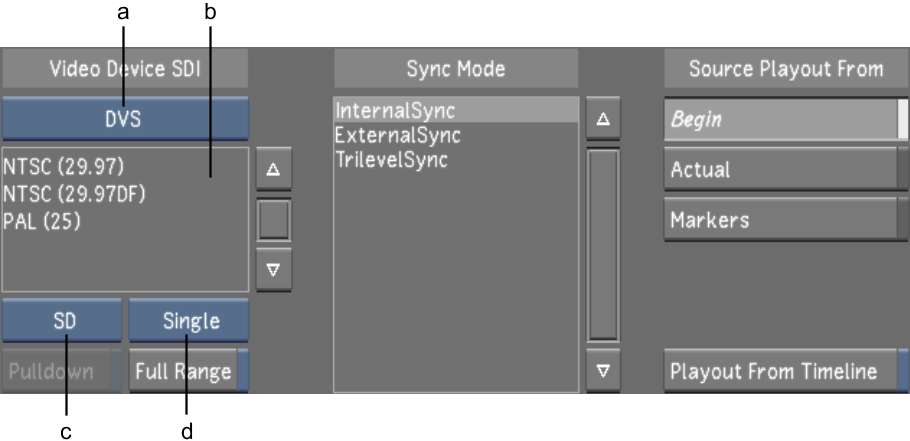
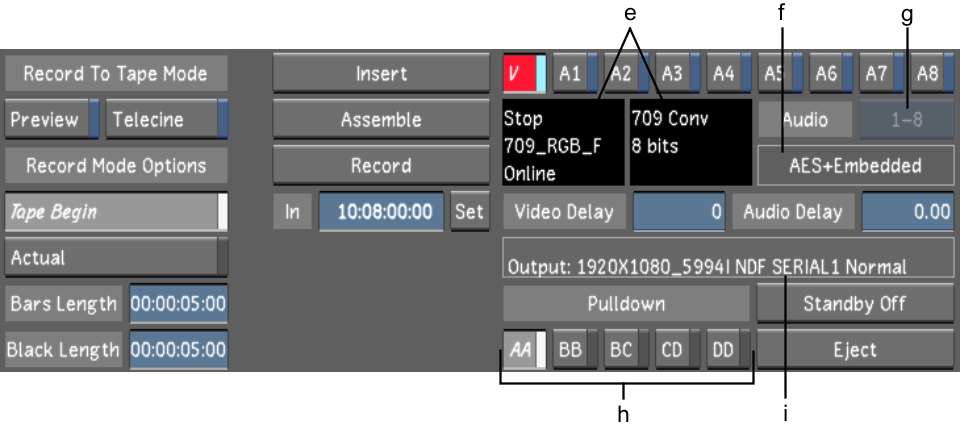
(a) Video/Graphics Raster option box (b) Raster list (c) Format option box (d) Link Type option box (e) VTR Status panel (f) Audio Output status (g) Audio Track Selection option box (h) Pulldown Field buttons (i) Playout Error status
Video/Graphics option boxToggle between the video card (AVIO) and the graphics card (GFX/SDI). The Raster list is then populated with rasters for the selected card.
Raster listWith a video card selected in the Video option box (AVIO), select one of the listed rasters to set the resolution and timing for capture. See Supported Video SDI and GFX SDI Rasters.
Format option boxToggle to display only rasters belonging to a particular footage format in the Raster list.
| Select: | To display: |
|---|---|
| SD | Standard definition rasters. |
| HD | High-definition rasters. |
| Film | Film rasters. |
| Audio | Audio rasters (only applicable to GFX/SDI). |
Link Type option boxToggle to display only rasters belonging to a particular link type in the Raster list.
| Select: | To display: |
|---|---|
| Single | The single-link (4:2:2 signal) rasters. |
| Dual | The dual-link (4:4:4 signal) rasters. |
| Stereo | The stereoscopy rasters (only applicable to GFX/SDI). |
Pulldown buttonEnable to configure Lustre to add a pulldown frame when playing out. See About 3:2 Pulldown.
Full Range buttonEnable to configure Lustre to play out the full video signal from the video board. If disabled, Lustre plays out only the legal portion of the video signal.
Sync Mode list Select one of the sync modes.
| Select: | To: |
|---|---|
| InternalSync | Set the sync mode to a free-running internal sync (SD and HD). |
| ExternalSync | Genlock to an analog sync connected to the sync input (SD only). |
| TrilevelSync | Genlock to a trilevel sync connected to the sync input (HD only). |
Source Playout From buttons Select a starting point for the playout.
| Enable: | To select: |
|---|---|
| Begin | The start of the timeline as the starting point for playing out to tape. |
| Actual | The current position of the positioner as the starting point for playing out to tape. |
| Markers | The marker position as the starting point for playing out to tape. |
Playout From Timeline buttonWhen enabled it allows you to play out source material containing secondary grading without having to perform a render first. See Playout from Timeline with GPU Acceleration.
Record To Tape Mode buttonsAllow you to configure Lustre to display what the edited footage would look like without recording to VTR or to play out the current timeline and send the source timecode to the VTR.
| Enable: | To: |
|---|---|
| Preview | Preview the footage that will be recorded without recording to tape. |
| Telecine | Record the footage to tape along with its original source timecode and black media between shots. See Writing Telecine-Style Tape. |
Record Mode Options buttonsDefine where on the tape Lustre begins recording when using the Record playout mode. For more information about Record Mode options, see Playing Out to a VTR.
| Enable: | To begin recording: |
|---|---|
| Tape Begin | At the beginning of the tape. |
| Actual | At the position of the current frame on the tape. |
Bars Length fieldDefines the duration (in seconds) of the colour bars recorded to the video tape before the recorded footage begins.
Black Length fieldDefines the duration (in seconds) of the leader black recorded to the video tape before the recorded footage begins.
Insert buttonInitiates recording when inserting video and/or audio onto a tape that already contains material.
Assemble buttonInitiates recording of both video and audio signals on all tracks to a tape when you need to record beyond the point where the valid control track ends.
Record buttonInitiates recording of both video and audio signals on all tracks when recording an entire cut to tape.
In Point fieldEnter the timecode of the tape where the recording will begin.
In Point Set buttonSets the current timecode of the tape as the in point.
V buttonEnable to play out the video track when playing out to a video source. Disable to play out audio only.
A1 - A16 buttonsEnable the audio tracks (A1-A16) for playout.
VTR Status panelDisplays VTR status messages when Lustre is connected to a VTR.
Audio Track Selection option boxUsed in correlation with the A1-A16 buttons. Toggle to determine whether tracks 1-8 or 9-16 are visible. Tracks 9-16 are only available with embedded AJA audio. If only eight audio tracks are available, this option is disabled (greyed out).
Audio Output statusAudio is always outputted to both AES and Embedded audio.
Video Delay fieldEnter a frame number to delay the video playout for that number of fields. For example, if you set the field to 10, playout begins 10 frames after the in point. If you set the field to -10, playout begins 10 frames before the in point.
Audio Delay fieldEnter a frame number to delay the audio playout for that number of fields. For example, if you set the field to 10, audio playout begins 10 frames after the in point. If you set the field to -10, audio playout begins 10 frames before the in point.
Playout Error statusDisplays a message if an error occurs while performing a playout.
Pulldown Field buttons Enable a Pulldown Field button to select the frame used for the 3:2 pulldown. Only available when Pulldown is enabled. See About 3:2 Pulldown.
Standby Off buttonRemoves the VTR heads from the tape.
Eject buttonEjects the tape in the VTR.


