


Animating Masks Using Spline Keyframing
You can animate the shape of a mask by moving the vertices of a garbage mask spline at different frames throughout the clip. Each vertex has its own X, Y and Z position channels in the Channel Editor, as well as several other parameters, as shown in the following table.
| Parameter | Channel Editor Folder & Name(s) | Channel Editor Values |
|---|---|---|
| The position of the mask vertices. | position: X, Y, Z | |
| The position of the left and right tangent handles relative to the mask vertex. | tangents: left, right | |
| The tangent continuity (handles broken or unbroken). | tangents: continuity | 0 = broken handles 1 = unbroken handles |
| The active/inactive status of mask vertices. See Adding and Removing Vertices. | Vertex_x: active | 0= inactive 1 = active |
Before you start to animate the mask, set the Spline Keyframing options in the Garbage Mask Setup menu. In the GMask node in Batch or the Modular Keyer, these options are located in the Node Setup menu. Use these options to specify which elements will get a keyframe as you animate the mask.
As you adjust the mask, you can opt to apply keyframes to selected vertices or to all vertices. To quickly animate a mask, keyframe all vertices every time you adjust a single vertex. This way, what you see at a given frame will be exactly what you get no matter how you animate the “surrounding” frames.
To have more control over the shape of the mask frame by frame, animate one vertex at a time. This method is useful for tracking garbage masks and keeping control over tangent animation. See Animating Masks Using Tracking.
By combining the Spline and Vertex Keyframing options in different ways, you can set an animation mode to suit the task at hand. For example, by selecting Item and All Vertices, you could animate just the tangent handles of all vertices on the mask.


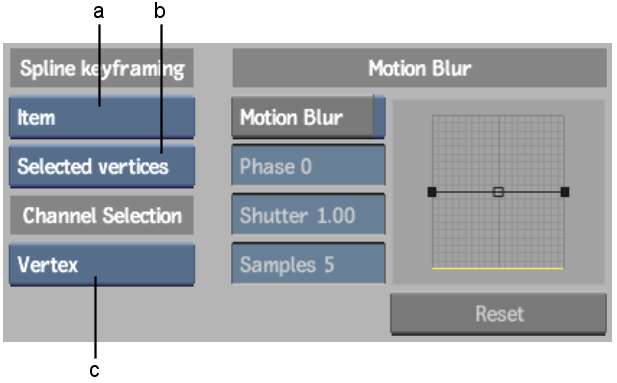
(a) Spline Keyframing box (b) Vertex Keyframing box (c) Channel Selecting box
Spline Keyframing boxSets the conditions under which keyframes are set, and for which parameters.
| Select: | To: |
|---|---|
| Spline & Tracer | Set a keyframe for all the parameters of the vertex or vertices and related elements, with the exception of the Sample On parameter. This option is only available when accessing the Garbage Mask Setup menu from the GMask node in Batch or the Modular Keyer. |
| Spline only | Set a keyframe for one or more vertices, or related elements, for the specified parameter, as well as for the mask vertex position and the tangent position channels. |
| Item | Set a keyframe for a parameter of a vertex, or of a related element. Only the particular parameter gets a keyframe. |
| On | Set a keyframe for the shape channel when a change to a vertex is made (such as moving a vertex or tangent handle, breaking tangent handles, or changing the Active/Inactive status of a vertex). This option is only available when Shape Animation is enabled in the Garbage Mask menu. |
| Off | No keyframes are set. |
Vertex Keyframing boxSets the conditions under which parameters are applied to specified vertices in the mask.
| Select: | To: |
|---|---|
| All Vertices | Set a keyframe for the parameter you are animating for all the vertices of the mask. Related elements, such as tangents, also all get a keyframe when you animate a parameter on the mask. |
| Selected Vertices | Set a keyframe for the parameter you are animating for all selected vertices on the mask. Related elements, such as tangents, that are selected, also all get a keyframe when you animate one on the mask. |
Channel Selecting boxDetermines which channels are selected in the Channel Editor when you select one or more vertices.
| Select: | To: |
|---|---|
| Vertex | Select all the channels related to the vertices you select on the garbage mask. For example, whether you select a vertex or one of its tangents, its active, position, and tangent channels are also selected in the Channel Editor. |
| Item | Select only the particular channel corresponding to the selected vertices. For example, if you select the right tangent handle of a vertex, only the corresponding right channel is selected in the Channel Editor. |
To further control the shape of a mask throughout the clip, you can add and remove vertices from your mask at any frame of the clip. For example, if the shape changes radically or gets bigger part way through the clip, you can add vertices to reshape the mask at that frame. When you add a vertex part way through the clip, it is added to the whole clip but respects the existing shape of the mask in all previous and subsequent frames. Therefore, any reshaping that you have done to the mask is not affected by the new vertices.
If you delete a vertex, it becomes “inactive” from that frame to the next active/inactive keyframe set for that vertex, or, if there are no keyframes, to the end of the clip. An inactive vertex has no effect on the shape of the mask. On previous frames, the vertex is still active, so the mask shape is unchanged by the deletion. To delete the vertex completely (that is, throughout the whole clip), click it a second time.
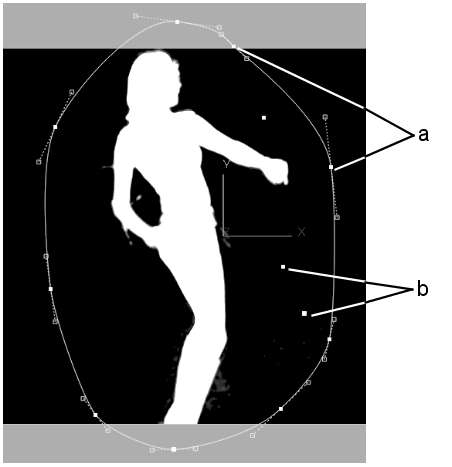
(a) Active vertices (b) Inactive vertices
Use the options in the Edit Mode box to add and delete vertices from the mask, and to control which vertices are active and inactive.
To add a vertex to the entire mask:
The new vertex is added and is active throughout the clip. It does not affect the existing mask animation, regardless of where in the clip you add the vertex.
To make an active vertex inactive:
The vertex is inactive from the current frame to the next frame where an Active/Inactive keyframe has been set, or, if there are no keyframes, to the end of the clip. The status of the vertex on previous frames is unchanged.
To make an inactive vertex active:
The vertex is active from the current frame to the next frame where an Active/Inactive keyframe has been set, or, if there are no keyframes, to the end of the clip. The status of the vertex on previous frames is unchanged.