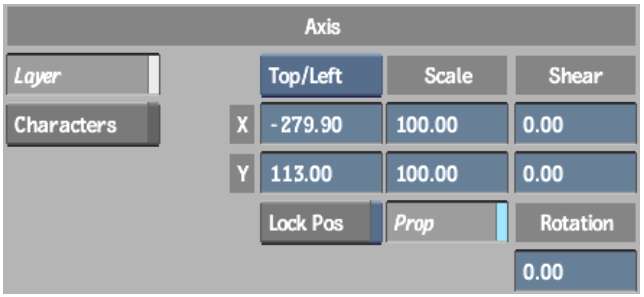
Use the Layer controls in the Axis menu to rotate, translate, scale, or shear a selected layer and to apply an effect uniformly to all characters.


Use the Character controls in the Axis menu to view and position the axis of each character. You can use the position, rotation, scale, and shear settings for each character in a layer to create an effect of scrambled letters.

To edit text characters, you must be in Move or Edit mode and some text must be selected. The Layer and Character controls are described as follows.
Layer Axis boxSets the alignment for the selected text layer.
| Select: | To move the axis: |
|---|---|
| Top/Left | To the upper-left corner of the text layer. |
| Centre | To the centre point of the text layer. |
Pos XMoves the layer or selected characters along the X-axis. By default, the value is 0 (for characters). Increase the value to move right and decrease it to move left.
Pos YMoves the layer or selected characters along the Y-axis. By default, the value is 0 (for characters). Increase the value to move up and decrease it to move down.
Scale XScales the layer or selected characters along the X-axis. This value is a percentage, so entering 50 means 50 percent. Use a larger value to increase the scale along the X-axis. Use a negative value to create a mirror image on the X-axis. Enter 0 to make a layer or selected characters disappear. The default is 100.
Scale YScales the layer or selected characters along the Y-axis. This value is a percentage, so entering 50 means 50 percent. Use a larger value to increase the scale along the Y-axis. Use a negative value to create a mirror image on the Y-axis. Enter 0 to make the layer or selected characters disappear. The default is 100.
Prop Proportionally changes the Scale X and Scale Y values.
Shear XShears or slants the layer or selected characters along the X-axis. Use a positive value to slant right and a negative value to slant left. The maximum and minimum values are 60 and -60, respectively. The default is 0.
Shear YShears or slants the layer or selected characters along the Y-axis. Use a positive value to shear up. A negative value near the minimum value -60 shears down. The maximum and minimum values are 60 and -60, respectively. The default is 0.
RotationRotates a layer around its axis or selected characters around their axes. Use a negative value to rotate clockwise and a positive value to rotate counter-clockwise. The default is 0.
Lock PosLocks a layer in a specified position. You can lock text in either the Top/Left or Centre position using the box beside this button.
Show Axis buttonShows the axis in the image window.
Centre Axis buttonMoves the axis to the centre point of the character.
Character Axis Pos X and Y fieldsSets the X- and Y-axes for the selected characters. Using the Axis Pos X and Axis Pos Y fields, you set each letter in a word spinning on its own axis in a different way.
Layer Order box(in the Layer Attributes section) Moves a layer in front of or behind another layer.

| Select: | To move the layer: |
|---|---|
| Push | One position down in the stack behind another layer. |
| Pop | One position up in the stack in front of another layer. |
| Bottom | To the bottom of the stack behind all other layers. |
| Top | To the top of the stack in front of all other layers. |
Use Align Sel mode to align multiple layers and specify the direction for the alignment.
| Press: | To: |
|---|---|
| 4 | Align left. |
| 6 | Align right. |
| 8 | Align to the top. |
| 2 | Align to the bottom. |
| 5 | Centre align. |
The text mode returns to Move when the Align Sel operation is done.
Use Leading mode to adjust the spacing between lines of text in a paragraph. The selected lines are adjusted in proportion to the leading values already specified. Use this mode to adjust the leading among paragraphs with various leading values.
Kerning refers to the space between characters that you can either increase or decrease. Use Rekern mode to change the kerning of all selected characters in relative proportion to the current kerning values.
Use Rekern to adjust the kerning among paragraphs with various kerning values.
In the Paragraph menu, the Kern field changes to the Rekern field.
Use Resize mode to change the font size of all the characters in a selection in relative proportion to the current font sizes. Use this mode if you have several font sizes represented in a selection.
The Size field allows you to apply an absolute font size value to selected text.
The Size field you used to specify the original size of the text changes to the Resize field.
Use Y Offset mode to shift selected layers along the vertical axis—the Y-axis. Use the up and down arrow keys to offset the selection.
Use Safe Title mode to align selected text within the safe title overlay. Use the numeric keypad (0-9) to specify the direction of alignment. Safe title is used to define the boundary for positioning text and how it appears in a rendered clip. By default, new layers appear in the upper-left corner of the safe title area.


