After you
create a key and key out any trouble areas, some of the background colour
may have spilled over at the edge of the key. In the Keyer, you
can use the colour suppression tools to suppress or disguise colour
spill in the front clip. You can:
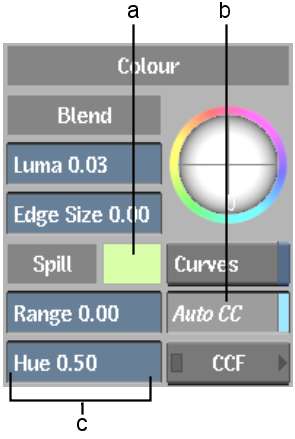
- Use Spill controls in the Keyer or Colour
menu to suppress a selected colour and shift colours adjacent to
the selected colour.
- Adjust the Suppression curve in the Colour
menu to suppress a selected colour.
- Adjust the Hue Shift curve in the Colour
menu to perform a hue shift on a selected colour.
Adjusting Spill Controls
Use the Spill controls
in the Keyer or Colour menu to eliminate and disguise the colour
spill in any key you create except a luminance key. You can sample
the colour you want to remove, and then adjust the Range and Hue
fields to suppress the selected colour and shift its adjacent colours.
When you sample an image
to generate a key from a Range menu, the sampled colour in the Spill
colour pot is also updated. However, the inverse is not true—if
you sample a colour using the Spill colour pot, sampled colours
used to generate keys are not updated. You can therefore sample colour
spill without affecting the original sample.
NoteTo apply these settings
to the key, the Auto CC button must be enabled.
To remove colour spill from a key:
- Click Result so that you can see changes
as you make them.
- In the Keyer, do one of the following:
- Click Keyer to show the Keyermenu.
- Click Colour to show the Colour menu.
- Enable Auto CC to apply the Spill settings
to the front clip.
- The Spill colour pot displays the colour
that will be suppressed in the clip. By default, the original colour
extracted from the key-in clip is displayed. In many cases, you
can use this colour because the colour spill is the same colour
as the original colour. However, if the colour spill is not the
same, change the colour sample. Click the colour pot, use the colour picker
to sample the colour spill in the image window, and then click the colour
pot again.
NoteWhen you select the
colour you want to key from a Keyer menu, the colour that appears
in the Spill colour pot is automatically updated to match the key
colour. However, the inverse is not true—when you sample a
colour from the Spill colour pot, the sampled colour used to generate
a key is not updated.
- Drag in the Spill fields to remove the
colour spill.
| Drag: |
To: |
| Range |
Suppress the primary sample colour where there is colour
spill (along the edges of the key).
|
| Hue |
Modify colours that are adjacent to the primary sample
and further remove colour spill.
|
NoteYou can reset the
Spill parameters, Blend parameters, and the Edge Balance trackball
by clicking Reset, located left of the Edge Balance trackball.
Adjusting the Suppression
Curve
If the edge of your key
is relatively small, you can eliminate colour spill by suppressing
it from the Colour menu. Sample the colour you want to suppress
and then suppress that colour where necessary.
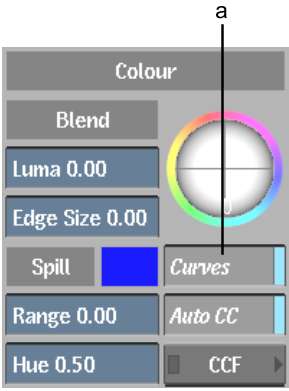
To apply settings from
the Colour menu to the key, the Curves button must be enabled in
the Colour or Keyer menu. The Curves button is enabled by default.
To suppress colour spill:
- Click Result so that you can see the
changes as you make them.
- Click Colour.
The Colour menu appears.
The Colour menu displays
colour curves over a hue spectrum. When you modify the shape of
a curve over a region of the spectrum, only those colours are affected.
- Enable Curves to apply the colour curves
of the hue spectrum to the front clip.
NoteWhen the Curves button
is disabled, settings in the Colour menu are bypassed.
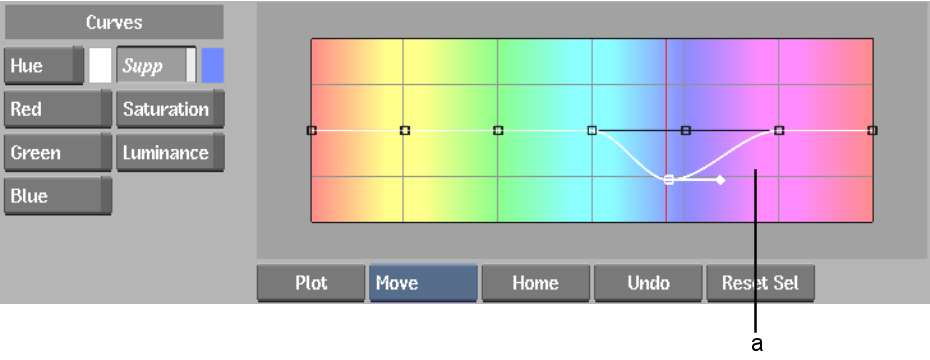
- Click Supp to modify the Suppression
curve.
- The colour pot next to the Suppress button
displays the colour that will be suppressed in the clip when you
modify the curve. By default, the original colour extracted from
the key-in clip is displayed. In many cases, you can use this colour
because the colour spill is the same colour as the original colour.
However, if the colour spill is not the same, change the colour
sample. Click the colour pot, use the colour picker to sample the
colour spill in the image window, and then click the colour pot
again.
- Click Plot.
The cursor turns into
a colour picker.
- Select a pixel within the spill.
A red vertical bar appears
in the hue spectrum identifying the colour to be suppressed.
- Select Move from the Edit Mode box so
you can use the cursor to move the points along the Suppression
curve.
- On the Suppression curve, drag the point
closest to the plotted colour down to a value of 25, intersecting
the plotted colour.
The colour spill is suppressed.
- Continue modifying the shape of the curve
until you are satisfied with the result.
- Click Saturation to adjust the saturation
of the spill.
NoteOnce you remove the
saturation from a spill, you may want to increase the values for
the other curves (for example, red and green if you removed a blue
spill) to reconstruct some of the natural colours at the edge of
the keyed image.
- Click Red, Green, or Blue to edit individual
colour curves.
- Click Luminance to adjust the luminance
of the spill.
NoteTo apply changes
made in the Colour menu, make sure the Adjust button is enabled.
Adjusting the Hue Shift
Curve
You
can disguise colour spill by shifting its hue so the colour blends
better with the background. Sample the colour to which you want
to shift the colour spill and then adjust the Hue Shift curve to
shift the colour spill accordingly.
To apply settings from
the Colour menu to the key, the Curves button in the Keyer or Colour
menu must be enabled. The Curves button is enabled by default.
To create a hue shift:
- Click Result so that you can see the
changes as you make them.
- In the Keyer, click Colour.
The Colour menu appears.
The Colour menu displays
colour curves over a hue spectrum. When you modify the shape of
a curve over a region of the spectrum, only those colours are affected.
- Enable Curves to apply the colour curves
of the hue spectrum to the front clip.
NoteWhen the Curves button
is disabled, settings in the Colour menu are bypassed.
- Enable Hue to modify the Hue Shift curve.
- Click the colour pot next to the Hue
button.
The colour picker appears.
- Select or pick a colour.
- Click again inside the colour pot next
to the Hue button to set the Hue colour.
- Click Plot.
- Select a pixel within the spill.
A red vertical bar appears
in the hue spectrum identifying the colour to be shifted.
- Select Move from the Edit Mode box so
you can use the cursor to move the points along the Suppression
curve.
- On the Hue Shift curve, drag the point
closest to the plotted colour down to a value of 75, intersecting
the plotted colour.
The colour spill is shifted
toward the Hue colour.
- Continue modifying the shape of the curve
until you are satisfied with the result.